Tuesday, December 24, 2013

Christmas Mini-Cake Magic: Frosty the Snowman and a Christmas Tree


Gifted with Mini-Cake Pans

In July, Ashley, my daughter, gifted me with  a set of four mini-cake pans - a bear, a rabbit, a snowman, and a fir tree. She found the set at a yard sale for $1.00. What a great daughter! I already own two fir tree mini-cake pans, but not the other three. However, she was thinking about how much easier it would be for me to bake mini-Christmas tree cakes three at a time. She knows her mother loves to decorate cakes and how much time is involved in baking them.

Two Magical Mini-Cakes

Frosty the Snowman is wearing his magical top hat and the star-topped Christmas tree reminds me of carolers singing "O Christmas Tree, O Christmas Tree".  I can't wait to give these two cakes to my family on Christmas Day.

The mini-cake pans

Holiday Applesauce Cake 

I adapted an Applesauce Cake recipe from my vintage Betty Crocker cookbook. This recipe makes about 5 cups of batter, which fills each mini-cake pan with about 2 1/2 cups of batter. Due to personal preference, I did not put raisins or nuts in the cake.

Applesauce Cake Ingredients

2 1/2 cups all purpose flour
1 cup of sugar
1 1/2 teaspoons baking soda
1 teaspoon salt
1/4 teaspoon baking powder
3/4 teaspoon cinnamon
1/2 teaspoon ground cloves
1/2 teaspoon ground allspice
1 1/2 cups unsweetened applesauce - Measure with a dry measuring cup
1/2 cup water
1/2 cup canola oil
2 eggs
1 cup raisins, optional - stir in after all ingredients are well blended
1/2 cup chopped walnuts, optional

Directions

  • Heat oven to 350 degrees F.
  • Grease and flour cake pan(s)
  • Put all of the dry ingredients in a bowl. 
  • Stir until all ingredients are well blended.
  • Add the applesauce, water, canola oil, and eggs to the bowl.
  • Beat on low speed or by hand for about 2-3 minutes, or until ingredients are well blended.
  • Pour batter into the greased and floured pans. (About 2 1/2 cups each)
  • Bake for about 40 minutes. Insert a toothpick in the center of the cake. The cake is done if the toothpick is clean, or only a few crumbs cling to it. 
  • Cool in pans on a cooling rack for 10 minutes.
  • Remove cakes from the pans. Place face down. The rounded tops will cause the cakes to break open if you place them rounded side down. 
  • Place cakes on a cooling rack and cool completely.
  • Place cakes back into pans. Using the pan as a guide, cut the rounded tops flat.
  • Cakes are ready for a crumb coat of icing.


Frosty the Snowman Cake

If you like to play with play dough or roll pie crust, you can cover and decorate a fondant cake.

Seriously, with homemade butter cream fondant, covering a mini-cake is easy.

Follow the "butter cream fondant" link below for the recipe, but make sure you read my changes to the original recipe.

One batch of  butter cream fondant for the Frosty the Snowman cake.


My Changes to the Fondant Recipe


  1. The original recipe calls for 1 cup of shortening which makes the fondant greasy. Use 1/2 cup of shortening for a better product.
  2. Use brown vanilla extract. Your fondant will be ivory instead of pure white

The recipe makes 3 pounds of fondant so I leave the fondant white until I need to color it. I also divide it into 1 pound and 1/2 pound balls that I flatten into rounds. I wrap each round of fondant with two layers of plastic wrap and store them in a tightly sealed container in the refrigerator until I need them.

Coloring the Fondant

My preference for coloring is to use Wilton gel food coloring and knead the gel into the white fondant. This can get a little messy so you might want to wear food safe gloves. I don't, but I am careful to keep folding and kneading the gel to the center of my fondant ball until it is incorporated into the fondant.

How I Cut and Placed the Fondant 

  • You will need to have a crumb coat of frosting on your cake that isn't wet.
  • Roll out butter cream fondant to about 1/8 inch thick.
  • I used my clean cake pan as a pattern to help me cut the rolled fondant into pieces of the correct shape and length for the snowman body, face, hat, and scarf. 
  • Place the rolled fondant over the design on the cake pan. (Not the side you pour batter into) 
  • Trim the fondant a little larger than you need with a sharp knife.
  • Place trimmed fondant on snowman body and then face.
  • Gently smooth fondant with your hands and tuck ends beneath the cake.
  • Next, roll out green fondant to about 1/8 inch thick. 
  • Cut 1/2 inch strip for a scarf. I used a fondant roller to cut mine.
  • Place piece for scarf "ends" vertically.
  • Then lay scarf piece of fondant across it. Fold the top end down across the "scarf".
  • Follow the same procedure for the hat that you use for the body.
  • For the eyes and buttons, I used the open end of a cake tip and coupler ring.
  • A small, 3 inch holly leaf cookie cutter was used for the holly sprig. Cut two leaves. Use one full size, and cut bottom 1/3 off of the other leaf.
  • Holly berries are rolled fondant.
  • The mouth is a made from a rolled fondant "string" 


Christmas Tree Cake


  1. Begin with a completely cool, trimmed, and crumb coated cake. 
  2. Using a #195 drop flower/star tip, cover Christmas tree with stars of icing.
  3. Pecans make great "bark" for the tree trunks
  4. Coated candies are ornaments
  5. A baked and piped star ornament cookie tops the tree. 


Christmas Cut Out Cookies


Baking Day

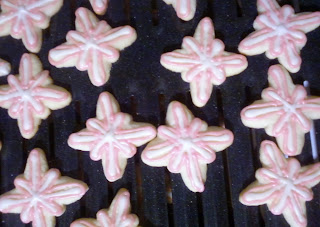
I decided to try some new cookie designs; snowflakes, reindeer, and an elongated star.
First, I made two types of roll-out cookie dough, my best ever sugar cookie dough and chocolate cookie dough. The chocolate dough is from Allrecipes.com. I wanted chocolate dough for the reindeer. Click on the link below.

Chocolate Dough Recipe

 After the dough was chilled, the rolling, cutting, baking, and cooling began.  Finally, it is time to decorate cookies. The reindeer cookies are first, because I downloaded a picture that I would be following. Also, I was fairly certain they would take the most time to decorate. Which was true. 
After the reindeer were done, I liked the look so well that I decided to just pipe designs on the sugar cookies. In the picture above, you can see the snowflake pattern that I piped straight onto an unfrosted sugar cookie.

Reindeer piped with a #3 piping tip and a red M&M for a nose.
For the eyes, I colored a small amount of thin icing black and
applied a drop to the center of the eyes with a toothpick.


Sallee's Sugar Cookie Recipe


Makes about 3 dozen 2.5” – 3” cookies  


Equipment

  • 2 medium or  large mixing bowls
  • measuring cup for dry ingredients
  • measuring spoons
  • electric mixer with dough hooks
  • flour sifter
  • wooden spoon
  •  rolling pin
  •  waxed paper
  •  spatula
  •  baking sheet(s)
  • cooling rack(s).


Ingredients


  • 1/2 cup salted butter, softened             
  • 1 cup sugar                              
  • 1 egg
  • 1 teaspoon vanilla extract                     
  •  3 cups flour, sifted              
  • 1 teaspoon baking powder                    
  • 1/2 teaspoon salt


Notes: 

1. Do not substitute margarine for all of the butter. It makes a big difference in how your cookies taste. Instead, use half margarine and half butter for a great tasting, but more economical cookie.

2. This recipe can be doubled successfully. However, the vanilla extract needs to be adjusted to 1 1/2 teaspoons, not 2 teaspoons.

Directions for Dough

  • In a large mixing bowl, cream butter and sugar on medium speed until fluffy. 
  • Beat in egg and vanilla until well blended. 
  • In a separate bowl, stir together sifted flour, baking powder, and salt. 
  • Add the dry ingredients to the butter/sugar mixture, in small amounts, and beat until dough is mixed well, but not forming a ball. 
  • Now you will use your hands and start kneading the dough in the bowl until it comes together and forms a smooth ball.
  • Be patient. 
  • Divide the dough into 2-3 portions and shape each portion into a flat circle. 
  • Cover and chill for 20-30 minutes before rolling out.


The Cookie Cutters - star, reindeer and snowflake
The reindeer cookie cutter is an upside down gingerbread man. 

Directions for Baking

  • Preheat oven to 350°F 
  • Roll one portion of dough out on waxed paper to about ¼ inch thickness. 
  • If dough tries to stick to your rolling pin or hands, put a very small amount of flour on the rolling pin. 
  • Cut your cookies and space evenly them evenly on an ungreased baking sheet. 
  • Bake for 8 – 10 minutes. 
  • Cool cookies on baking sheet for 1-2 minutes before removing to cooling rack. 
  • Cool cookies completely before frosting.

Notes:
First, do not use dark baking sheets; they will over brown the bottoms of your cookies.
Next, make sure your baking sheets are cool before you put another batch of cut cookies on them to bake. Hot cookie sheets will affect the baking time. 

Snowflakes in blue with a #3 piping tip

Decorating Frosting Recipe

I find myself searching for the perfect frosting on a regular basis. This year was no different, but I knew that I wanted frosting that would be glossy, not too sweet, and pipe easily. I combined two recipes that I like into the one below. It is egg white free and doesn't require any type of egg white powder. It tastes great, pipes well, and sets within twenty minutes. Cookies need to set overnight before packaging

Equipment

  • soup bowls for making each color of frosting
  • dry ingredient measuring cup
  • measuring spoons
  • Plastic decorator bags
  • 2 - 4 couplers and rings for the decorator bags
  • #3 decorator tip for piping icing

Ingredients

  • 1 - 1 1/2  cups powdered sugar            
  •  ½ teaspoon clear, or brown vanilla extract       
  • 1 teaspoon lemon juice                        
  • 1 -2 Tablespoons milk or water
  • gel or liquid food coloring
Notes:

1. Use a thinner frosting to frost cookies completely. Make frosting thinner by using 1 cup of powdered sugar with the liquid ingredients. The frosting will dry to a glossy shine and can be touched lightly after twenty minutes.
2. Add liquid coloring to the powdered sugar and vanilla before you add any milk. 
3. The amount of liquid you use will vary so don't add all of your liquid at once.
4. Humidity, gel coloring, and liquid coloring will all effect the frosting consistency. Don't panic, just add a little more powdered sugar to get the consistency you want.


Directions for Frosting

  • In a soup bowl, combine powdered sugar, food coloring, vanilla, and milk, a little at a time until it is a nice consistency for piping. 
  • Stir until all ingredients are mixed well and your color is consistent. ( I mixed mine with a whisk and it turned out nice, smooth, and the color was even.) 
  • Repeat the above procedure for each color of frosting that you want.
  • Cover your frosting with plastic wrap until you are ready to fill your decorator bag and pipe your designs.


Pink and white stars.
 I piped the white without using a piping tip,
just fill your decorator bag with frosting,
then snip the end open and pipe the frosting on.
The pink was applied with a #3 piping tip

Christmas tree cookies
Blue coated candy star.
 I piped the green frosting without using a piping tip,
just fill your decorator bag with frosting,
then snip the end open and pipe the frosting on.


Sunday, December 22, 2013

Christmas Baking: M & M Pretzel Kisses

A seriously addictive combination.

 Today, I am making M&M Pretzel Kisses following a recipe I found at All Kinds of Yumm. Festive treats that are quick and easy. Yep, that is what I am looking for this close to Christmas.

Recipe: All Kinds of Yumm: M&M Pretzel Kisses


Mini-pretzels waiting for a chocolate
topper.
Fresh from the oven and topped
with candy. 


Wednesday, December 18, 2013

My Newest Blog Find

Sleet, snow, freezing rain and the flu. What a combination!

Last week, during horrible weather, I had to drive to my youngest daughter's house. She was ill with the flu and needed Mom to help her with her eleven month old son. Guess what? No wi-fi, no internet, no satellite TV is to be found at her house. My mobile, nonsmart phone was the only way I could log online. Darn! However, I managed to find a great blog while scrolling through food pictures at Pinterest.

Cooking Classy - With a Sprinkle of Fancy is an incredible blog. Jaclyn is a twenty something mom who also loves red velvet sweets of all types. Her blog features great pictures of mouth-watering appetizers, main dishes, sides, and holiday treats. Check out this great blog and I hope you like it as much as I do.

Saturday, December 7, 2013

The Ultimate Breakfast Comfort Food - Cheesy Sausage and Potato Breakfast Pie

Topped with tangy Colby Jack cheese, layered with fried, slightly sweet potato slices, the porkalicious flavor of mild country-style sausage and held together with eggs. Breakfast doesn't get any better than this. As far as I am concerned, this dish is the ultimate breakfast comfort food. 


INGREDIENTS

  • 1 pound mild, bulk pork sausage
  • 1 cup shredded Colby Jack cheese
  • 1/4 cup chopped onion, optional
  • 5 eggs
  • 1/4 cup milk
  • 1/8 - 1/4 teaspoon garlic powder
  • 1/4 teaspoon fresh ground pepper
  • 2 Tbsp. butter
  • 1 Tbsp. canola oil
  • 2 medium potatoes, peeled and sliced crosswise into 1/8" rounds (I use a mandoline slicer)
I do not add salt to this dish. Sausage is salty and adds enough flavor for me. However, if you absolutely must add salt - use 1/4 to 1/2 tsp.

DIRECTIONS
  • Preheat oven to 375 degrees Fahrenheit. Place 2 Tbsp. of  butter in a 10 inch quiche pan or deep dish pie pan. Place pan in the preheated oven until the butter is melted. Remove pan from the oven and set aside.
  • Put 1 Tbsp of canola oil in a medium nonstick skillet over medium heat. Put sliced potatoes in skillet and cover tightly. Cook for about 7-10 minutes. Using a spatula, gently turn the potato slices. Then, replace the lid on the skillet and cook until the potatoes are tender. 
  • While the potatoes are cooking, place sausage in a large skillet. Cook over medium heat until evenly brown. Crumble and drain in a colander.
  •  Spread browned sausage into the bottom of your quiche or deep dish pie pan.
  •  Layer cooked potato slices on top of the crumbled sausage.  
  • In a medium bowl, beat eggs with milk, garlic powder,and  pepper. Pour over layered sausage and potatoes.
  • Bake in preheated oven for 12 - 15 minutes, or until a knife inserted into the center comes out clean.
  • Sprinkle with 1 cup of Colby Jack cheese. 
  • Cool for 10 minutes, then cut into slices.
Yield: 4-6 servings, depending upon how big your appetite is.

Tuesday, December 3, 2013

Cookie Cutters Aren't Just for Cookies

Home cooking can be presented artistically using cookie cutters. Pie crust leaves make this pie almost too pretty to eat. Just roll out your top crust, pick your favorite cookie cutter, and scatter your "pie crust cookies" across the top of your fruit pie. How simple is that?


The biscuit in the picture looks like a flower and I used homemade bacon crumbles to top the gravy.  Pretty can be simple. Listed below are some other ways to use cookie cutters to add that wow factor to your home cooking.

Scalloped Biscuit

      1. Biscuit Cutters

Using a large, metal cookie cutter to cut biscuits increases the eye appeal factor and it doesn't take any longer to make the biscuits.

Festive Floral Pancakes


      2. Pancake Molds

Spray a large, metal cookie cutter with pan coat, place it on a griddle, pour pancake batter into it. Let the batter get bubbly, flip the cookie cutter over using tongs. You may have to gently push the pancake until it contacts the griddle again. Use 3 or 4 different cookie cutters to create variety.

     3. Melon Shapes

If your getting tired of melon balls, this idea is for you. Slice your melon crosswise, then take cookie cutters and cut shapes out of the melon slices. I like to use floral shapes for this.

     4. Quick Cookies

Purchase two or three dollar packages of soft cookies at the dollar store. When you get home, take a cookie cutter that's almost the size of the cookies and cut each one into the desired shape. Place vanilla icing in a zip top sandwich bag, snip the corner, zig zag icing across the cookies diagonally. End result? Beautiful decorator cookies that look like you worked for hours making them.

    5Upscale Bar Cookies

Bake your favorite bar cookie recipe, let them cool, then cut out shapes with the cookie cutter of your choice. Metal cookie cutters work best.

    6.  Rice Cereal Treats

Make a batch of  crispy, rice cereal treats. Keep the mixture warm. Spray a large, metal cookie cutter lightly with pan coat, and pack it full of the cereal mixture. OR you can pack the mixture into a pan, let cool, then cut shapes out of it. I have done this both ways. If you pack the cookie cutter, it will take a little longer, but you don't have to deal with crumbs.

I hope you enjoy using these ideas at your house; being creative can be quick. Happy cooking!


Wednesday, November 27, 2013

Sweet Turkey Cake - My First Effort

What do you think? With the help of a vintage 1979 Wilton cake pan and a Wilton #21 star tip, I created this sweet turkey cake.

To line, fill, and define the different areas of the turkey, I decided to use white, orange, and red frosting The star tip, held at different angles, created the various shapes and textures.The pupil of the eye is half of a raisin.

The Pumpkin Cake

Ingredients

1/2 cup canola oil                   1 1/2 cup sugar
1 egg                                      1-15 oz. can pumpkin
2 tsp. baking soda                 1 tsp. cinnamon   
1/4 tsp. cloves                       1/8 tsp. allspice
                                                                2 cups of flour                       1/4 tsp. salt

Directions

  • Coat turkey cake pan with a thin layer of shortening (not cooking spray).
  • Flour the pan.
  • Pour excess flour out and set cake pan aside.
  • Cream oil and sugar
  • add egg and beat well
  • add the pumpkin and mix just until blended
  • Add baking soda, cinnamon, cloves, allspice, flour, and salt. Mix until blended.
  • Pour batter into floured cake pan.
  • Spread batter with a spoon until it is level.
  • Bake at 350 degrees for 25-30 minutes.
  • Remove from oven and let cool in the pan for 10 minutes
  • Place a cooling rack or foil covered square of card board over the cake pan
  • Flip the rack and pan upside down. Cake should release from pan and drop onto the cooling rack or foil covered card board.
  • Let cake cool completely before frosting. 

This cake does not need extra liquid. I thought the liquid ingredient had been left out of the recipe, but I followed it as written. The cake was fine. Everyone loved it.

The Cream Cheese Frosting

Ingredients

4 Tbsp. butter             1 - 8 oz. package of cream cheese, at room temperature
2 tsp. milk                   3 1/2 cups powdered sugar
1/2 tsp. vanilla

Directions

Blend the butter and cream cheese with a hand-held mixer or stand mixer, at low speed, until well blended. Add all of the remaining ingredients and beat at low speed until thick and glossy. Separate into separate bowls and tint as desired.

I did not "dirty ice" or put a base layer of frosting on the cake before I started piping on frosting stars, etc. I felt the turkey looked more realistic with a little "skin" peeking out here and there. 


Saturday, November 23, 2013

Ramen Pork Chop Suey


Tan isn't Bland

Yes, it needs some color. However, I wish you could smell the wonderful aroma rising up out of the pan. Onion soup mix, soy sauce, garlic powder and celery seed meld to create a flavor masterpiece that will make your taste buds sing. Water chestnuts add a crisp, crunchy texture note that contrasts nicely with the chewiness of the pork and ramen noodles. 

My husband doesn't like veggies, especially green veggies.

Adding a half cup of frozen peas or using the top half of your celery stalk will add a nice pop of color to this casserole. My celery stalk was down to the pale green bottom half, so it didn't add any color, which was fine with Bill, my husband.

Ingredients
1-2 Tbsp. canola oil                
 1 lb. lean pork loin                 
 1/8 to 1/4 tsp garlic powder
1/8 tsp. fresh ground rainbow peppercorn                               
1/4 tsp. celery seed
1 cup of celery, thinly sliced      
1/2 cup sliced onion               
1 envelope onion soup mix     
1 1/4 cup water                        
1/4 cup soy sauce                  
2 - 4 oz. cans Bamboo shoots and water chestnuts 
2 - 3 oz. packs of ramen noodles (You are not using the flavor packets, only the noodles)

Directions - Meat and Veggies
  • Season the pork loin with the garlic powder and ground peppercorns. 
  • Place 1 Tbsp. oil  in a large skillet over medium heat;  brown pork well. 
  • Remove pork from the pan and set aside
  • Place the remaining tablespoon of oil to the skillet, saute the celery and onion until tender crisp; Add the celery seed about 1 minute before the celery and onion are done.
  • Add the soup mix, water, and soy sauce to the vegetables in the skillet.
  • Simmer for 5 minutes, stirring constantly, Add pork and remaining ingredients; simmer until heated, stirring constantly. 
  • Turn off heat and place pan on a cold burner. 
  • Prepare the ramen noodles according to the package directions.  
Do not use the flavor packets. Save them for flavoring rice at some other time.
  • Serve noodles mixed with your chop suey or serve the chop suey over the ramen noodles.
Yield: 4-5 servings


Saturday, November 16, 2013

Amped Up California Rancho Casserole

Tired of Beef Nachos

Nachos have been on the Bonham menu alot. We are tired of them. So, I pulled out my 1969 Beta Sigma Phi Casserole cookbook to look for a recipe in the "Ground Beef - Rice Casseroles" section. (I collect cookbooks.) The "Ground Beef-Rice Casseroles" section has almost twenty recipes, but the one that caught my eye was the California Rancho Casserole recipe.

 Amp it Up!

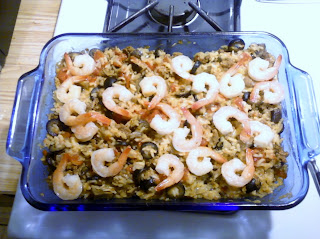
I scanned the ingredients list: ground beef, onions, garlic, uncooked rice, ripe olives, mushrooms, tomatoes, grated cheese. Happily, the recipe contains most of the ingredients I keep on hand for nachos. However, I decided to amp up the recipe with mild green chili sauce, baby Portobello mushrooms (criminis), Colby Jack cheese, fresh ground rainbow peppercorns, and shrimp.

Taste Response

Slowly savoring the meaty,olive - tomato - cheesy richness and mushroomyness with just a hint of heat from the mild green chili sauce was an intensely sensuous moment. Then, I ate one of the perfectly cooked, juicy and tender shrimp. I seriously wanted to just grasp that precious pan in my hands, shield it from anyone else's eyes, and find a secret place to adoringly eat the whole thing. I was amazed at the rich, unctuous flavor meld that had transformed the simple casserole ingredients while they baked in the oven. Bill's response? "Oh baby, please make this again." It doesn't get any better than that, does it?

Amped Up California Rancho Casserole

Equipment

Large skillet or Dutch oven                   2-quart casserole dish                     spatula
fork                                                        dry measuring cup set                     liquid 1-cup measuring cup
measuring spoon set                               sharp knife

Ingredients

  • 2 Tbsp. canola oil
  • 1 lb. ground beef
  • 1/2 cup chopped onion
  • 1/4 tsp. powdered garlic, or 1 clove of garlic, chopped
  • 1 cup of water
  • 1 c. uncooked rice (when measuring the rice, completely level the rice in the cup)
  • 1 c. sliced ripe olives
  • 4 oz. baby Portobello mushrooms, diced (about half of an 8 ounce container)
  • 1/2 cup mild green chile sauce (I used Old El Paso brand)
  • 1 15 oz. can diced tomatoes, undrained
  • 1/8 tsp. freshly ground, rainbow peppercorns
  • 1/2 tsp. salt
  • 1 cup shredded Colby Jack cheese
  • 20 frozen, cooked and  cleaned, medium shrimp

Directions

  • Heat oil in large skillet or Dutch oven; saute beef, chopped onion, and chopped garlic or sprinkle    garlic powder over the beef and mix it in with a spatula.
  • Saute until beef is no longer red, stirring with a fork or spatula.
  • Place beef mixture in a colander and drain the oil and fat off of it.
  • Return the beef mixture to the skillet or Dutch oven.
  • Mix in water, rice, olives, mushrooms, green chili sauce, undrained can of diced tomatoes, salt, and pepper.
  • Bring mixture to a boil, stirring occasionally.
  • Pour into a 2-quart casserole; cover tightly with aluminum foil
  • Bake at 375 degrees for 30 minutes.
  • Remove from oven and carefully remove foil.
  • Sprinkle cup of shredded Colby Jack cheese onto casserole and gently stir it into the casserole.
  • Place the 20 frozen shrimp on top of the casserole. Replace the foil. Bake for 15 minutes longer.
  • Remove from the oven and allow to cool for about 10 minutes before removing the aluminum foil.
Yield: 6 generous servings

Thursday, November 14, 2013

This is how I'm doing a turkey this year - Imgur

For the bacon lover in your family: Dress-up your turkey with a woven, bacon strip robe.


This is how I'm doing a turkey this year - Imgur

We Wish You A Merry, Merry Turkey Day! Published on Yahoo Voices

Christmas in July is now an annual reality, instead of an occasional party event.

 Enjoy a chuckle or two as you read, "We Wish You A Merry, Merry Turkey Day!"I took the classic "Christmas Carol" ghosts and wrote about the Ghost of Thanksgiving, Thanksgiving Past, and Thanksgiving Present.

http://voices.yahoo.com/we-wish-merry-merry-turkey-day-12400465.html


Note: Your page view will be counted by Yahoo Contributor Network toward a future payment for myself, Sallee Bonham

Sunday, November 10, 2013

Weird and Edible Food Event.

On November 8-9, weird, edible food art and experimental foods went on display in London, UK. The Yahoo news article that I read said:

"a breathable tearoom, a wild flower meadow made entirely from sugar, a camera made from edible materials that when cooked form a meal and bitters infused with moisture scientifically extracted from the walls of the Churchill War Rooms are just some of the remarkable items being served up across over 3800 square feet at this years Experimental Food Society Spectacular exhibition."

The twelve pictures that accompany the article are worth looking at. Click on the "article" link to view them.

This is the fourth year that this remarkable event has been held in London. The Experimental Food Society began hosting the event in 2009.  http://www.experimentalfoodsociety.com/society.html


Sunday, November 3, 2013

MYO Cranberry Sauce, Sweet Potatoes, and Green Bean Casserole - My Family's Thanksgiving Favorites


The holidays are about to commence and I am so excited! Yesterday, my shopping list contained the following items to buy:
  • 12-15 pound turkey
  • cranberries
  • orange juice
  • sweet potatoes
  • crushed pineapple
  • green beans, canned
  • french fried onions
  • mushroom soup
  • soy sauce

Ruby red, whole berry cranberry sauce with orange juice is a family favorite. I found the recipe on a bag of cranberries in 1989 and have been making this amazingly simple dish ever since.

Another side dish is candied sweet potatoes with pineapple. I simmer the sweet potatoes until they are just fork tender. The hot sweet potatoes are placed into a colander to cool until I can peel and then slice them. Seriously, you need to try adding crushed pineapple to your favorite recipe. My daughter, Ashley always wants to make this dish.

Our traditional family feast will also include green bean casserole with french fried onions. The recipe is on the french-fried onion can or in any women's magazine. The addition of soy sauce is a fairly new ingredient to the recipe, but it did add another layer of flavor to this wonderful casserole dish.

These traditional favorites are being made by four generations of women in my family. My granddaughters are learning to make them now. When the lone grandson is older, he will begin to learn to make these dishes too.

Tuesday, October 29, 2013

A Halloween Fairy Godmother Costume

Cinderella's fairy godmother changed her life by turning a pumpkin into a coach, mice into horses, and a nice fat rat into a coachman. Then, she changed Cinderella's ragged dress into a ball gown. All by waving a magic wand. I always wanted a fairy godmother like Cinderella's, but settled for my own wonderful grandmothers. However, for Halloween,  I am going to be a fairy godmother.

The Dress 

I went through my closet looking for a suitable dress and found my three year old wedding dress tucked into the back of the closet. It isn't a ballgown, but the tea length hem is perfect for a working, fairy godmother. A white camisole with lace complements the dress perfectly.

Dollar Store Items - $12.00

A quick shopping trip to the local dollar store yielded all the items that I needed to create my accessories.
  • a can of silver spray paint    $3.95
  • a glow light wand                 $2.00
  • a bottle of glitter nail polish with a wide applicator brush $1.00
  • a pack of hair ties with organza ribbon streamers      $1.00
  • two packs of self-adhesive crystals          $2.00
  • a headband with two rows of pearls         $2.00
  • Total - $12.00

Silver Shoes

My shoes are an older pair of mary jane flats that I only wear at home. After a good cleaning, I filled the shoes with crumpled newspaper. Taking the shoes outside, a quick coat of silver spray paint turned them from ordinary to extraordinary. Like magic! After drying for several hours, I applied pale green crystals to the toes of each shoe. My fairy godmother shoes were done!

A Sparkling Wand

While the shoes were drying, I opened the glow stick wand package and discovered that the star was green, not clear. However, two coats of glitter nail polish caused the star to sparkle. The hair ties with bejeweled organza streamers yielded three, white organza streamers that I tied onto the top of the glow stick, below the star. The end result can be seen in the picture below.

Pearls and Crystals

I tried on my dress to make sure it still fit. It did. Then I rummaged through my jewelry drawer. Yes, my jewelry drawer. A multi-strand pearl necklace (bought from Ebay last year), my Grandma Pansy's aurora borealis crystal brooch, and a long strand of pearls (bought on sale) completed my outfit. I wrapped the long strand of pearls into a pearl bracelet.

The  Hair Plan

I am planning on curling my hair with small and medium size curling irons, then spraying it with lots of hairspray. In the picture below, it is its normal, straight, self. 
Fairy godmother Halloween costume


 The perfect accessories for a fairy godmother - silver shoes and a wand that will glow.

Friday, October 25, 2013

A Quick Dinner Menu: Seasoned Oven Fries, Craisin Coleslaw, and Salisbury Steak

If you arrive home from work tired and frazzled, read on.

Do you open up the freezer and ask yourself, "What am I going to cook for supper? Do I cook a frozen dinner or do I order take out?"

It's decision time and I want to help you make that choice.

I'm going to share one of the meals that I rely on when the hubby is hungry and I'm dragging from a long day of commuting and work.

Seasoned oven fries cooked in your toaster over, a mixed green salad or craisin coleslaw, and a microwaved main dish.

AND it will be ready in about an hour.


The Menu

  • Seasoned Oven Fries ala Toaster Oven
  • Craisin Coleslaw or mixed salad greens
  • Salisbury Steak with Gravy, family size package (28 ounces)

To feed a hungry husband, you need to cook the whole package of Salisbury Steak. Two patties weigh 4 ozs. and make a skinny gal portion. Three patties weigh 6 ozs. and make a he-man portion. Plus, the 28 ounce package includes two cups of gravy which can be poured over the oven fries or used for another meal.

 The Meal

  1. Put mixed salad greens or coleslaw mix in a bowl and add desired toppings. I love Craisin Coleslaw. It is quick and easy to assemble. Coleslaw is best if it can sit in the frig for 30 minutes (or more) before serving it.
  2. Prepare the potatoes for Seasoned Fries Ala Toaster Oven and begin baking.
  3. Follow the package directions for microwaving ( about 20 minutes total time) or baking the Salisbury Steak with Gravy (about 50 minutes). I microwave mine.


The Seasoned Fries Ala Toaster Oven


Ingredients

2 medium sized potatoes, peeled
canola oil
garlic powder
black pepper I like to use fresh ground black pepper.
paprika

Directions

  • Slice each potato in half
  • Slice each half once, then stack and cut into 1/2 inch cubes
  • Put in a one quart bowl
  • Add 1 TBSP canola oil, sprinkle with about 1/8 tsp. each garlic powder, fresh ground black pepper, and paprika. Add more if you wish.
  • Stir potatoes cubes until they are well coated with the oil and seasoning
  • Remove toaster oven tray from your toaster oven. Put 1 tsp. of canola oil on the tray and spread it out to coat the tray. 
  • Place potatoes in a single layer on your toaster oven tray
  • Bake at 375 degrees for 20 minutes.
  • Carefully remove hot tray, turn cubes over with a spatula, and replace hot tray back into toaster oven.
  • Bake for about 20 minutes more (until potatoes are golden and tender.) 


Wednesday, October 16, 2013

Gotta Have That Sausage Gravy, Baby

Bob Evans on Urbanspoon
Love That Bob Evans Gravy

Bill loves Bob Evans sausage gravy and biscuits. Since we live seventy miles from the nearest Bob Evans restaurant, my husband can spot a Bob Evans sign from a mile away. I kid you not. We drove to St. Louis on business. When we drove through Valley Park, my husband spied the Bob Evans sign, but didn't say anything. Once we were done with our business and traveling home on I-44, he said,"Think you can find that Bob Evans restaurant we passed ?" What could I do? I said yes. I love breakfast as much as Bill loves Bob Evans sausage gravy and biscuits. I am more than happy to eat at an establishment that serves breakfast from open to close.

Country Biscuit Breakfast

At the restaurant, we looked at the menus. Even though we knew what we wanted, we still followed the ritual of looking at the laminated menus. Bill ordered his classic item - two biscuits with sausage gravy. I ordered the Country Biscuit Breakfast, minus the egg, and with home fries. In my mind, there is nothing better than a biscuit and home fries, accompanied by creamy country gravy, and lightly sprinkled with shredded, cheddar cheese. (My mouth is watering just thinking about it.)

The Food and Service

The food arrived in good time, but I knew I was in trouble when my server offered to replace the home fries before placing my plate on the table. Sure enough, the home fries were fried to a nice, dark brown color. Translation: burnt to a crisp. Never should have left the kitchen. After asking for a replacement, I watched Bill eat and I nibbled at my breakfast feast, but I don't like to eat it without the home fries. No home fries appeared. Bill wasn't talking cause he was busy savoring his perfectly cooked sausage gravy and smothered biscuits. Finally, Bill stopped the server, who showed surprise at forgetting about the side order. However, the saucer of home fries were brought to me hot and golden. Perfect. The rest of my meal was yummalicious. The flaky, tender biscuit was perfect with the creamy, perfectly seasoned, country gravy, melted cheddar and nicely fried cubes of home fries.


The Drinks

Bill ordered a strawberry banana smoothie, but left most of it. He said it was due to the bland flavor or lack of flavor. He won't order it again. I believed him and didn't taste it. My drink was water, so that was just fine.

Three Quarters Happy

Overall, we were happy with our meal. The cashier did take a dollar off the total cost of our meal after Bill explained what had happened with the home fries. We didn't want a free meal or a discount. We just want the cook or cooks to know NOT to send out overcooked, inedible food to customers. Take pride in the food you prepare. Servers want to make customers happy, but don't want problems with coworkers. I understand that. However, you never know who you are serving food to. Our server had no idea I write a blog with an occasional restaurant review.

Saturday, October 12, 2013

Ghoulishly Easy Carved Spider and Skull Pumpkins


This blog post has been published online by Yahoo Voices. Click on the link to read how to carve a spider and skull pumpkin using a free template.


Hammin' It Up For Dinner

Skyrocketing beef prices ($2.89 to $6.99 a pound) are limiting the types of meat  I buy for my carnivorous family. This month, glorious, porky ham is $1.49 a pound. I bought a nine pounder and brought it home. Tonight, ham is the star of our dinner.

My dinner production is going to begin with baking a fully-cooked, spiral-sliced ham. In the supporting roles will be mashed potatoes, home made gravy, and glazed baby carrots. Sound yummy doesn't it?

Baking a Fully-Cooked Ham

Heating a precooked ham is easy. Bake it at 250 degrees Fahrenheit for 12-15 minutes per pound.
  • An eight pound ham will take approximately 1.5 hours to bake.
  • A ten pound ham will take approximately 120 minutes or 2 hours.
Cover the ham with aluminum foil. Remove the foil for the last 30 minutes of baking. Apply your glaze.


Glazing a Fully-Cooked Ham

What is a glaze? A glaze is simply a coating that is applied to the ham to make it look more appealing. My favorite glaze is brown sugar and orange juice. The sweetness balances very nicely with the saltiness of the ham.

1 cup brown sugar
4 Tablespoons orange juice

  • Blend the two ingredients in a glass bowl.
  • Microwave for 1 minute. Stir the glaze. If the sugar is melted and syrupy, you are ready to apply it to the ham. If it is not melted and syrupy, microwave for an additional 30 seconds.
  •  Sugar heats to a high temperature very quickly. Be careful not to get it too hot.
  • Brush or spoon the glaze onto the ham for the last 20-30 minutes of baking.
  • Reapply the glaze again about 10-15 minutes before the ham is done baking.  
Yield: This is enough for an 8-10 pound ham.
Double the recipe for larger hams.

Variation: Pineapple juice can be used in place of the orange juice.

What About the Leftover Ham?

  • Dice leftover ham. Package in 1/4 cup portions for use in omelets. Package 1/2 - 1 cup portions for use in mac and cheese, scalloped potatoes, rice, or hash.
  • Slice thinly and pack in 1 pound packages. Use for sandwiches and or freeze for future meals.
  • Finely chop ham and make ham salad.


Thursday, October 3, 2013

Making Washer Necklaces


A Donation Deadline

 I have several pins on my Pinterest board, "Handmade Accessories", that feature washer necklaces with a bead or button strung on the ribbon above the washer. I have been wanting to make these for months. This summer, I even bought two dozen washers, three spools of narrow black ribbon, and disassembled several necklaces for this purpose. However, I just couldn't seem to find time to assembly the necklaces until I promised to make some for my local Christian Motorcyclists Association chapter. The local Fall Festival celebration is in September and the CMA chapter wanted to sell crafts as a fundraiser. Nothing like a deadline to help me get a project done.


Gift Bag Paper

My paper was from a dollar store gift bag that had a coordinating floral and stripe background. I liked the fact that the paper is sturdy and the design is coated so it will not bleed or fade when a topcoat is applied to it.
The last four of my dozen necklaces.

The Source of My Inspiration

The blogger that I found inspiration from is Deneen at  A Path of Paper. AND she found inspiration and a tutorial from Haley Dyer, The Inky Scrapper. Click on Haley's name and watch her tutorial for washer necklaces. Then, go create!

Thursday, September 26, 2013

Macaroni and Colby Jack Cheese Recipe


My daughter Ashley is allergic to FD&C yellow 5 and 6 dye. Yellow dye is a pervasive ingredient in packaged food. Ashley can not eat any of the macaroni and cheese brands sold at the store. And, that pesky dye is in all the processed cheeses.
Natural cheese tends to be colored orange with natural colorants like annatto or beta carotene. However, I still check the ingredients list carefully. Once in awhile, even a natural cheese will have that darn dye in it.

You know where I'm going with this don't you? Yep, I make pantry style mac and cheese. Milk, butter, flour, and Colby Jack cheese. The tangy, richness of this mac and cheese will cause an intense food moment. Your eyes will close as you savor every flavor note from your taste buds. Bill has only eaten boxed mac and cheese. After eating my version, he told me I had ruined boxed mac and cheese forever. He is looking forward to eating this meatless main dish at least once a month.
Macaroni and Colby Jack Cheese  
Ingredients
  • 1 1/2 cups uncooked elbow macaroni                                
  • 1/4 cup salted butter
  • 1/4 teaspoon salt                                                                        
  • 1/4 teaspoon pepper
  • 1/4 cup all-purpose flour                                                           
  • 1 3/4 cup warm milk
  • 8 ounces Colby Jack cheese, shredded                                     
  • Optional: 1/4 cup chopped onion

Directions
  • Cook macaroni as directed on the package.
  • Drain macaroni and place into a lightly buttered 1.5 quart casserole.
  • Melt butter in a skillet over low heat. If using chopped onion, add it to the skillet and cook over medium heat until onion is slightly tender.
  • Add salt, pepper, and flour. Blend in with a whisk.
  • Cook over low heat, stirring constantly with a whisk until mixture is smooth and bubbly; remove from heat.
  • Stir in warm milk.
  • Heat to boiling, stirring constantly with a whisk. Boil and stir one minute; remove from heat.
  • Stir in shredded cheese until melted.
  • Stir cheese sauce into the cooked macaroni.
  • Cook uncovered in 375 degree oven for metal pans or 350 degree oven for glass pan for 30 minutes.
  • Remove from oven and let cool until the bubbling stops.
Yield: about 5 servings

Friday, September 20, 2013

Marvelous Mini Corn Dogs - A Classic Recipe


Golden, crispy mini-corndogs fried in canola oil. Mmmmmm... Sometimes dinner just has to be something fried. Bill and I occasionally develop a yearning for corn dogs. My vintage, 1978 Betty Crocker cookbook contains the recipe that I use for this family favorite.

Mini Corn Dogs


Ingredients


1 pound of hotdogs, about ten                                                 Canola oil

1 cup all-purpose flour                                                               2 tablespoons cornmeal

1 1/2 teaspoons baking powder                                               1/2 teaspoon salt

3 tablespoons shortening                                                          3/4 cup of milk

1 egg, beaten                                                                               1/4 teaspoon onion powder, optional


Directions

  • Cut hotdogs into thirds. Pat dry with paper towels.

  • Heat oil, two to three inches, to 365 degrees. I used about two inches in a skillet.

  • Mix flour, cornmeal, baking powder, and salt.

  • Cut in shortening. I use my hand.

  • Stir in remaining ingredients.

  • Dip hot dog chunks into batter, allowing excess batter to drip into bowl.


I like to skewer the piece with a toothpick, dip the piece into the batter, then use a second toothpick to slide the coated chunk off the skewer and into the oil.

Fry, turning once, until brown, about six minutes; drain on paper towels.
Yield:  3-4 servings.

Note:  This recipe was intended for a sixteen ounce package of hot dogs. Today, most packages are twelve ounces. You will have left over batter unless you use ten hotdogs. The twelve ounces packages usually have eight hotdogs in them.