Saturday, February 27, 2016

Lollipop Crispy Treat Pops

Lollipop meets rice crispy treat and the two merge to form a Lollipop Crispy Treat. The outside is rice crispy treat and hidden inside is a lollipop. This is how to make them:
  • Make a batch of rice krispy treats. 
  • Pour the warm krispy treats into a greased 10 inch by 15 inch  by 1 inch sheet pan or sided cookie sheet. 
  • Press into an even layer. 
  • Cut into two inch circles.
Unwrapped Dum-Dum lollipops
  • Shape and form the cereal treat circle around a lollipop. 
  • Use pieces of cereal treat as necessary to achieve a smooth, solid layer. 
  • Continue until all of the krispy treats are gone.
  • This will make about twenty to twenty-two  lollipop crispy treats. 
  • If desired, dip the crispy treat cake pops into a glaze, melted candy melts, or melted almond bark and apply sprinkles. 
  • Set on waxed paper until dry.
A finished lollipop crispy treat finished at midnight for an afternoon baby shower.

Friday, February 26, 2016

It's a Boy! Baby Bottom Cake

Here it is! The baby bottom cake topper and half sheet cake that I made for my daughter's baby shower.
Cake topper ingredients: rolled butter cream fondant, cereal treats, and royal icing
Mini-fondant cutters were used for the baby's name
Cake frosting and piping: butter cream frosting and a 1M tip
To form the baby bottom, legs, and feet, I used warm, marshmallow cereal mixture.  

Baby bottom - A small, two cup bowl is a great mold for shaping the baby bottom. 

Baby Legs and Feet - A 3 1/2 inch cookie cutter helped me to shape the legs and feet.
  •  First, I made two circles by packing warm, marshmallow cereal treat mixture into the cookie cutter; one 3/4" thick and one 1/2" inch thick.
  •  Next, I cut the 3/4" circle in half and formed two curved "legs." 
  • I also cut the 1/2" circle in half and formed the feet from these two pieces.  
Rolled Butter Cream Fondant Recipe               Click Here
Silky Smooth Butter Cream Frosting Recipe      Click Here  


Tuesday, February 23, 2016

It's a Boy! Baby Shower - Lime Green and Blue

About the last week of January, I received a phone call from my pregnant daughter. The conversation went like this:

A: Hi, mom. Are you feeling?
S: I am feeling better. My ribs and head feel a LOT better now. (I was in a black ice accident and totalled my car about a week before the phone call.)
A: Mom, are you going to have a baby shower for Cooper?
S: I was thinking about it.We only have five weekends until you are due. (This is where I pulled up the calendar on the computer.)

After checking the church calendar, our calendars, and her sister's calendar 
We set a date three weeks away. Yep, I know I am crazy for attempting a baby shower in three weeks, but that is the challenge I took on. 

My first step was to create a private event page on Facebook 
Ashley invited family and friends. I invited the church family members.Immediately after having the shower put on the church calendar, the event was in the church bulletin for the next three weeks. 

How did I plan the decor? By Searching Pinterest, Baby! 
Most of my ideas came from pictures featured on Pinterest boards. 

The trick to not getting overwhelmed? Search by color. I searched for lime green and blue baby showers. 

A variety of themes appeared during my color search - nautical, jungle, monkeys, rubber duck, and little man. However, I kept my colors firmly in mind. 

When I couldn't find the printed plates I designed the colors from, I didn't melt down. Instead, I chose solid colors in lime green and blue.
The night before the shower.
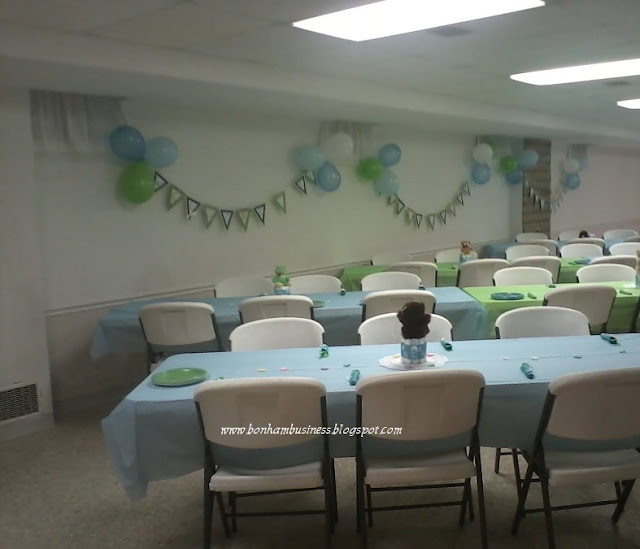
Alternating lime green and blue napkins and cutlery were rolled and then tied with white curling ribbon for the place settings. 
Table cloths, plates, napkins, cutlery, prizes, name tags, banners, and lime green balloons were purchased at dollar stores. A 72-balloon package with predominantly white, light blue, and a darker blue balloons was purchased from the local supercenter.
The finished decor for the It's a Boy! baby shower.
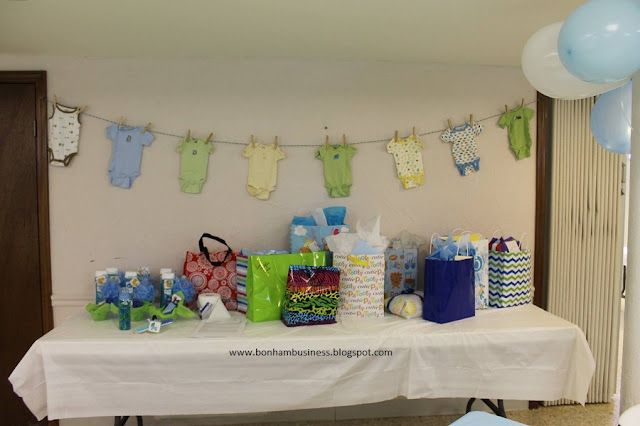
Onesies with baby animals coordinate with the centerpiece toys. A blue and white clothesline completed the onesie banner. 

  • Cupcake and sugar cookie party favors were placed on the tables for the guests.
  • The cupcakes are baked in aluminum liners and topped with blue and green swirled buttercream frosting. 
  • The letter "c" initial sugar cookies are topped with royal icing.
  • Party cups, treat bags, and light blue, iridescent curling ribbon were used to package the favors. 
 
Cupcake and sugar cookie favors flank a  mini-diaper cake and frog centerpiece. See the red lip print on the frog's cheek? 
  • Guess How Many? baby bottle game - You will need two, 11 oz. packages of candy to fill a 9 ounce baby bottle with only blue and green pieces. The bottle is the prize.
  • Shower prizes - Blue body wash with adorable bath puffs. 
  • The labels are squares cut from a jumbo gift bag. I printed "From Ashley's shower to yours!" on each label. Then I tied everything together with light blue, iridescent curling ribbon. 
I hope this post helps you plan a baby shower. For a baby girl, use the same ideas just use pink and lime green. 


Sunday, February 21, 2016

Our Lives Are Like a Cake

I smiled as I read these lines from Rebekah Beene's 2/21/2016 devotional:
"Our lives are like a cake. It’s messy and untidy much of the time. But God is working in our lives to make us more beautiful than we could be on our own. In Christ we are perfected. The hurts, the troubles, the sorrows, the pains, the unbelievable moments added to the intercession of years all work together to make something beautiful out of our lives. Presented to God, in Christ, we are absolutely perfect."
This is really appropriate because I just finished making a cake for my daughter's baby shower! Pics will be posted soon.  

Tuesday, February 2, 2016

Strawberry Chocolate Squares

Corrections: www.bonhambusiness.blogspot.com
"Honey, I wish we had some cookies or something."
My answer to the hubby?
"I can make some treats."
lol...lol little did he know that I had yummy, strawberry chocolate treats in mind!

This simple easy treat can be made in less than thirty minutes. The next time you want something sweet, reach for a bag of marshmallows, sugar free strawberry jello, and some chocolate almond bark.

Strawberry Chocolate Squares
Ingredients
  • 1 - 10 oz. bag of marshmallows
  • 1 - 0.30 oz. pkg. of sugar-free strawberry jello
  • 4 Tbsp. butter, or margarine
  • 3-4 squares of chocolate almond almond bark, or about 1/4 of a 20 ounce package
  • 6 cups of puffed rice cereal
Directions
  • Lightly grease a rectangular, 2 quart casserole pan with vegetable shortening and set aside.
  • Place 4 Tbsp. of butter in a microwaveable 3 quart bowl.
  • Microwave in 30 second intervals until the butter is melted
  • Empty the sugar-free jello and marshmallows into the 3 quart bowl
  • Stir until the marshmallows are evenly coated with the butter and jello.
  • Microwave the marshmallows for 1 minute.
  • Remove from the microwave and stir for a minute
  • Microwave for an additional 30 seconds
  • Remove from the microwave and stir until the marshmallows are completely melted and blended with the jello.
  • If necessary, microwave for an additional 15 seconds.
  • Stir in the 6 cups of puffed rice cereal until the marshmallows are blended evenly with the cereal.
  • Spoon the cereal mixture into the lightly greased 2 quart casserole pan.
  • lightly coat your hands with vegetable shortening and press the cereal mixture into an even layer with no air pockets. 
  • Set the pan of cereal treat mix aside.
  • Put 3-4 squares of chocolate almond bark( about 1/4 of a 20 ounce package) into a microwaveable small bowl.
  • Microwave for 1 minute and stir 
  • Microwave for an additional 15 seconds and stir the chocolate bark until it is completely melted. If necessary microwave for an additional 15 seconds.
  • Pour the melted chocolate bark on top of the cereal treats and spread evenly with a spoon.
  • Place the pan of treats in the freezer compartment of your refrigerator for 5 minutes, or until the chocolate bark is firm.
  • Slice the treats into 12 large squares, or 16 smaller squares, with a sharp knife
Your treats will still be slightly warm and soft, but this is how Bill and I LOVE to eat them. 
Enjoy your slice of homemade happiness on a plate!