
Saturday, December 24, 2016
Cocoa Drop Cookies
 |
| Holiday cocoa drop cookies dipped into vanilla almond bark and sprinkled with .....Christmas sprinkles! |
He's my official taste tester and fellow lover of sweets. In fact, he would be happy if I dipped the WHOLE cookie in almond bark.
However, I love the contrast between the dark chocolate of the cookie and the white of the almond bark side.
Personally, I like using almond bark in place of chocolate because it is so easy to use.
Just pop two or three squares of almond bark and 1 tsp solid vegetable shortening into a small deep bowl and microwave in 30 second bursts and stir until the bark is melted and smooth.
You are ready to dip cookies!
Yield: about 4 dozen cookies
Time: 1 hour chill time 8-10 minute bake time for each cookie sheet of cookies.
Yield: about 4 dozen cookies
Time: 1 hour chill time 8-10 minute bake time for each cookie sheet of cookies.
Ingredients
- 1 cup sugar
- 2/3 cup salted butter, softened
- 1 egg
- 1/2 cup cocoa powder
- 1/3 cup water
- 1 tsp. vanilla extract
- 1 3/4 cup all purpose flour
- 1/2 tsp. baking soda
- 1/2 tsp. salt
Directions
- Place sugar, butter, egg, water, and vanilla into a medium size bowl and mix until blended.
- Stir in flour, cocoa powder, baking soda, and salt. Stir until mixed well.
- Cover bowl tightly and chill in the refrigerator for about an hour.
- Preheat oven to 400 degrees Fahrenheit.
- Drop dough by rounded teaspoonfuls about 2 inches apart on to an ungreased, or parchment paper lined cookie sheet.
- Bake until almost no indentation remains when touched, with is about 8-10 minutes.
- Immediately remove from the cookie sheet and cool.
Dipping the Baked Cookies
- Once the cookies are cool, melt 3-4 squares of vanilla almond and 1- 2 tsp. of solid vegetable shortening in a small, deep bowl, following the package directions. I wing it and put the ingredients in the bowl and microwave in 30 second bursts and stir in between the bursts until the almond bark and shortening are melted.
- Dip each cookie into the bark, shake off excess bark, and add sprinkles. My method consists of pouring the sprinkles into a soup bowl and holding the dipped cookie over the bowl as I sprinkle the decorations on each cookie. This is a great job for the kids!
- Set dipped cookies onto a parchment paper lined cookie sheet.
- When the cookie sheet is full of dipped cookies, put the cookie sheet into the freezer for 5 minutes to set the vanilla bark.
- Remove cookie sheet from the freezer and cookies are ready to start packaging.
Enjoy eating some homemade happiness on a plate!
Friday, December 23, 2016
Applesauce Drop Cookies with Easy Caramel-Coffee Frosting

Christmas Applesauce Drop Cookies dressed up with a vanilla almond bark swirl and gold food spray.
My annual Christmas baking began on December 21 this year.
I just had a little trouble getting into the baking mood after making and decorating a half sheet cake for our CMA Christmas party. How about you? There always seems to be so much to do between Thanksgiving and Christmas Eve.
Additionally, I made 4 dozen cutout snowmen cookies for the Christmas cookie exchange at work. I love baking, but sometimes I just need to make the baking easy on myself by making drop cookies to accompany the decorated, holiday sugar cookies.
Yield: about 3-4 dozen cookies
Cookie Ingredients
- Heaping teaspoonful of dough makes 3 dozen
- Slightly rounded teaspoonful of dough makes 4 dozen
Cookie Ingredients
- 1 cup packed brown sugar
- 1/2 cup shortening
- 1/2 cup unsweetened applesauce
- 1 egg
- 1 3/4 cups all purpose flour
- 1/2 tsp. baking soda
- 1/2 tsp. salt
Directions
Perfect Drop Cookies Every Time Tips
- Put brown sugar, shortening, applesauce, and egg into a medium sized bowl and mix well with a whisk, or a hand mixer.
- Add flour, baking soda, and salt. Stir by hand until blended well.
- Heat oven to 400 degrees F.
- Measure dough out with a teaspoon and scoop out a rounded teaspoonful. Use a second spoon to aid in dropping the dough onto your cookie sheet.
- Drop rounded teaspoonfuls of dough about 2 inches onto an ungreased, or parchment lined cookie sheet.
- Bake for about 8-10 minutes, or until almost no indentation remains when you touch the cookie top. Also, cookies will harden somewhat as they cool.
- Immediately remove from the cookie sheet and cool.
Cookie Baking Tip
Lining a cookie sheet with parchment paper makes transferring hot cookies VERY easy.
You just slide the entire sheet of cookies out of the pan and onto the cooling rack.
No trying to slide a spatula under hot cookies! Yeah!
Caramel-Coffee Frosting
Ingredients
- 1/4 cup salted butter
- 2 cups powdered sugar
- 1 tsp. caramel flavoring
- 2 Tablespoons cold coffee
Directions
- Heat butter in a 1.5 quart sauce pan over low heat.
- Remove pan from the heat when the butter is melted.
- Stir in powdered sugar and caramel flavoring
- Stir in coffee until frosting is smooth and spreadable
- Cover tightly until ready to use the frosting
This frosting dries quite quickly, so keep a damp paper towel over the frosting and cover tightly if you need to stop frosting your cooled cookies.
Perfect Drop Cookies Every Time Tips
- Keep the cookie dough refrigerated in between batches
- Put cold cookie dough onto a cool cookie sheet each time. Baking times are figured from the time you put a batch of cold dough onto a cool cookie sheet.
Wednesday, December 21, 2016
Snowman Cookie Exchange Winner

My adorable snowman cookies won 1st in the Best Decorated category in the annual Christmas cookie exchange at work.
Sugar Cookie recipe Click Here Use a 3 inch gingerbread man cookie cutter
Royal Icing recipe Click Here Use clear vanilla extract to get snow white icing.
Icing Colors
- Apply the white royal icing with a butter knife and allow to dry for about 20 minutes.
- Tint a small amount of icing black with Americolor Gel Super Black.
- Tint a small amount of icing orange with 1 drop Americolor Gel Super Red, and 2 drops Americolor Gel Yellow.
- Put tinted icing into a small decorator bag. Carefully snip the very end of the bag off. Pipe onto the cookies.
Saturday, December 17, 2016
Polar Bear Christmas Cake
 |
| Blue-eyed polar bear Christmas cake made with American butter cream frosting and a cooking-from-scratch pumpkin spice cake. |
Bear Cakes
Bear cakes are a favorite of mine - camo bears, biker bears, and NOW a blue-eyed, polar bear Christmas cake.
Love how the wreath turned out!
This is a "spur of the moment" cake.
After arriving home from work at 5:30 PM, I made the decision to start baking.
I grabbed my bear cake pan, prepped it, and whipped up a pumpkin spice cake to pour into it while the oven was preheating
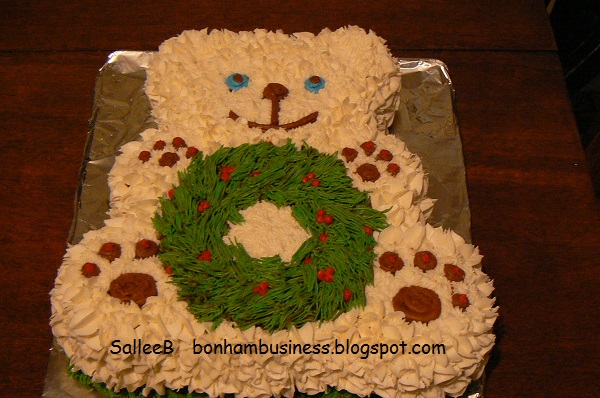
Fur color was easy. I wanted an Arctic white polar bear and a green wreath.
Eye color took a little thought. However, I settled on blue because I knew it would be the perfect pop of color. Then I could add the leftover blue frosting to the bowl of green frosting for the wreath. No waste that way!
I pulled out my decorator tip container and looked through the plastic baggies containing decorator tips. As I looked through them, I thought:
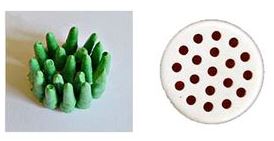
No, not floral flowers or basket weave. Hmmm...maybe the #5 frosting tip for berries, eyes, nose, and paws.For the sides I wanted a LARGE tip that would cover a maximum amount of cake. I picked a Russian tip that looks like an extra large #233 grass tip, the actual #233, and a very small star tip.
 |
| #5 frosting tip for berries and paws. #233 grass tip for the wreath. |
Russian Tip was a Fail.
I spent an exasperating 20 minutes trying to pipe fur onto my bear with the Russian tip.
- The frosting kept sticking to the tip when I released pressure on the bag.
- I tried starting on the cake and slightly above the cake. Same results.
- Then I tried changing the angle at which I held the bag. Same results.
I switched to a large, 2D tip. Hence, the feathery looking fur. I filled in around the paws, face, and any bare spots left by the 2D tip with a medium open star tip.
Monday, December 12, 2016
Redeemed Riders 2016 All-Buttercream Christmas Party Cake
 |
At the Christmas party,
our friends and CMA family gathered around the cake table to look at the holiday cake. As a hobby baker, I appreciate the many compliments that the decorated cake received. Yes, in my opinion, the compliments paid for the hours I spent on making, baking, and decorating the party cake.
|
 |
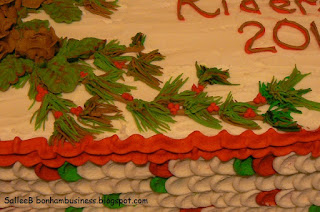
The Christmas Party Cake
A two layer cake that is half white cake, half devils food chocolate with a strawberry buttercream filling. Five rows of petals and a ruffled border decorate the cake sides.
|
 |
My first time piping greenery onto a cake.
With a #104 petal tip, I made pine cone roses and rose leaves. Other decorator tips that I used were a #233 grass tip for the pine needles and a #5 piping tip for the trios of small red berries.
|
 |
Frosting Colors
For the rose leaves and pine needles, I used Wilton leaf green, Wilton copper, Wilton brown,and a drop of Americolor black gel food coloring to achieve the various colors. A mix of Wilton burgundy and Americolor super red, gel food coloring was used for the ruffle border, side petals, berries, and lettering.
|
Tutorial Videos for the Visual Learner
I am a visual learner, which means video tutorials are the perfect way for me to learn new piping techniques. There are several tutorials that I have watched multiple times before practicing the demonstrated techniques that I used on this cake and I want to share that information with you.
- Liz Larson's Elk and Pinecone Cake - https://youtu.be/PZAUsVRpxQw
- Olga Zaytseva's BC Red Roses Wreath Cake - https://youtu.be/_mxUIt-t2MA
- Olga Zaytseva's BC English Roses Wreath Cake - https://youtu.be/kvae1rb1ZS0
- Brigitte Fultz's Petal Technique - https://youtu.be/WASVWn4nN6w
Dare to challenge yourself to become a better cake decorator! Honestly, you can be a self-taught cake decorator by watching these videos and practicing the techniques you see.
Subscribe to:
Posts (Atom)