Wednesday, December 30, 2015

First Responder Holiday Cookie Trays

Thank-you C. Brown for the wonderful picture! 
Baptist Bakers at Work
The bakers in our church, First Baptist Church of Belle, contributed dozens of cookies for First Responder holiday cookie trays. Yesterday, three of us were able to assemble fourteen, large trays. Yes, fourteen trays loaded with a variety of home baked treats for some of the least recognized folks in our communities, First Responders.

Our town is centrally located in a Tri-County area and our trays are being delivered to First Responders in four communities. Yesterday, I assisted with delivery and it was heart-warming to see the surprise and happiness on the faces of our local EMT's, 9-1-1 dispatchers, and police officers.

I challenge you to hold a "Make a Tray Day" and give a tray of home baked cookies to the EMT's, police, 9-1-1 dispatchers, and fire fighters in your community. 

Wednesday, December 23, 2015

Gingerbread Snowmen, Snowflakes, and Stars


Snowflake snowmen, star snowmen, and gingerbread snowmen are the theme for my 2015 Christmas gift plates. 

I have been waiting since January to create these adorable snowman cookies. 

Why January you say? In January, I saw a plate of star shaped and snowflake shaped snowman cookies on Pinterest. Seriously, I fell in love with a plate of snowman cookies.

To create my Christmas plate of cute cookies,
I made a double batch of holiday sugar cookie dough, a double batch of homemade gingerbread cookie dough, and one batch of old-fashioned royal icing that was somewhere between piping and flow consistency for decorating. Old-fashioned royal icing means I used real egg whites and lemon juice. 

At the end of my baking and decorating, I had 10 plates with 1 dozen cookies on each plate.

Plus, I made stocking stuffer snack bags for our grandchildren, nephews, and nieces. Each stocking stuffer snack bag holds one gingerbread snowman and one sugar cookie snowman.

Sallee B's Go To Recipes
Roll out sugar cookie recipe      Click Here
Gingerbread cookie recipe        Click Here
Royal icing recipe                      Click Here

Note: I did not use molasses in the gingerbread cookie recipe. As a substitute, I used butter pecan pancake syrup. The dough will be a little softer and has to be chilled at least two hours. 

The picture below shows the cookie cutters that I chose. 
Cookie cutter sizes starting at the top left: 
  • 3 inch gingerbread cookie cutter
  • 3 inch five point star cookie cutter
  • 3 inch Christmas tree cookie cutter
  • 1.5 inch snowflake cookie cutter
  • 2.5 inch star cookie cutter
Decorating with Zip Top Bags
I did not use any decorator tips on this baking project. I did fill 1 pastry bag with white royal icing and two snack size, zip top bags with  orange and black royal icing. With a small pair of scissors, I snipped the end of each bag. Make sure you barely snip the corner, or tip, of each bag because if you snip too much off, the royal icing will make a gloppy, wide line. Not telling you how I know this. lol...lol

Frosting the Sugar Cookie Snowman Stars, Sugar Cookie Snowflakes, and Gingerbread Snowmen
  1. Outline the cookie with white icing
  2. Pipe a few lines onto the cookie, inside the outline, to partially cover it.
  3. With a short, thin bladed knife, carefully spread the icing to cover the cookie inside the outline. Add more icing if necessary I used a dollar store paring knife. 
  4. Let frosted cookies dry until the icing is hard. Royal icing dries FAST.
  5. Use a dot of black icing to form eyes, mouth, and buttons. I used five dots for each snowman's mouth. 
  6. Add an orange dot and line for the nose. Mine are vaguely triangular. I made a dot, then added a small line to shape each nose. 
  7. Let dry until frosting is hard. 
Decorating the Sugar Cookie Stars and Sugar Cookie Christmas Trees
  1. Pour desired sprinkles into a soup bowl
  2. Outline a cookie with royal icing. Add icing lines anyplace you want sprinkles to adhere.
  3. Hold the cookie over the soup bowl and drop sprinkles onto the wet icing.
  4. Repeat until all of the cookies are outlined with sprinkles. 
I spread a thin coat of icing on the top of a few stars and then applied sprinkles onto the cookies. Personally, I like the sprinkle outlined cookies better than the cookies with a solid coating of sprinkles. 


Wednesday, December 16, 2015

You Rock! Christmas Treat Bag


Last year, my sister Nan sent me a jar of what looked like gravel. Bill and I eyed the jar of rocks trying to figure out why my sis would send me a jar of rocks. 

Finally, I picked up several nuggets of "rock" and smelled them. 
"Chocolate" is what my nose told my brain. Trusting my sense of smell, I popped the "rocks" into my mouth and let them sit in my mouth for a short while. Yep, my nose was right and what my sis had sent me was a jar of  candy coated, chocolate rocks. 

This year, I found a great deal on one pound bags of gluten free, Choco Rocks and decided to make You Rock! Christmas treat bags for the elementary students that I work with. Personally, I think this is a very cute way to send a positive message to students. Candy slogans appeal to the kid in me, too. 
  
Note: I used 1/3 cup of Choco Rocks for each treat bag and a one pound bag will fill about 7 snack size, treat bags.  

To make your own treat bags you will need the following materials:
  • snack size, zip top bags
  • 3x5 index cards
  • Christmas gift labels
  • bows
  • Choco Rocks
  • red and green permanent markers
  • stapler
To Assemble
  1. Fill out the 3x5 index cards. 
  2. Add a square gift label and bow to each card.
  3. Put 1/3 cup of Choco Rocks into each gift bag and zip closed.
  4. Staple each decorated index card to the top of each zip bag.

Tuesday, December 15, 2015

Sparkling Gooey Lemon Cookies

I am from Missouri, home of the Gooey Butter Cake. 
Of course, it didn't take long for a cookie version of Gooey Butter Cake cookies to arrive on the food scene. Yellow cake mix, butter, and cream cheese make these cookies addictively good. Plus, they only use five ingredients. How sweet is that? 

Sparkling Gooey Lemon Cookies are a variation of the Gooey Butter Cake cookies. The main difference is using a lemon cake mix in place of the yellow cake mix. I LOVE these lemony, rich, and decadent cookies that are drizzled with a tangy sweet lemon frosting and a slight crunch from the sparkling white decorating sugar. As always, these cookies have been husband tested and approved. 

Yield: about 4 dozen cookies  

Preparation Time: 15 minutes to make dough and about 30 minutes to chill the dough

Ingredients
1 - 8 oz. package cream cheese, softened
1/2 cup, or 1 stick of unsalted butter, softened
1.4 teaspoon vanilla
1 medium egg1/4 
1 box lemon cake mix


Directions
  • Preheat oven to 375°F.
  • In medium bowl, beat cream cheese and butter with spoon until well blended. 
  • Stir in vanilla and egg. Add cake mix; stir until well combined 
  • Chill dough for about 30 minutes, or until the dough can be handled easily
  • Shape 1 level Tablespoon of dough into a ball; roll in powdered sugar to coat.
  • Repeat above step until your cookie sheet is full
  • Place 1 inch apart on ungreased cookie sheets. I use parchment paper to line my cookie sheets. Then it is simple to transfer an entire tray of hot cookies unto the cooling rack.
  • Bake 10-12 minutes or until set. 
  • Remove from cookie sheets to cooling racks.
Easy Lemon Drizzle Frosting
This is where I LOVE having my cookies on parchment paper. Just slide the sheet of cookie laden parchment paper from the baking sheet to the cooling rack and from the cooling rack to the table top, or work surface. Then, the cookies can be drizzled with frosting and sprinkles while they are still on the parchment paper. This makes for a quick and easy cleanup once the frosting has set.


Ingredients
1 cup of powdered sugar
1-1/2 to 2 Tbsp. lemon juice, or bottled lemon juice
sparkling white decorating sugar.

  • Mix all of the ingredients in a small bowl with a spoon. 
  • Drizzle frosting back and forth across cooled cookies and then use sparkling white decorating sugar. 
Easy isn't it? Homemade happiness on a plate was never so easy! 


Wednesday, December 9, 2015

SalleeB's Christmas Wreath Cupcakes

Christmas 2015 is almost here!
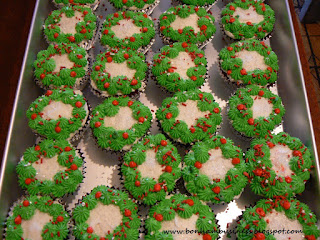
Frosting, two frosting tips, and sprinkles are all you need to create these gorgeous, holiday cupcakes. Listed below are the seven steps to turning a baked cupcake into a festive, Christmas dessert.
2. Frost with a base coat of butter cream frosting   Click here for frosting recipe
3. With a #32 open star tip, pipe leaf green frosting stars around the outside edge of each cupcake with a #32 open star tip. 
4. Pipe a few frosting stars that slightly overlap the first row to give each wreath a fuller, more natural shape.
5. Carefully sprinkle the white center of each cupcake with sparkling white sugar.

6. Pipe red frosting ornaments with a #7 piping tip.

7. Carefully sprinkle each wreath with your choice of Christmas sprinkles.

Enjoy eating some homemade happiness on a plate! 


Monday, December 7, 2015

Baking Cupcakes in a Half Sheet Cake Pan

In October, I told my fellow Christmas committee members I would bring a half sheet cake to the Christmas party. 

Now, flash forward to the Friday before the party in December. 

  • I worked at my pay-the-bills job all day Friday. 
  • I stopped at the grocery store and bought three cake mixes for the half sheet cake. 
  • Upon arriving at home, I started loading Christmas party items into my car. 
  • Making thirty centerpieces for the party tables was my next task. 
  • At midnight, I finished the centerpieces. 
This was my "I got myself into trouble" moment; the fruit of procrastination. 

No way was a half sheet cake going to get made. While tucking myself into bed beside my snoring husband, I decided I would make Christmas wreath cupcakes five hours later. 

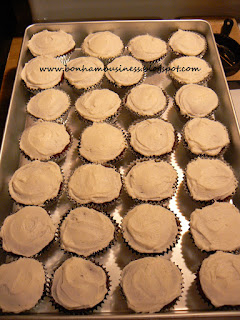
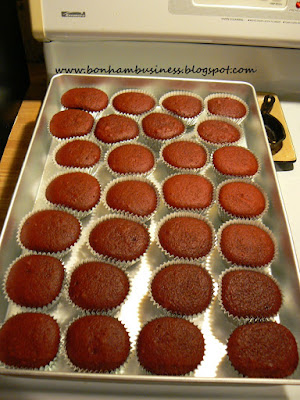
At 5:00 A.M. ,the half sheet cake pan was sitting where I had left it at midnight, on the stove top. Somewhere between preheating the oven and placing the aluminum foil cupcake liners on the counter, I had a great idea, or at least I think it is a great idea. I could put the sturdy, aluminum foil liners into the sheet cake pan. No messing with taking cupcakes out of the cupcake pan! Yah!
What a time saver! 
First, I baked two dozen cupcakes in 17 minutes. Next, the cupcakes cooled in the same pan for 20 minutes. While the cupcakes cooled, I whipped up a batch of buttercream frosting. Finally, I began decorating the wreath cupcakes with a base coat of white frosting. Not one cupcake had to be pried out of a cupcake tin, or ended up upside down on a tray! 
As I applied the final touch, sprinkles, the excess was caught in the bottom of the cake pan. Due to the cake pan sides, not one sprinkle ended up on the table top. Wow, another benefit from using the half sheet cake pan!

In my opinion, using the heavier aluminum foil cupcake liners and baking the filled cupcakes in my half sheet cake pan is as easy as making a one dish casserole!