Friday, July 31, 2015

Journey Off the Map Cakes

Block party! 
Yes, a block party is thrown for the last day of "Journey Off The Map" vacation bible school. My contribution to the fun? Four, nine inch cakes for the cake walk. Not from scratch cakes. Cake mix cakes. BUT, I did make my own buttercream frosting. It isn't pantry style, unless I make something from scratch! 
Our VBS theme was "Journey Off the Map."
 The tropical tree house theme inspired the flower garland decorations.
Frosting colors: yellow McCormick's food color, Wilton gel color in sky blue, violet, and leaf green.
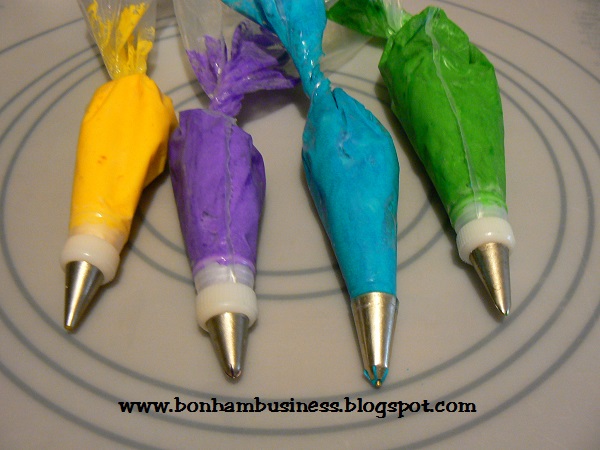
The four decorator tips that I used to create the flower garland border:
Left to Right: #5 piping tip, Wilton #224 drop flower tip, #191 drop flower tip, #67 leaf tip.

Drop flowers are a quick and easy way to create a pretty cake. During vacation bible school week, quick and easy is what I am going for!

I did not have a drawing, or a plan for my flower borders. Just an idea in my head. Flowers and leaves are pretty flexible.

I knew I wanted the cakes to say, "Trust Jesus."

Yellow is a great color because it can be used for the piped message AND the center of each drop flower. Again, quick and easy. I love purple and blue wild flowers, so I went with violet and sky blue. 

Never made drop flowers? 
Get a drop tip and practice forming flowers onto a sheet of wax paper until you are comfortable shaping the flowers. Do not forget to have fun! Just remember to squeeze the piping bag to form the flower and then relax your grip on the piping bag before you lift the pastry bag and tip. Your frosting should be at room temperature. Cold frosting does not pipe well.

Silky Smooth Buttercream Frosting
This is my favorite buttercream frosting to use for piping through a bag.

Ingredients
2 sticks of salted butter
1/2 cup of vegetable shortening
1 tsp. vanilla extract
1/2 cup of water
2 lb. bag of confectioners sugar

Directions
  • Place butter and vegetable shortening into a mixing bowl.
  • Using an electric mixer on low speed, cream the butter and vegetable shortening together for 2-3 minutes.
  • Add about 1/4 of the confectioners sugar and the vanilla extract.
  • Beat with the mixer on low speed until well blended.
  • Add another 1/3 of the remaining confectioners sugar and continue to mix at low speed until the frosting is well blended.
  • Add 1/2 cup of water and half of the remaining confectioners sugar.
  • Beat until well blended.
  • Add remaining confectioners sugar.
  • Continue to mix with the electric mixer on low speed.
  • If coloring the frosting, add food coloring now.
  • Blend food coloring into the frosting until the desired color is achieved.
  • Icing may be thinned with additional water to frost your cake or cupcakes. 
Tip: This recipe can be reduced by half for a small cake or double the ingredients for a large amount of frosting. 


Wednesday, July 29, 2015

Journey Off The Map Granola Bar Bites

Vacation bible school started this week and the theme is "Journey Off The Map." Our church members make drop cookies, bar cookies, snack size cupcakes, and other sweet treats for the kids. I teach the 5th/6th grade class so I decided to make a three ingredient treat for the VBS students. My offering for the kiddos is a no bake, chewy granola bar dessert that your children can help you make. The hardest part of making Off The Map Granola Bar Bites is taking the wrappers off of the 36 granola bars!
I bought my granola bars at the local dollar store. The store sells a variety box of 18 chewy granola bars. The three flavors are S'mores, Chocolate Chunk, and Peanut Butter Chocolate Chip. Yummy! 


Off The Map Granola Bar Bites
Yield: 72 bites, or 6 dozen
Serving size: 2 bites 

Equipment
microwavable, medium glass bowl
small pan that the glass bowl will sit on top off
two medium to large cookie sheets
wax paper
Ingredients
12 oz. vanilla almond bark
solid, all vegetable shortening
26 chewy granola bars
decorating sprinkles 
Directions
Prepping the granola bars
  • Cover the cookie sheets with wax paper.
  • Unwrap the granola bars and lay them out on the wax paper covered cookie sheet(s)
  • Cut the granola bars in half 


Melting the vanilla almond bark
  • Separate the vanilla almond bark into squares.
  • Place the squares into the glass bowl and microwave for 60 seconds.
  • Stir the vanilla bark until it is smooth. If necessary microwave for another 30 seconds. 
  • Put about an inch of water in a small pan that the glass bowl will sit on top off.
  • Place the pan of water over low heat and put the bowl with vanilla bark on top of it.
  • Stir the vanilla bark occasionally during the dipping step. 

Thinning the vanilla almond bark to dipping consistency

Note: Do not thin the almond bark with butter, oil, margarine, milk, or water. It will NOT work. Only solid, all vegetable shortening will work. 
  • Add 1 level Tbsp. of solid, all vegetable shortening to the vanilla bark and stir until it is melted.  
  • The consistency is correct when you dip in your spoon and the vanilla bark coats it smoothly. Unthinned, or thick vanilla bark tends to form "clumps" and is not smooth.
  • If necessary add another level tablespoon of shortening and stir until it is melted.
Dipping the granola bars
Note: When using granola bars with chocolate chips, some of the chocolate may melt slightly in the almond bark, but this is okay.
  • Dip the cut end of each granola bar half into the thinned vanilla bark.
  • Place the coated granola bar bite onto the wax paper cookie sheet
  • Immediately sprinkle each coated bite with sprinkles, or other desired decorations. Adding the sprinkles is a great job for children!
  • Continue until all of the pieces are done.
  • Place the pans of coated bites into the freezer, or refrigerator, for about 10 minutes to set the vanilla bark
  • Remove the pans and your bites are ready to eat! If you are packaging your bites, use a layer of wax paper in between the bites. 


Thursday, July 23, 2015

Out of the Kitchen Traveling

Bill and I dressed to ride our motorcycles. 

Busy, busy, busy! This describes my summer vacation this year. Bill and I rode our motorcycles to the Spring River Rally in Hardy, Arkansas and the Kentucky Bike Rally in Sturgis, Kentucky. Two weeks separated the two trips. 

During my two weeks at home, I spent more time mowing grass than in the kitchen cooking! The Fourth of July holiday and Gasconade Valley Baptist Association Children's Camp has also taken up a portion of this two week break. 
Kid Land Art created by my nature class at Gasconade Valley Baptist Association Children's Camp.
Bill and I returned home three days ago after camping for four days in Sturgis, Kentucky. Upper ninety degree temperatures kept us seeking shade under the Christian Motorcyclists Association hospitality tent during the day. 
Christian Motorcyclists Association hospitality tent in Sturgis, KY
I am looking forward to spending some time in my kitchen this week. In fact, I just took a pan of brownies out of the oven! Yum, time to eat a piece of homemade happiness on a plate!

Friday, July 3, 2015

Packing Food to Travel in a Motorcycle Trailer

Summer time is motorcycle riding time! Bill and I spend one weekend a month camping beginning in May and ending in August. Normally, we eat at a restaurant,or food truck once during a three or four day camping trip. However, many times coffee is not available in the morning and I do not function without my coffee! Therefore, we travel with a two burner camp stove, a nine cup coffee pot, and a few groceries. 
Bill and I stopped at Grand Gulf State Park in Thayer, Missouri to admire the scenery and to stretch our legs See the cooler? 
 Grocery List From Home
  • 1 dozen eggs
  • 1 stick of butter
  • 1 pound of  bacon, put into a quart zip top bag and frozen.
  • 2 pork cutlets, frozen or other frozen meat. 
  • 4-5 large potatoes
  • breakfast cereal
  • ground coffee
Packing Food to Travel 
A motorcycle trailer doesn't have shocks. Everything in it, or on it must be cushioned. To get eggs from point A to point B, this is how I pack them:
  1. I pack the eggs into an egg carrier. Next, it goes into the bottom of an insulated lunch cooler to further cushion the eggs. 
  2. Then the frozen bacon, frozen cutlets, and stick of butter are loaded into the lunch cooler. 
  3. The lunch cooler sits in the large cooler.


Kitchen Bag
We have a very large duffel bag that is almost as long as our trailer is wide. All of the kitchen supplies/cooking gear fit into. This is where I carry cereal and raw potatoes, too. 
Last year I borrowed an idea from Pinterest and bought a shoe organizer to use as a camp kitchen organizer. Click here to see picture and article.
I keep dish soap, scrubber sponge, salt, pepper, meat tenderizer, sugar, creamer, coffee grounds, trash bags, wet wipes, sunscreen, medicine, tent patches, twine, nylon rope, toilet paper, paper towels, etc. in each pocket. Then, I roll the organizer and place it into one end of the duffel bag. The coffee pot, skillet, plates, hot pads, matches, long lighter, collapsible water container, etc. go into this duffel bag 

Packing Items for Motorcycle Trailer Travel
  1. Coffee - 1/3 cup packed into a zip top snack bag = 1 nine cup pot of coffee.  This is my formula for figuring out how much coffee to take. Plus, I add a couple of extra bags because my perking coffee pot will attract campers who do not have any coffee at their camp. lol...lol Once the snack bags are packed, I pack three bags into a zip top sandwich bag, just in case a snack bag opens up, the coffee is still contained in a bag. Yes, I learned this by having it happen! Plus, the sandwich bag will fit into a pocket in the kitchen organizer. 
  2. Potatoes - Pack into a gallon, zip top freezer bag
  3. Cereal- I pack the cereal into a plastic storage bowl with a lid. This prevents the cereal from being crushed to small pieces. Instead of bowls, I use nesting, plastic storage containers to eat cereal out of. 
  4. Kitchen utensils: potato peeler, paring knife, short spatula etc.  Pack into a gallon, zip top freezer bag, let the air out of the bag, and roll tightly. 
Packing the Cooler   
  • Two days before leaving, I fill two gallon zip top bags 2/3rds full of water and place the bags into the freezer. Each bag will yield a block of ice that weighs about six and a half pounds. These blocks will last in the cooler for at least four days. 
  • While traveling, we only keep the two gallon bags of block ice, three - one liter bottles of water, three -  20 oz. bottles of soda, 1 small bag of ice cubes from the store, and the insulated lunch cooler in the large cooler. This is necessary to prevent too much weight from being placed on the trailer tongue at the ball hitch. 
The Grand Gulf has turned into small lake due to the copious amounts of rain Missouri has received  this year, 2015. 
Arriving at Our Campsite
Bill and I set up our tent as soon as we get to our destination camp site. We unload the kitchen bag, set up the air bed, and unload the cooler, chairs, and two, resin folding tables. However, we still have a short trip to make with me still pulling the trailer. We go shopping! Yep, we buy the rest of our water, soda, a half gallon of milk, ice, cheese, meat, and snacks at the local grocery store. Then it is time to go back to camp, completely fill the cooler, and unhitch the motorcycle trailer that is now going to be my portable storage for a camp kitchen. 

Bill's HD Roadglide parked beside our tent. Bill carries the tent on the back seat of his bike. 
Cooking at Camp
  • You may have noticed that I have never mentioned cooking oil in my list of groceries. I do not use it. I use butter and bacon grease. However, if you absolutely must have oil, only carry a small quantity and keep it bagged up in a zip top bag. A little oil goes a long ways if it spills. I do not care to take a chance on it spilling inside the motorcycle trailer.  
  • I carry one medium size camp skillet and cook all of our meals in the one skillet.  
  • For breakfast, I cook bacon first, and place the cooked bacon on our two plates. (Put a paper towel over the plates to keep flying critters off of your food!) Next, I  add butter,if necessary, and  fry the potatoes. When the potatoes are done, I remove them from the skillet and divide them between the two plates. Now it is time to scramble, or fry the eggs!
  • For dinner, I use 2-3 Tbsp. of butter to cook the potatoes and fry the meat in the skillet. Nothing tastes better after a long day outdoors than food cooked on a camp stove. 
The first thing I do when we are camping - get the coffee ready to perk! 
Daybreak on the Spring River at Griffin Park in Hardy, Arkansas.

Thursday, July 2, 2015

A Chocolate Chip Cookie Dough-Strawberry-Banana Split


This week, the local grocery store has ice cream and frozen, whole strawberries on sale. Happily, I decided it was time to make my favorite July dessert - a banana split! 

I must have stood in front of the dairy case for five minutes trying to decide on one flavor of ice cream. What a tough decision, picking one flavor out of fifteen flavors! Finally, a carton of chocolate chip cookie dough was sitting in the shopping cart beside the bunch of bananas and the one pound package of whole frozen strawberries. 

Before making supper, I poured the pound of frozen strawberries into a quart bowl to thaw and sprinkled a 1/4 cup of sugar over the berries. I knew that supper was going to take about an hour to cook, plenty of time for the berries to thaw. However, I can always thaw frozen berries in the microwave by using the timed defrost setting.  

After supper, it was time to assemble and make two banana splits in the vintage glass banana split dishes I love. Carefully, I split two bananas in half and laid them in the bottom of each dish. Three scoops of ice cream soon sat on top of the split bananas. Then, I spooned the now thawed, sweetened strawberries over the middle scoop of ice cream and I squeezed chocolate syrup over the end scoops of ice cream. That's it, an easy dessert that looks elegant when served in glass serving dishes. 

Now, it is time to eat a banana split!