 Bill is curious about this project and has asked me what I'm making the collage for. The project is simply for my own satisfaction and enjoyment. Also, I want to experiment with this type of art project. So far, a large amount of time has been spent on placing the paper pieces and deciding on the most balanced arrangement. I've consulted my original sketch once or twice, but now I'm planning the additional elements that will help to complete my collage.
  |
| My acrylic paint choices for the collage. |
Primary and Secondary Colors
Before I put paint on the canvas, I decided that my primary colors are regency blue, leaf green, pineapple, and white. My secondary colors are Burnt Sienna, Cardinal Red or Real Red, Sandstone, and Antique Gold.
Brushing and Blending the Paint
The naked canvas was a little bit intimidating. Paint by number sets, junior high art class, and walls are the extent of my experience with paint and a brush (roller). Therefore, I just did what I saw a YouTube artist do. I squeezed paint out of the tube onto the canvas and applied my brush to spread it out. Regency Blue was applied to the bottom half, leaf green was brushed onto the top right, and pineapple(yellow) was applied to the top left. More paint was applied until I thought it was okay.
Mod Podge was brushed over the dry acrylic paint and further blended the three colors. I was surprised that the Mod Podge also lightened the paint to some extent. Then I left the canvas to dry for twenty-four hours.
Preparing Paper Items
- Two coffee filters were dipped into yellow food color and water. The two filters went onto a baking rack until they were dry.
- Using Cardinal Red acrylic paint and a little water, I painted the lip shape and one paper heart. Then I placed them on the baking rack with the coffee filters to dry.
- My small angel cookie cutter made a great template to trace around for angel shapes. I traced five angels onto the sheet music, cut them out with scissors, trimmed the bottom of the wings with edging scissors, and made another set of wings for the angels with a paper doily.
- Next I cut out three crosses using a cross cookie cutter. The paper came from a National Geographic and an antique New Testament cover.
- The last item I wanted was a crown and I used a template to trace around. Yes, it was a cookie cutter. Smile.
- Using two conversation dot stamps and a black ink pad, I stamped about a quarter of a sheet of green and blue tissue paper. I used a different stamp on each color.

Applying Paper Items using Mod Podge
Aah, how I love the smell of Mod Podge in the morning. (I am laughing as I type this!) Now the last time I did a decoupage project, I was a Junior Girl scout. Okay, quit laughing cause I'm just being honest with you. Actually, I used the white gluey stuff last fall to glue paper circles onto glass gems for a refrigerator magnet project. This morning though I began putting my selection of art objects onto the prepped canvas.
- First I tore one yellow coffee filter into wedges. Then I tore the center circle out of the second coffee filter. Then I just used a brush and my fingers to position each piece until I was satisfied.
- Torn pieces of the stamped blue and green tissue paper were applied over the corresponding colors on the canvas. I did tell you my experience was with paint by number sets, right?
- I continued with the Earth shape, sheet music corner, crosses, lip shape, heart, crown, etc.
Using Microsoft Paint for Planning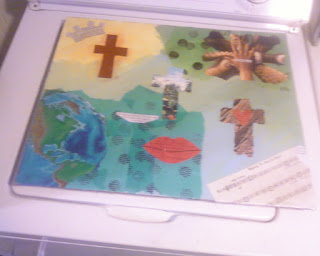

My next step will be to paint highlights, low lights, and blend the edges of the blue tissue paper again with Regency Blue, white, and maybe a touch of True Blue. You can see how well the green tissue paper blended with the painted area. My goal is to add more depth.
The picture below shows how I used Microsoft Paint to assist me with placement of text, angels, and adding further paint. This picture is for planning purposes only. The completed collage will be similar, but not identical.

No comments:
Post a Comment
Thank-you so much for stopping by and visiting. SalleeB