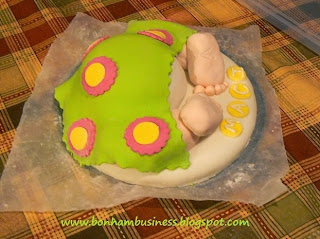
Baby bottom cakes are so cute! That round, diaper clad bottom, half hidden by a blanket, with the tiny baby toes and feet peeking out are irresistible.
I couldn't wait to try making a baby bottom cake topper for a coworkers baby shower party. The color scheme was pink and green with a scattering of polka dots. Our cake was semi-homemade because the quarter sheet cake base was from a local supermarket.
Making a cake topper is much easier than making a whole cake. This is my first baby bottom cake. Yep, my very first one. However, the end result was worth the time AND I will be much quicker the second time
However,on this first attempt, I spent about six hours making marshmallow fondant, making marshmallow cereal treats, making frosting, baking a 9" cake round,and assembling the topper.
I watched two tutorials before I attempted making this cake.
.
What I Will Do Differently
I couldn't wait to try making a baby bottom cake topper for a coworkers baby shower party. The color scheme was pink and green with a scattering of polka dots. Our cake was semi-homemade because the quarter sheet cake base was from a local supermarket.
Making a cake topper is much easier than making a whole cake. This is my first baby bottom cake. Yep, my very first one. However, the end result was worth the time AND I will be much quicker the second time
However,on this first attempt, I spent about six hours making marshmallow fondant, making marshmallow cereal treats, making frosting, baking a 9" cake round,and assembling the topper.
I watched two tutorials before I attempted making this cake.
- Fondant baby bottom tutorial.
- Butter cream frosted tutorial for a baby bottom cake.
To form the baby bottom, legs, and feet, I used warm, marshmallow cereal mixture.
Baby bottom - A small, two cup bowl is a great mold for shaping the baby bottom.
Baby Legs and Feet - A 3 1/2 inch cookie cutter helped me to shape the legs and feet.
- First, I made two circles by packing warm, marshmallow cereal treat mixture into the cookie cutter; one 3/4" thick and one 1/2" inch thick.
- Next, I cut the 3/4" circle in half and formed two curved "legs."
- I also cut the 1/2" circle in half and formed the feet from these two pieces.
Name Tiles - The open end of a standard frosting tip cut the yellow circles for the name tiles. Piped, butter cream frosting is used for the lettering.
.
What I Will Do Differently
- For a quarter sheet cake, downsize the cake base to eight inches by two inches.
- Use royal icing instead of butter cream frosting for a base coat on the cereal treat pieces for the bottom, legs, and feet. Butter cream frosting just doesn't dry quickly enough.
- Make a template for the toes and feet.
These changes will decrease the amount of time I need for the next topper that I make.


No comments:
Post a Comment
Thank-you so much for stopping by and visiting. SalleeB