Showing posts with label teaching. Show all posts

Tuesday, July 11, 2017

Learning My Carb Counting Range and More

Life-long learner is a term that describes me well. 
A new project, or interest means I will immerse myself into learning and studying how to accomplish the task, or interest. This isn't just a passing phase, this is a part of my personality

Learning a new way of eating means I will devote myself to the initial learning and then keep myself updated. 

Online Research
First, I researched online to find out what types of food I needed to be eating and what type of plan would work well for me. Websites by individuals can be helpful, but my initial search for information was from research-based websites, like the National Institute of Diabetes and Digestive and Kidney Disorders (NIDDK) and the National Institutes of Health (NIH). 

The article that helped me shape my eating plan is linked to the NIDDK link above. 

Now on to carb counting.
I found a 15 pg. PDF booklet at www.lillydiabetes.com that I am finding to be very helpful and it has links to additional resources included. 

According to the booklet, most women need 45 to 60 grams of carbohydrates at each meal. This means the carb counting range for me is a total of 135-180 grams of carbs. 
I can easily count my carbs because I am using the LoseIt! online website and app to help me track what I eat. 
I hope you find this information helpful. I am finding that I can eat more food than I want and I am still losing weight and within my carb range. 


Saturday, June 4, 2016

Kids Makin' Dirt Cups with a Gummy Worm


How about letting kids make their own dirt cups? No, not real dirt, Oreo dirt. After all, dirt cake, or dirt cups are FOR kids. This is an easy recipe, even a kindergartner can manage to make a dirt cup with a bit of assistance.

Ingredients and Materials for Eight Children
  • 1 package of instant chocolate pudding
  • 2 cups of cold milk
  • 16 Oreo cookies
  • 8 regular gummi worms - not the sour kind
  • 1 can or whipped cream
  • 8- 8oz. plastic party cups
  • 8 snack size, zip top bags
  • 8 plastic spoons
  • 1/4 cup measuring cup
  • 1 plastic knife for leveling the pudding
  • 1 black permanent marker
Note: I make the instant chocolate pudding ahead of time. One package will yield eight -one fourth cup servings.

 Before starting, have each child write their name on their party cup with a black permanent marker. 

1. Give each child an Oreo cookie and have them put it in the zip top snack bag and crush it up. Resist the urge to help. It is okay to have larger chunks in your"dirt."

2. Demonstrate and explain how to use the back of the plastic knife to level the pudding in the 1/4 cup measuring cup.

  • Assist as necessary with the leveling procedure. Then, the kids will use their spoon to scrape the pudding out of the measuring cup and into their cup. 
This is where I talked about the importance of measuring ingredients exactly when following a recipe. 

3. Each child can now dump the crushed cookie into the cup and stir it in.

The cookie filling will stick a little bit to the inside of  the bag, but that is okay because they are going to crush a second cookie.

4. Tell the children they are going to squirt about the same amount of whipped cream into the cup as they have pudding. 

  • Then they are going to stir the whipped cream into the cookie/pudding mixture until it is all the same color, or well blended. 
This is why I use 8 oz. cups. the children can stir, but keep the mixture in the cup. 

5. Give each child a second cookie to crush in their zip top bag and a gummi worm.

  •  Make sure they understand that they are not going to stir this cookie into the pudding even though their spoon is still in the cup. 

6. Have children dump the crushed cookie on top of the pudding mixture for topsoil and put the worm on top of the crumbs.
Remember - the plastic spoon stays in the cup.

7. Place "dirt" cups on a tray and refrigerate for 30 to 40 minutes.

 This is just enough time to go on a walking field trip and look for different kinds of dirt, or have containers of potting soil, sand, and regular dirt for children to look at and examine with magnifying glasses. 

Now it is time for the kids to eat their very own "dirt" cup. Yay! Homemade happiness in a cup!

Thursday, August 7, 2014

A Surprise Breakfast for Great Grandma Tucker

Front Center: Great Grandpa Marion Tucker and Great Grandma Ella Mae Tucker 
Back L - R:  Francis, Neal, Shirley(Shirl), My Grandpa Millard, and Roland 

Oatmeal reminds me of my Great Grandma Tucker. Great Grandma started me on the healthy breakfast path when I spent weekends with her. In fact, I cooked my first bowl of oatmeal at Great Grandma's house.

Early one morning, I woke up before Grandma and wanted to surprise her with an oatmeal breakfast. My five year old self carefully crept out of bed and went into the kitchen to begin the morning meal. What could have been a disaster ended very well.

I had carefully watched Grandma Tucker prepare our breakfast oatmeal many times. Feeling very grown up, I began my surprise. Opening the cabinet, I reached in for the oatmeal pan. Slowly,standing on a chair, I took the oatmeal box out of the cabinet. The rolled oats scoop was in the round oats box. One scoop of oats went into the pan of water, just like Grandma did it. Time to get off the chair and move the pan from the sink counter to the stove counter. Carefully, standing on tiptoe, I placed the pan on the counter by the gas stove, pushed the chair up to the stove, climbed onto the chair, and moved the pan onto the front burner. Time to light the stove! Pausing for a moment, I thought about everything I had watchedGrandma do to light the stove. Reaching for a match out of the metal matchbox holder, I lit the match, turned the burner knob, lit the front stove burner, and turned the stove knob to the right mark, Still standing on the chair, I let the oatmeal come to a simmer. Just about the time the oats were done, Grandma appeared in the kitchen.

Her eyes went wide and I knew I had surprised her. "Grandma," I said proudly."I fixed breakfast for you!" Grandma opened her mouth and closed her mouth. I had a vague feeling I had done something wrong, but did not know what. Suddenly,she smiled gently, hugged me, and said thank you.

After breakfast, Grandma told me I was a wonderful,  kitchen buddy. She quietly told me that kitchen buddies waited for each other before cooking. I promised that I would wait for her before I cooked again.

After that morning, my Grandma Tucker started asking me if I was going to be her kitchen buddy before we went to bed. Happily, I answered,"Yes, Grandma. I'm a good kitchen buddy!" and Grandma would say,"Yes, you are!" accompanied with a big hug.

As I grew older,  I realized how dangerous what I had done was. My admiration for my Grandma Tucker's self control taught me a lesson that I didn't fully appreciate until my own daughters wanted to begin cooking.

#TBT 

Monday, July 28, 2014

SalleeShares - Food Network Star Week 9

#foodnetworkstar 
The Big Apple, New York City. I have never been to New York and can understand the excitement of the five finalists. I would be gawking and chattering like a chipmunk. To walk down the halls of the Food Network offices would be so scary-marvelous.

Woohoo! I am celebrating. Last week's Bonham Business prediction is in perfect alignment with the decision made by the Food Network Star (FNS) mentors. Butcher Babe Loreal Gavin went home.

A bit of advice for Loreal: Practice talking and teaching about food. Then, try again.You can do it Loreal. Your point of view was made for television. Yes, I am trying to encourage Loreal. After all, we both ride motorcycles and biker chicks need to hang together. 

Week 9 was about two challenges.

1. Visit a Chelsea Market business and learn about a summer staple. THEN, give a live camera presentation to the mentors who were back at Food Network HQ. No redoes here.

2. Solve a food problem for one of Rachael Ray's viewers. Rachael Ray is my cookin' shero! I know, I'm corny, but I love Rachael Ray. 

Challenge 1
I disagreed with the mentors decision on who did the best job. Luca has star power, a 1000 watt smile, and charisma. He did a great job and handled Bobby Flay's question well. Luca's smile shone through that camera lens and engaged the judges and viewers. However, the mentors couldn't hear me and picked Nicole Gaffney.

Nicole pulled everything together and did a great job. Remember, last week I did say that if she would quit trying so hard and RELAX, we would see a more polished Nicole. We did see the professional, friendly and capable Nicole, finally.

The Bottom Three
Cowboy Lenny just wasn't connecting with the yogurt, or the camera.
Texas gal Sarah started out well with the Santa Clause melon, but forgot to taste it.
Butcher Babe Loreal did not volunteer any information about why viewers should shop for meat at a butcher shop, her POV.


Challenge 2
  • Nicole's advantage for winning Challenge 1: assign the family food problems to the other finalists.This challenge should have been fairly easy; if you used some common sense. Unfortunately, "common sense is so rare that it oughta be a super power!" Yes, it is a T-shirt slogan, but I really like saying it. Nicole put siracha sauce on a plate for children to eat. The youngest boy promptly spit out the spicy spoonful of food his mom fed him. Not what you want to see happen on national TV.
  • Luca  did well, but unfortunately for him - the kids saw him put the cauliflower in the food processor. You cannot let the kids see the veggies!  Giada also pointed this out to the other mentors.
  • Loreal made an involved dish of asparagus stuffed chicken breast for a family that wanted quick, budget friendly food for on the go.
  • Sarah made sure everyone knew that she had cooked Loreal's dish for her own husband on Valentine's Day because the dish is special. Catty comments will not make you the next Food Network Star, Sarah. The mentors were clear that Sarah had not connected with the family, or the audience. 
  • Lenny ripped his jeans during his cooking demo, OMG! However, he hid it well and continued with his cooking. Thumbs up to Lenny. None of the mentors realized  he had a wardrobe malfunction until he told them. Personally, I would have kept that info to myself. 

Who Will Go Home? - Week 10

Out of the final four, Lenny, Sarah, Nicole, and Luca, I predict that.....I am nervous to make this prediction...Sarah Penrod will be the finalist to go home next week.

My decision is based upon the fact that Sarah missed the mark on both of the challenges.

  1. During the first challenge, she should have known to taste the Santa Clause melon before talking about it. Taking a bite out of half a melon to answer Bobby Flay's question," What does it taste like?" was a beginner's mistake. 
  2. Yes, I did not like Sarah's catty behavior. BUT, as a mom, she should have been able to connect with the single mom and children.  

Saturday, June 7, 2014

Kitchen Disaster Popcorn Mix

On Wednesday, this blog post was supposed to be an update about coating popcorn with almond bark and mixing in a cranberry nut trail mix that I found at the local Wally World store.

After shuffling some ingredients around on the pantry shelf, I discovered that I had forgotten to buy vanilla almond bark AND chocolate almond bark. Dang it!

Substituting white chocolate chips was supposed to be the solution to this problem. However, my genius brain decided that the melted white chocolate chips were too thick. The solution to that problem was to melt butter with the chips. This is a solution if you melt the butter to the same temperature as the melted chocolate before you mix it together, but I didn't do that.


 Nope, I just chunked up the cold butter and stirred it into the melted white chocolate. The chocolate promptly seized. As a watcher of cooking programs, I have seen chefs and cooks say that their chocolate "seized". Now I know exactly what that means. The thick, melted chocolate became a gummy, stiff, granular mass.        
                                                                

Now what? Fortunately, there was a bag of  milk chocolate chips in the pantry. Putting melted milk chocolate on popcorn wasn't my favorite choice, but getting a blog post done caused me to go ahead and follow this plan. The melted milk chocolate chips were thick and going to stay that way!


After stirring the chocolate into the popcorn mixture, I carefully spread it out onto a wax paper-lined tray and put it in the freezer for five minutes like I do with almond bark. Carefully I pulled the tray out of the freezer. The chocolate promptly began to sweat and return to a thick, sticky state. OMG! Now what? Bill was the recipient of a bowl containing sticky, chocolate covered popcorn mix. Then, I dumped the rest of the mess into a repurposed ice cream bucket and went to bed.


Yesterday, I took the lid off of the ice cream bucket and found that in the eighteen plus hours that I had ignore it; the milk chocolate had returned to a solid state on the popcorn. Milk chocolate coated cranberries could be my new food crave! Bill and I ate most of the bucket while watching Grudge Match last night.


Moral to this story:


No almond bark on the pantry shelf means no popcorn mix in the bucket.


Ingredients

Yields about 10 cups of popcorn mix 

  1. 1 - 10 oz. bag of Cranberry Nut Trail Mix (main ingredients are dried cranberries, peanuts, sunflower seeds, and dark chocolate chips)                                                                               
  2. 2 - 2.75 oz. bags of  94% Fat Free Microwave Popcorn, popped (about 10 cups)                 
  3. 12 oz. bag of milk chocolate chips                                                                                             
       

Directions

  • Follow package directions and pop the popcorn in your microwave
  • Place popcorn in a large bowl
  • Add Cranberry Nut Trail Mix to the popcorn
  • Melt chocolate according to package directions
  • Slowly stir into the popcorn mix
  • Spread onto a wax paper-lined shallow tray
  • Allow to dry until the milk chocolate is hardened.
  • Put into a large lidded container. I used a repurposed ice cream bucket.

To make some vanilla almond bark coated yumminess follow the recipe for my original popcorn post.


Wednesday, August 21, 2013

Wild about Reading Bulletin Board


Window or bulletin board display for elementary school.


Wild About Reading and Math Display

  • Green party plates, small, two packs                
  • Monkey party plates, one pack                        
  • Green upper case lettering, one pack                
  • Red lower case lettering, one pack                  
  • Clear double sided tape and/or clear scotch tape

This is an economical and quick display to assemble!
 
 For the letter tiles, my coworker and I used pieces of scotch tape that we rolled into small cylinders to place the lettering onto the party plates. The plates were placed on the inside of the window with clear double sided tape.

Friday, January 25, 2013

Double Duty Snowmen Bulletin Boards

I browse my way through catalogs, magazines, EBay, Pinterest, and other websites on a daily basis. Flipping through pages of all sorts, scanning pictures, and reading combine in a curious way inside the storage files of my mind.  My creative brain sifts through information from unrelated sources and combines these bits and pieces into a new idea. For example, making flowers from coffee filters and making a cupcake bouquet somehow gave birth to the idea of using flattened cupcake liners to edge a bulletin board. Before that, the picture of letter tile paper plates and wrapping Christmas presents inspired me to use wrapping paper for quilt block squares on a bulletin board. Below are pictures of the two bulletin boards that I assembled for a hallway bulletin board that is close to the elementary office. I hope that these two ideas will help and inspire you to new creative heights of your own.

December to January Snow Secret Bulletin Board

It's Snow Secret We're A Great School!

Supplies

  • two rolls of gift wrap from a dollar store
  • 3 dinner size party plates
  • 2 dessert size party plates
  • 2 or 3 sheets of black and green construction paper
  • orange marker for snowman nose
  • black marker for snowman buttons, eyes, mouth, and "stitching" around squares
  • scissors
  • stapler
  • scotch tape
  • computer and printer

I typed the headline on my computer, printed it, and trimmed each page to the size I wanted. If your computer or printer has a banner setting that would make this job less time consuming.
The font is called LD SNOW
Font size needs to be set at a minimum of 200.

Verna M. Kelly Snowflake Quote
Snowflakes are on of nature's most fragile things, but just look what they do when they stick together

I wasn't happy with the size of the quote that you see in the picture, so I reset the font size on my document and redid it.


Snowmen were created by turning party plates upside down and drawing buttons, face, and nose with markers.
I didn't use a pattern for the scarfs, arms, or hats. The hats are cut from a 8.5x11.5 inch sheet of construction paper. I free handed the bowler and top hat with a pencil. The hatbands are held in place with rolled tubes of scotch tape. I fringed the ends of the scarf by snipping the end with scissors.

Assembly

  • White paper covered the bulletin board. I cut snowflake gift wrap into fourteen, 12" "quilt"squares and the snowman gift wrap into 2" strips for the boarder. Using the printed grid on the reverse side of the gift wrap made this an easy job.
  • Start at the bottom left of the board and place your first row across the bottom of the bulletin board.
  • Use your bottom row for a guide to place the second and third row. I placed all the full squares first, then placed the squares that had to be trimmed to fit.
  • I stapled the snowmen heads and bodies first, then slid the "twig" arms under the plate rims and stapled them into place. Hats and scarfs are also stapled into place.
  • Staple headline and quote into place.
  • Using a black marker, draw 'x' stitches around each quilt square. You don't have to, but it does make for a much nicer bulletin board.
  • Last, staple border into place.

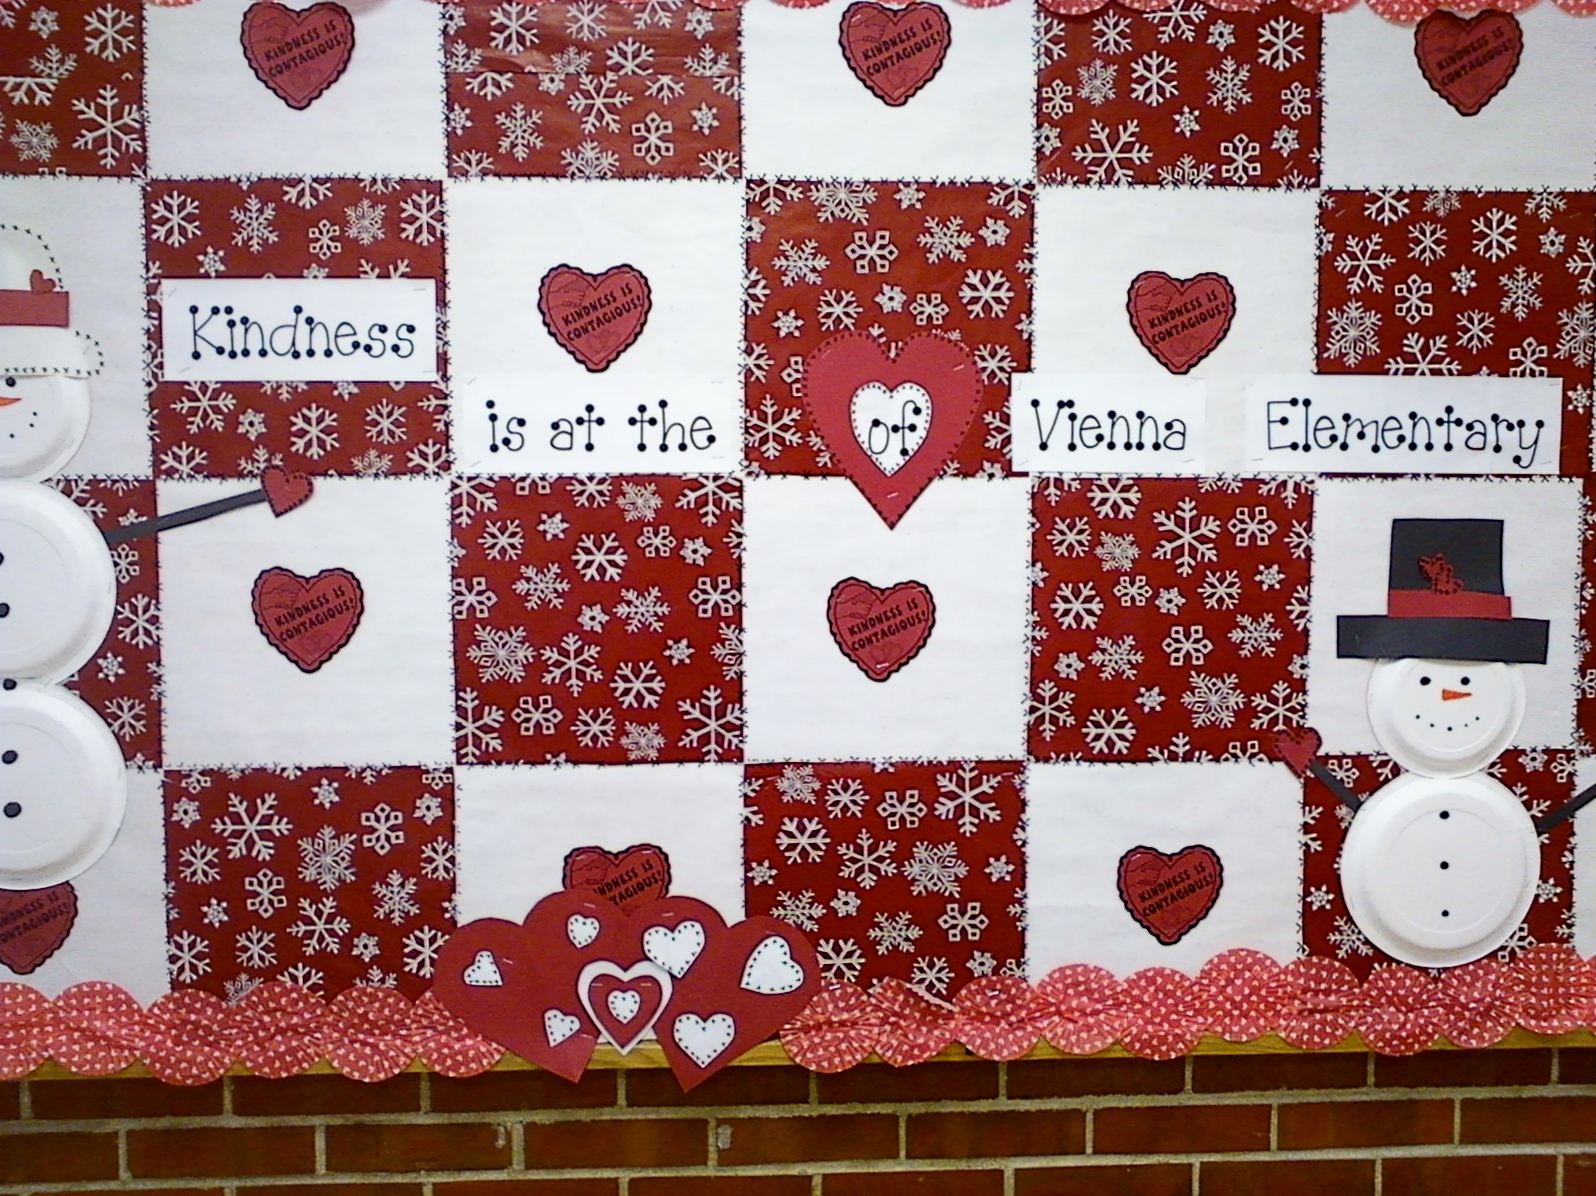
February to March Kindness Bulletin Board


Supplies

2 packages of 40 cupcake liners, red with white hearts
About 6 sheets of red construction paper.
2 sheets of white copy paper


Assembly

  1. Remove the snowman border from the bulletin board and throw away. Carefully remove the snowman hats and save for reuse.

  2. I found a black line master of a heart that read, "Kindness in Contagious".  I enlarged the pattern 120%  so the hearts are about 3.5" and made fourteen hearts. Next I cut them out.
  3. Using the green bowler hat for a pattern, place it on a sheet of white paper and trace around it. Cut out the white hat. Make a red hat band with a narrow strip of red construction paper. Use tubes of rolled scotch tape to place it on the white hat. Use a black marker and draw small X's along the edge of the hat for contrast "stitches" Replace the green hatband on the black stove top hat with red paper also.
  4. On a computer,  set up a word document using landscape, narrow margins, my font is LD Dots 200 font or use a size that will fit the word kindness on a single sheet of paper. Type your headline,  Kindness is at the heart of (Name of School). Then trim your sheets of paper into strips.
  5. Fold a sheet of red construction paper in half and cut a heart shape starting at the fold line. You will need three of these large hearts. Cut 5 or six small red hearts and  six white hearts. Using  bulletin board pictures as a guide, place your hearts as shown. Draw small black X's for stitching around the hearts that decorate the snowman hats and the heart each snowman is holding.
  6. Staple hats onto snowmen. Staple a heart onto one hand of each snowman.  
  7. Use flattened cupcake liners for your border. I placed a heart arrangement in the center of the bottom border. If you don't want to do this, purchase 3 packages of cupcake liners.