Showing posts with label Christmas. Show all posts

Saturday, December 24, 2016

Cocoa Drop Cookies

Holiday cocoa drop cookies dipped into vanilla almond bark and sprinkled with .....Christmas sprinkles!
Bill ate one of these cookies and he LOVED the vanilla bark side!
He's my official taste tester and fellow lover of sweets. In fact, he would be happy if I dipped the WHOLE cookie in almond bark. 

However, I love the contrast between the dark chocolate of the cookie and the white of the almond bark side.

Personally, I like using almond bark in place of chocolate because it is so easy to use. 
Just pop two or three squares of almond bark and 1 tsp solid vegetable shortening into a small deep bowl and microwave in 30 second bursts and stir until the bark is melted and smooth. 
You are ready to dip cookies!

Yield: about 4 dozen cookies
Time: 1 hour chill time          8-10 minute bake time for each cookie sheet of cookies.

Ingredients
  • 1 cup sugar 
  • 2/3 cup salted butter, softened
  • 1 egg
  • 1/2 cup cocoa powder
  • 1/3 cup water
  • 1 tsp. vanilla extract
  • 1 3/4 cup all purpose flour
  • 1/2 tsp. baking soda
  • 1/2 tsp. salt
Directions
  • Place sugar, butter, egg, water, and vanilla into a medium size bowl and mix until blended.
  • Stir in flour, cocoa powder, baking soda, and salt. Stir until mixed well.
  • Cover bowl tightly and chill in the refrigerator for about an hour.
  • Preheat oven to 400 degrees Fahrenheit. 
  • Drop dough by rounded teaspoonfuls about 2 inches apart on to an ungreased, or parchment paper lined cookie sheet. 
  • Bake until almost no indentation remains when touched, with is about 8-10 minutes. 
  • Immediately remove from the cookie sheet and cool.
Dipping the Baked Cookies
  • Once the cookies are cool, melt 3-4 squares of vanilla almond and 1- 2 tsp. of solid vegetable shortening in a small, deep bowl, following the package directions. I wing it and put the ingredients in the bowl and microwave in 30 second bursts and stir in between the bursts until the almond bark and shortening are melted. 
  • Dip each cookie into the bark, shake off excess bark, and add sprinkles. My method consists of pouring the sprinkles into a soup bowl and holding the dipped cookie over the bowl as I sprinkle the decorations on each cookie. This is a great job for the kids! 
  • Set dipped cookies onto a parchment paper lined cookie sheet. 
  • When the cookie sheet is full of dipped cookies, put the cookie sheet into the freezer for 5 minutes to set the vanilla bark.
  •  Remove cookie sheet from the freezer and cookies are ready to start packaging.
Enjoy eating some homemade happiness on a plate! 

Monday, December 12, 2016

Redeemed Riders 2016 All-Buttercream Christmas Party Cake

At the Christmas party, 
our friends and CMA family gathered around the cake table to look at the holiday cake. As a hobby baker, I appreciate the many compliments that the decorated cake received. Yes, in my opinion, the compliments paid for the hours I spent on making, baking, and decorating the party cake.  
The Christmas Party Cake
A two layer cake that is half white cake, half devils food chocolate with a strawberry buttercream filling. Five rows of petals and a ruffled border decorate the cake sides. 
My first time piping greenery onto a cake. 
With a #104 petal tip, I made pine cone roses and rose leaves. Other decorator tips that I used were a #233 grass tip for the pine needles and a #5 piping tip for the trios of small red berries. 
Frosting Colors
For the rose leaves and pine needles, I used Wilton leaf green, Wilton copper, Wilton brown,and a drop of Americolor black gel food coloring to achieve the various colors. A mix of Wilton burgundy and Americolor super red, gel food coloring was used for the ruffle border, side petals, berries, and lettering. 


Tutorial Videos for the Visual Learner
I am a visual learner, which means video tutorials are the perfect way for me to learn new piping techniques. There are several tutorials that I have watched multiple times before practicing the demonstrated techniques that I used on this cake and I want to share that information with you.
  1. Liz Larson's Elk and Pinecone Cake - https://youtu.be/PZAUsVRpxQw
  2. Olga Zaytseva's BC Red Roses Wreath Cake - https://youtu.be/_mxUIt-t2MA
  3. Olga Zaytseva's BC English Roses Wreath Cake - https://youtu.be/kvae1rb1ZS0
  4. Brigitte Fultz's Petal Technique - https://youtu.be/WASVWn4nN6w
Dare to challenge yourself to become a better cake decorator! Honestly, you can be a self-taught cake decorator by watching these videos and practicing the techniques you see. 

Wednesday, December 23, 2015

Gingerbread Snowmen, Snowflakes, and Stars


Snowflake snowmen, star snowmen, and gingerbread snowmen are the theme for my 2015 Christmas gift plates. 

I have been waiting since January to create these adorable snowman cookies. 

Why January you say? In January, I saw a plate of star shaped and snowflake shaped snowman cookies on Pinterest. Seriously, I fell in love with a plate of snowman cookies.

To create my Christmas plate of cute cookies,
I made a double batch of holiday sugar cookie dough, a double batch of homemade gingerbread cookie dough, and one batch of old-fashioned royal icing that was somewhere between piping and flow consistency for decorating. Old-fashioned royal icing means I used real egg whites and lemon juice. 

At the end of my baking and decorating, I had 10 plates with 1 dozen cookies on each plate.

Plus, I made stocking stuffer snack bags for our grandchildren, nephews, and nieces. Each stocking stuffer snack bag holds one gingerbread snowman and one sugar cookie snowman.

Sallee B's Go To Recipes
Roll out sugar cookie recipe      Click Here
Gingerbread cookie recipe        Click Here
Royal icing recipe                      Click Here

Note: I did not use molasses in the gingerbread cookie recipe. As a substitute, I used butter pecan pancake syrup. The dough will be a little softer and has to be chilled at least two hours. 

The picture below shows the cookie cutters that I chose. 
Cookie cutter sizes starting at the top left: 
  • 3 inch gingerbread cookie cutter
  • 3 inch five point star cookie cutter
  • 3 inch Christmas tree cookie cutter
  • 1.5 inch snowflake cookie cutter
  • 2.5 inch star cookie cutter
Decorating with Zip Top Bags
I did not use any decorator tips on this baking project. I did fill 1 pastry bag with white royal icing and two snack size, zip top bags with  orange and black royal icing. With a small pair of scissors, I snipped the end of each bag. Make sure you barely snip the corner, or tip, of each bag because if you snip too much off, the royal icing will make a gloppy, wide line. Not telling you how I know this. lol...lol

Frosting the Sugar Cookie Snowman Stars, Sugar Cookie Snowflakes, and Gingerbread Snowmen
  1. Outline the cookie with white icing
  2. Pipe a few lines onto the cookie, inside the outline, to partially cover it.
  3. With a short, thin bladed knife, carefully spread the icing to cover the cookie inside the outline. Add more icing if necessary I used a dollar store paring knife. 
  4. Let frosted cookies dry until the icing is hard. Royal icing dries FAST.
  5. Use a dot of black icing to form eyes, mouth, and buttons. I used five dots for each snowman's mouth. 
  6. Add an orange dot and line for the nose. Mine are vaguely triangular. I made a dot, then added a small line to shape each nose. 
  7. Let dry until frosting is hard. 
Decorating the Sugar Cookie Stars and Sugar Cookie Christmas Trees
  1. Pour desired sprinkles into a soup bowl
  2. Outline a cookie with royal icing. Add icing lines anyplace you want sprinkles to adhere.
  3. Hold the cookie over the soup bowl and drop sprinkles onto the wet icing.
  4. Repeat until all of the cookies are outlined with sprinkles. 
I spread a thin coat of icing on the top of a few stars and then applied sprinkles onto the cookies. Personally, I like the sprinkle outlined cookies better than the cookies with a solid coating of sprinkles. 


Wednesday, December 16, 2015

You Rock! Christmas Treat Bag


Last year, my sister Nan sent me a jar of what looked like gravel. Bill and I eyed the jar of rocks trying to figure out why my sis would send me a jar of rocks. 

Finally, I picked up several nuggets of "rock" and smelled them. 
"Chocolate" is what my nose told my brain. Trusting my sense of smell, I popped the "rocks" into my mouth and let them sit in my mouth for a short while. Yep, my nose was right and what my sis had sent me was a jar of  candy coated, chocolate rocks. 

This year, I found a great deal on one pound bags of gluten free, Choco Rocks and decided to make You Rock! Christmas treat bags for the elementary students that I work with. Personally, I think this is a very cute way to send a positive message to students. Candy slogans appeal to the kid in me, too. 
  
Note: I used 1/3 cup of Choco Rocks for each treat bag and a one pound bag will fill about 7 snack size, treat bags.  

To make your own treat bags you will need the following materials:
  • snack size, zip top bags
  • 3x5 index cards
  • Christmas gift labels
  • bows
  • Choco Rocks
  • red and green permanent markers
  • stapler
To Assemble
  1. Fill out the 3x5 index cards. 
  2. Add a square gift label and bow to each card.
  3. Put 1/3 cup of Choco Rocks into each gift bag and zip closed.
  4. Staple each decorated index card to the top of each zip bag.

Tuesday, December 15, 2015

Sparkling Gooey Lemon Cookies

I am from Missouri, home of the Gooey Butter Cake. 
Of course, it didn't take long for a cookie version of Gooey Butter Cake cookies to arrive on the food scene. Yellow cake mix, butter, and cream cheese make these cookies addictively good. Plus, they only use five ingredients. How sweet is that? 

Sparkling Gooey Lemon Cookies are a variation of the Gooey Butter Cake cookies. The main difference is using a lemon cake mix in place of the yellow cake mix. I LOVE these lemony, rich, and decadent cookies that are drizzled with a tangy sweet lemon frosting and a slight crunch from the sparkling white decorating sugar. As always, these cookies have been husband tested and approved. 

Yield: about 4 dozen cookies  

Preparation Time: 15 minutes to make dough and about 30 minutes to chill the dough

Ingredients
1 - 8 oz. package cream cheese, softened
1/2 cup, or 1 stick of unsalted butter, softened
1.4 teaspoon vanilla
1 medium egg1/4 
1 box lemon cake mix


Directions
  • Preheat oven to 375°F.
  • In medium bowl, beat cream cheese and butter with spoon until well blended. 
  • Stir in vanilla and egg. Add cake mix; stir until well combined 
  • Chill dough for about 30 minutes, or until the dough can be handled easily
  • Shape 1 level Tablespoon of dough into a ball; roll in powdered sugar to coat.
  • Repeat above step until your cookie sheet is full
  • Place 1 inch apart on ungreased cookie sheets. I use parchment paper to line my cookie sheets. Then it is simple to transfer an entire tray of hot cookies unto the cooling rack.
  • Bake 10-12 minutes or until set. 
  • Remove from cookie sheets to cooling racks.
Easy Lemon Drizzle Frosting
This is where I LOVE having my cookies on parchment paper. Just slide the sheet of cookie laden parchment paper from the baking sheet to the cooling rack and from the cooling rack to the table top, or work surface. Then, the cookies can be drizzled with frosting and sprinkles while they are still on the parchment paper. This makes for a quick and easy cleanup once the frosting has set.


Ingredients
1 cup of powdered sugar
1-1/2 to 2 Tbsp. lemon juice, or bottled lemon juice
sparkling white decorating sugar.

  • Mix all of the ingredients in a small bowl with a spoon. 
  • Drizzle frosting back and forth across cooled cookies and then use sparkling white decorating sugar. 
Easy isn't it? Homemade happiness on a plate was never so easy! 


Wednesday, December 9, 2015

SalleeB's Christmas Wreath Cupcakes

Christmas 2015 is almost here!
Frosting, two frosting tips, and sprinkles are all you need to create these gorgeous, holiday cupcakes. Listed below are the seven steps to turning a baked cupcake into a festive, Christmas dessert.
2. Frost with a base coat of butter cream frosting   Click here for frosting recipe
3. With a #32 open star tip, pipe leaf green frosting stars around the outside edge of each cupcake with a #32 open star tip. 
4. Pipe a few frosting stars that slightly overlap the first row to give each wreath a fuller, more natural shape.
5. Carefully sprinkle the white center of each cupcake with sparkling white sugar.

6. Pipe red frosting ornaments with a #7 piping tip.

7. Carefully sprinkle each wreath with your choice of Christmas sprinkles.

Enjoy eating some homemade happiness on a plate! 


Monday, December 15, 2014

Sallee's Sugar Cookies - A Cookie Exchange Winner!

The two zip bags of cookies were for my coworker, Carrie. Carrie is a big fan of my sugar cookies.
Deck the cook with a flowered apron Fa la la la la, la la la la
Bake the fav'rit'  Christmas cookies Fa la la la la, la la la la


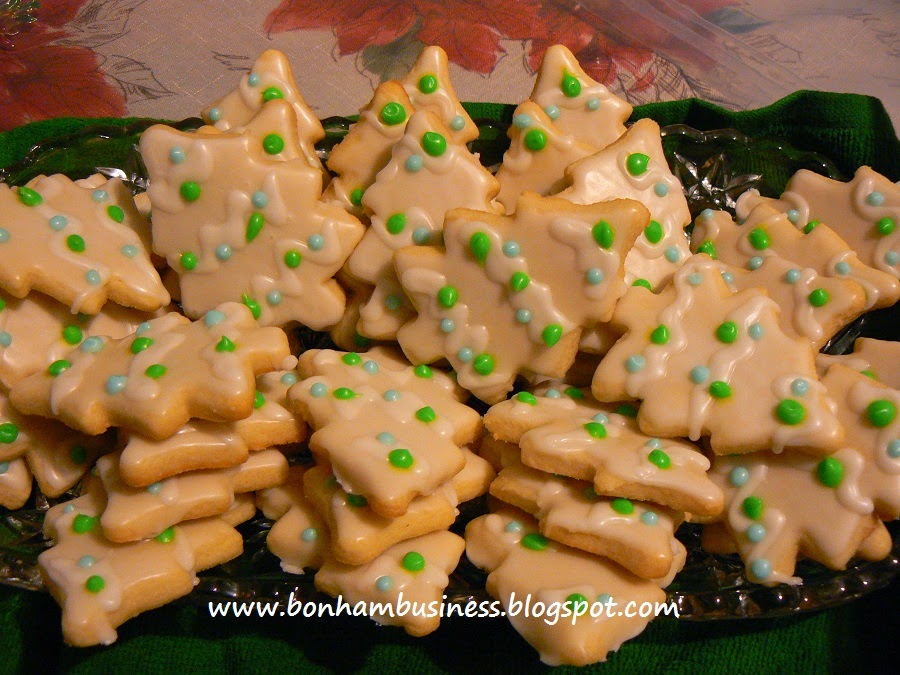
Roll out sugar cookies. Yep, I decided to take my classic, holiday sugar cookies to the cookie exchange at work this year. In addition to using the traditional cookie recipe, I decided to make my favorite shape of all time, Christmas trees. 
This year, twenty-seven of my coworkers brought three dozen cookies to the cookie exchange. The cash prizes were a great surprise!


Yes, I am a Christmas tree lover. The variety of decorating schemes for Christmas trees are endless! This love of decorating Christmas trees, includes making and decorating Christmas tree cookies.

Inspiration for this year's cookie exchange Christmas tree cookies was found over at Bakers Royale. Blogger Naomi Robinson's gorgeous white on white Christmas tree cookie pictures provided the decorating scheme for my cookies. 
  • Thinned frosting was spread on the cookies with a butter knife. 
  • The frosted cookies were placed on a cooling rack that was sitting on a baking sheet to collect drips.
  • The frosting was glossy and set in about twenty minutes. 
  • Then the garland and decorations were piped on.
  • White garland and green "ornaments" were piped on with a pastry bag that had the tip snipped.
  •  The blue ornaments were piped on with a #2 piping tip and pastry bag. 


For the cookie and frosting recipes click on the link:  Sallee's Sugar Cookies