Wednesday, November 30, 2016

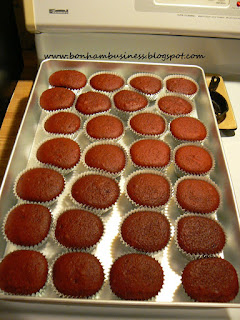
Selling Cupcakes at a Community Marketplace Event

A local organization is hosting a community marketplace on the first Saturday of December. 
Their community marketplace event began several months ago, but this will be my first time to participate by selling cupcakes.

Do you have trouble picking only four cupcakes to bake? It is terribly difficult for me to make a decision when it involves cupcake flavors and frosting choices.

Impromptu Survey
I tried an impromptu survey on my personal Facebook page to have my friends and family help me pick four cupcake and frosting flavors to make. What I discovered is that everyone has a personal favorite and some were not on my list. lol...lol  The first two cupcakes on my list below were the front runners in my cupcake survey.

My picks are:
  • chocolate with peanut butter buttercream
  • carrot cake with cream cheese frosting
  • pumpkin spice cake with cream cheese frosting
  • sugar-free, marbled chocolate/vanilla cupcakes with a sugar-free vanilla cream cheese frosting.
Packaging and pricing the cupcakes was my next knotty problem. 
I kid you not, I sat with an online baking/pricing calculator, pen, and paper for a couple of hours to figure out how much my total cupcake and packaging cost were per cupcake. Then, I had to decide if my community will pay $1.10 - $1.20 per cupcake. After a great deal of thought, my price point is going to be:

Individual cupcakes - regular $0.90  and sugar-free $0.80
Half-dozen - regular $4.80 and sugar-free $4.40
Dozen - regular $9.00 and sugar-free $8.80

These prices are higher than bake sale prices, but lower than custom cupcake shops. 
More importantly, my costs are covered, I will make a small amount of profit for my time and labor, and someone will be eating some homemade happiness on a plate, or cup in this instance!

Saturday, November 26, 2016

Baking Hen Shoulda Been a Stewing Hen!

The Baking Hen
Wow! I bought a "baking hen" a couple of weeks ago. Note the parentheses, I am being sarcastic
After thawing the frozen bird, I was ready to bake it for supper last night.
And the Meat Thermometer Said...
I baked the hen using a meat thermometer and took it out when it reached the correct temperature for poultry. Pushing gently down on the drumstick of the bird, I found that there was very little yield in that drumstick joint. Quickly, I relocated the meat thermometer from the middle of the breast to the back of the breast by the thigh. Yep, the thermometer still read 160 degrees Fahrenheit. The bird was done.
A Rubber Chicken or a Tough Old Bird?
However, after letting it rest for 20 minutes, my serrated knife acted like I was trying to cut through a firm, rubber ball. After switching to a newly sharpened butcher knife, I managed to cut off some breast meat for supper. The meat was done and wasn't dry, BUT Bill and I had to cut it up with steak knives. Our jaw muscles had a nice workout though.

Laughing through our meal of "tough old bird", we finished dinner and the remainder of the "baking hen" went into a large pot of water on the stove. Once the water started simmering, I tried to stick a fork into the bird every 30 minutes. It took two full hours of simmering to make that hen fork tender!

I am positive I bought the world's oldest baking hen AND it should have said stewing hen on the outside wrapper!

To conclude this post, chicken and noodles will be on the Bonham menu next.

Friday, November 25, 2016

SalleeB's Thanksgiving Pies

Happy Thanksgiving Weekend! 
I hope your 2016 Thanksgiving dinner was, or will be, wonderful. What a marvelous Thanksgiving day Bill and I enjoyed with the girls and their families! 

On Wednesday evening,
I joined Ashley in her kitchen and visited with her while making bread stuffing. 

Ashley has recently started baking from scratch and Momma Sallee gave her a couple of pointers for her apple pie and crust. As a mom and a cook, I am going to tell you that Ashley's apple pie, pumpkin pie, and turkey were perfect. Her boyfriend Scott also cooks and he made the mashed potatoes.

My contribution to the family meal included a cherry pie, cranberry-orange sauce, and traditional, out-of-the-can jellied cranberry sauce. However, as you can see in the picture above, I made a pumpkin pie that stayed at home for Bill and I to eat over the weekend. 

Thanksgiving Day 2016 was wonderful. The afternoon of joking, laughter, eating, and family time is stored in my memory for the rest of my life. I am thankful for such a precious memory.

Recipes

Chill and Thrill Pie Crust - A Never Fail Pie Crust 
                        
I published my go-to pie crust recipe in a post called, "Chill and Thrill Pie Crust." The link to the recipe is below.

Click Here for the recipe. 

Quick and Tasty Cherry Pie

Ingredients

  • 2 cans of cherry pie filling
  • 1/2 tsp. almond extract
  • 1 tsp. cinnamon
  • 1/4 tsp. allspice
  • pie crust for a 9 inch double crust pie

Directions

  • Open the two cans of cherry pie filling. Using a spatula, remove the filling from the cans and put into a 1 quart bowl. 
  • Add the almond extract, cinnamon, and allspice to the bowl.
  • Using a spatula, gently fold the spices and extract into the filling. You want to keep the cherries from breaking apart as much as possible. 
  • Put the filling into a pie crust lined, 9 inch pie pan. 
  • Gently level the cherry pie filling
  • Place the top crust onto the pie and crimp the edges together. 
  • Cut a few small slits into the top crust
  • Put the pie into a 350 degree Fahrenheit oven. Bake for 30-40 minutes.
  • Remove from the oven and allow to cool at room temperature.

Cut and serve up a slice of  homemade happiness on a plate!


SalleeB's Pumpkin Pie

  • 1-14 oz. can of sweetened condensed milk
  • 1-15 oz. can of pumpkin puree
  • 1 large egg and 3 egg yolks
  • 1/2 tsp. salt
  • 1 tsp. ground cinnamon 
Note: 1 and 1/2 tsp. of pumpkin pie spice can be used in place of the cinnamon, ginger, and nutmeg.
  • 1/2 tsp. ground ginger
  • 1/4 tsp. nutmeg
  • one 9 inch pie crust. 
Directions

  • Mix pumpkin and eggs in a one quart bowl until smooth
  • Add all of the ingredients to the pumpkin/egg mixture
  • Mix until blended well
  • Pour into a pie crust lined, 9 inch pie pan
  • Put into a preheated, 425 degrees Fahrenheit oven for 15 minutes before lowering the temperature to 350 degrees Fahrenheit and baking for an additional 30 - 40 minutes. 
To test for doneness
 Insert the blade of a knife into the pie about midway between the center and edge of the pie. Lift the knife and look at the knife blade. If it doesn't have pumpkin on it, the pie is done. 

You may notice that in the picture above there isn't a slit, or hole in the pumpkin pie. I carefully and gently touched the center of the pie with a fingertip. The pie felt firm, the center had expanded upward and was rounded. I judged the pie to be done based on this. My hands are not super sensitive to heat, but I don't recommend that you try my method. 


Saturday, November 19, 2016

Baby Floral Celebration Cupcakes


A coworker is having her second baby. 
After her family reveal party on a Friday night,  I made two dozen celebration cupcakes to take to work on Monday morning. As you can see, Baby Number 2 is a girl!

Start with two dozen of your favorite cupcakes and a batch of your favorite butter cream frosting. 
Divide the frosting into small bowls and tint the desired colors. I used Wilton and Americolor gel food coloring in the following combinations:
  1. pink with a touch of burgundy - blossoms
  2. lemon yellow with a touch of copper - flower centers and blossoms
  3. lemon yellow with a touch of red - orange blossoms
  4. leaf green with a tiny touch of brown - greenery

Note: I used two colors in my pastry bag for the blooms and kept reloading the same bag with frosting.
Decorating Tips Used
1. Wilton 2D tip for the butter cream flowers
2. #5 piping tip for the yellow flower centers
3. #68 leaf tip for the greenery
4. #3 piping tip for writing the "Baby" topper

Steps for Frosting the Cupcakes with Butter Cream Frosting
  1. Using the #68 leaf tip and green frosting, pipe a band of greenery around the outside edge of each cupcake. Note: It is not necessary to frost the cupcakes with a base coat of frosting. I piped the blooms directly onto the bare cupcake tops that were edged with the band of greenery. 
  2. Using the 2D tip and two colors of frosting, cover the top of each cupcake with flowers. To create height, slightly overlap some of the blooms, and in the center of the cupcakes, pipe a bloom or two over the first layer of blooms. 
  3. Fill in gaps between the flowers with the leaf tip and green frosting. 
  4. Using the #5 piping tip, place a small dot of yellow frosting into the center of each flower. 
  5. Carefully place the "Baby" cupcake topper onto each cupcake

How to Make the Baby Cupcake Topper

Ingredients
  • 3 - 4 blocks, or squares vanilla almond bark
  • 1 tsp. solid, vegetable shortening
  • tiny drop of red, gel food coloring
Directions
  • Melt almond bark in a microwave following the package directions.
  • Add a tsp of solid, vegetable shortening and stir into the melted almond bark until it is melted.
  • Add a tiny bit of red gel food coloring to tint the almond bark pink. 
  • Place a sheet of parchment paper onto two baking sheets.
  • Spoon the warm, tinted almond bark into a piping bag that has been fitted with a #3 piping tip.
  • Pipe the word Baby about 26-28 times onto the parchment paper covered baking sheets.Try to hold the tip slightly above the parchment paper as you pipe the word. 
  • Place the baking sheets into the freezer for about 10-15 minutes, or until you are ready to put them on top of the cupcakes. 
  • When completely cooled and solid, gently lift each word from the parchment paper and place carefully onto the frosted cupcakes. 

SalleeB Shares: Subpar Desserts for $16

Hi there. Last night the hubby and I had dessert at a local chain restaurant.
You know the saying, "hindsight is 20/20"? NOW we know ordering dessert was a bad and costly idea. After a lengthy wait, long enough that we thought our order was lost, the two desserts and beverages arrived.
Should've Looked at the Price
Now I do have to say that the hubs didn't look at the menu price because the words "Chocolate Lava Cake" robbed him of his common sense. lol...lol  Chocoholics know what I am talking about don't you? Yes, we are taking part of the  blame for the dessert debacle.
The Hubs Chocolate Lava Cake
Bill's chocolate lava cake looked good except for the two walnut sized scoops of vanilla ice cream. The size of the lava cake actually made the minuscule scoops look even smaller.

Being in tune with the hubs, I knew he didn't like it because he paused after he chewed the first bite of cake once.

He went ahead and ate it, but probably shouldn't have because he told me the ice cream tasted "weird." Also, the "lava" was chocolate syrup drizzled over the cake and maybe a little bit in the center.
My Strawberry Cheesecake
I did look at the menu prices and figured about $4.00 for a slice of strawberry cheese cake would be good. After all, it is hard to mess up cheesecake.

My slim wedge of cheesecake was about two inches wide at the outside edge. Since I am trying to cut calories, it was the perfect size and it taste great!

By comparison, the cheesecake just made the quarter of a cup of  thawed, frozen strawberries and juice look slightly pitiful. Yes, that was what topped that lovely wedge of cheesecake.

Comparing Bill's dessert with mine, mine was the better of the two sweet treats. Cheesecake won over chocolate this time.

The waitress arrived with the bill for our lovely desserts.
Yes, you hear sarcasm. Here is where the hubs went into price shock. Silently he handed me the ticket so I could read it and go into price shock with him.

Chocolate Lava Cake with vanilla ice cream     $6.49 
Strawberry Cheese Cake                                      $3.99
Coffee                                                                   $2.49
Soda                                                                     $2.49
Total                                                                     $15.46  before tax was added. 

Wow! The beverage prices were sky-high!
I am going to rant a little bit here. For $2.49 I can buy two, 2-liter bottles of soda! AND when you fill a glass full of ice you might have 4-5 ounces of soda in your glass. The hubs may have drank 20 ounces of soda. What the heck?  Additionally, my coffee cup might have held about 8 oz. of coffee and I only refilled it once! For $2.49 I should have drank half a pot!

Okay, I am trying to calm down and remember things like overhead that a restaurant has to deal with.

I think what bothers us the most about our dessert experience, is that we could have gone to another local restaurant and eaten a meal with drinks, and dessert for an additional $5.

Sure, the dessert wouldn't have been cheesecake, but the self-serve ice cream and dessert bar would have been infinitely better than Bill's chocolate syrup lava cake and weird tasting ice cream!

Here in the Ozarks we have a lot of  folk sayings and I am going to conclude this post with my Great-grandma's favorite saying:
Don't buy a pig in a poke, or Don't buy something you haven't looked at!