Showing posts with label decorating tip. Show all posts

Wednesday, May 31, 2017

My First Ever 4 Tier Wedding Cake.

Tier sizes: 12 inch, 10 inch, 8 inch, and 6 inch
Yield: about 100 servings of cake
I volunteered to make a wedding cake for a friend's wedding as my wedding present to her. 
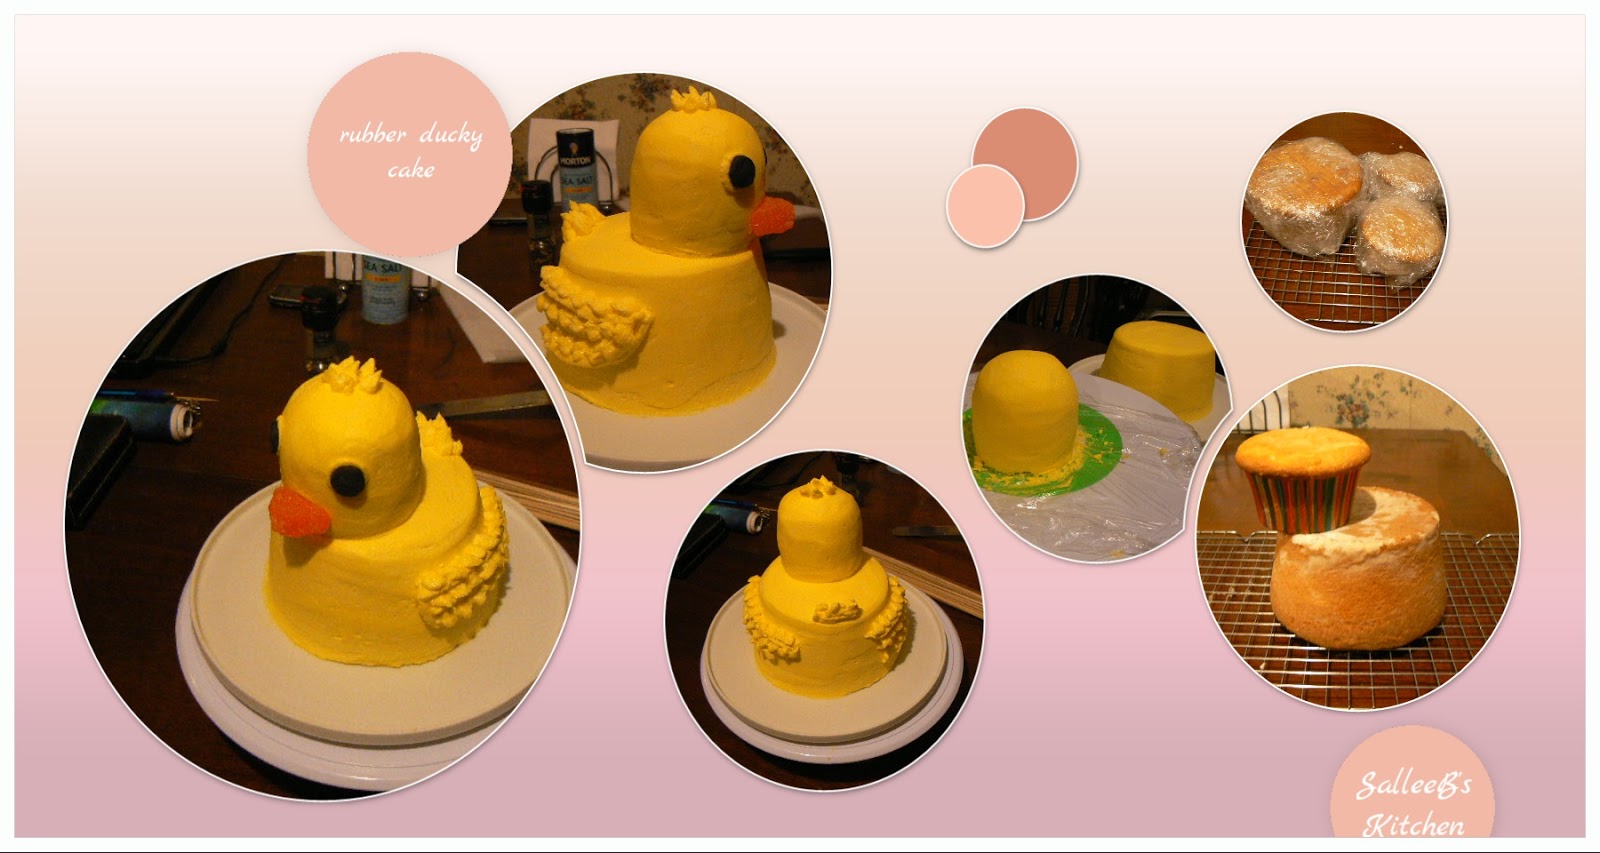
My experience with making wedding cakes is limited to 2 - two tier cakes and 2 - three tier cakes. However this is my first, four tier cake. 
Despite losing electricity for almost eight hours, baking the cake layers went somewhat smoothly until I started baking the 12 inch rounds. After throwing away 3 layers of cake due to fallen middles and falling apart,  I managed to end up with 2 usable layers of vanilla cake.
Why did I have so much trouble with the 12 inch layers? 
After thinking about it, I believe the cake mixes that I bought on sale were old and just didn't bake as well as they normally do. Even the smaller layers had one or two issues, but nothing like the large, 12 inch layers! 

Once the power was restored and the cake layers were cooling, I set about making the buttercream frosting with 10 pounds of powdered sugar, 2.5 lbs of butter, and 2.5 cups of solid, vegetable shortening, 3 Tbsp. and 1 tsp. of vanilla extract, about a quarter cup of lemon juice, and about 1.5 cups of water. 
Like Making Four Cakes of Different Sizes
When I began to work with the two inch layers, I quickly discovered that making the wedding cake was the same as making four, separate layer cakes. Each tier had two cake layers that had to have the tops leveled before they were cut in half, filled with frosting, stacked, and crumb coated with icing. THEN, each tier had a final coat of frosting applied and smoothed. 
Each sunflower was individually piped onto a square of parchment that was attached to a flower nail.
Sunflower petals and buds: Wilton #366 leaf tip
Sunflower centers: Wilton #21 open star tip
Sunflower leaves: Wilton #125 petal tip. 
Cake borders: Wilton #21 open star tip

Sunflower Tutorial


Smoothing Crusting Buttercream
The following tutorial will show you the basics of frosting a cake and then smoothing the crusted buttercream frosting with a Viva paper towel.

  • For best results, wait 10 to 20 minutes after frosting your cake before you begin smoothing the frosting. 
  • If your work area is warm, put the frosted cake into a refrigerator for about 10 minutes before you begin smoothing the buttercream. 

Believe me, it took several attempts before I figured this out for myself!


Sunday, April 2, 2017

Spring Blooms Cake Pictures

An original, SalleeB's Kitchen design for a spring half sheet cake - blooming red bud branches, daffodils, narcissus, hyacinths, and yellow, drop flower clusters.

The daffodil and narcissus blooms are piped using Wilton petal tips #104 and #102. Use a square of parchment paper on a flower nail to shape each blossom. Put the blossoms into the freezer until you are ready to place them. 
The narcissus petals are made using the Wilton #104 tip and the ruffle was the Wilton  #102 tip. 
The green centers were formed with a #3 piping tip.

The red bud branches are made with a Wilton #10 piping tip and the blossoms are a Wilton 2D tip. 
Narcissus and daffodil leaves are formed with a Wilton #352 leaf tip
Hyacinths are made with a drop flower tip. Layer the clusters to get a rounded, 3D look. In the pictures the hyacinths shown have 3 layers of blooms. 

The cake top is textured with the end of a spatula. 
Move the spatula from side to side in about 2 inch, vertical strips, long side to long side of the cake.
Don't measure anything exactly so you can have a more random look. 
The borders are made with a #16 star tip. . 
And that is how to create a SalleeB's Kitchen Spring Blooms cake. 

Saturday, March 18, 2017

Rubber Ducky Smash Cake

Right to Left: Beginning to End
It has been 364 days since my youngest grandson was born! His mom asked me if I would make his smash cake.
Of course I said YES!
Step 1
  • Preheat the oven to 300 degrees Fahrenheit.
  • Make a white cake mix according to the package directions.
  • Grease and flour a 1.5 quart crock pot insert - see the picture below.

  • Put liners for 2 jumbo cupcakes into  jumbo cupcake pan.
  • Filling the jumbo cupcake liners 2/3 full of batter and pouring the rest into the greased and floured cake pan.
  • Cook for 20 - 24 minutes. Check the jumbo cupcakes by inserting a toothpick into the cupcakes about halfway between the edge and center of the cupcakes. If the toothpick comes out clean, your cupcakes are done.
  • Remove the cupcakes from the oven and let cool for about 10 minutes in the pan. Remove from the pan and let cool on a cooling rack. 
  • Cook the cake for another 16 minutes and check the cake for doneness with a bamboo skewer about halfway between the edge and center of the cake. If the skewer comes out clean, your cake is done.
  • Remove cake from oven and cool for 10 minutes before removing it from the pan. 
Step 2

  • After cooling the cake and cupcakes, wrap them in plastic wrap and put them in the freezer until good and firm.
  • Remove wrapped cupcakes and mini-cake. 
  • Cut the rounded tops off of the two jumbo cupcakes to form a flat surface.
  • On one of the cupcakes only, cut off 1/3rd from the bottom end. This will be the bottom of your duck head.
  • Pipe a dam of frosting around the top, outside edge of the trimmed cupcake, then fill with a thin coat of frosting inside the dam. Place the whole jumbo cupcake, topside down, onto the top of the frosting. Apply a thin base coat to the cupcakes and put back into the freezer until the frosting is firm. 
  • Apply a base coat of frosting to the duck head and the mini-cake. Finish frosting the head and the body of the cake. and chill until the duck head can be handled  and attacked to the mini-cake as pictured below. 


Wednesday, March 8, 2017

Cake Pictures for Family

My grandson's 1st birthday smash cake, a rubber ducky cake in all buttercream.

My parents 59th anniversary cake. Sugar-free yellow cake with a super thin base coat of buttercream and tons of buttercream flowers.
Watch for the blog posts about these two cakes.
Homemade happiness on a plate! 

Monday, February 20, 2017

Spring Fever and Piping Practice

Unseasonably warm temperatures have me thinking about spring flowers. 
Yes, spring fever has struck and I succombed to it by making floral cupcakes for the Ladies Tea and Luncheon at church. Spring fever isn't the only reason I made these cupcakes. 

I have been wanting to practice piping buttercream flowers with my new petal tips. 
I did find that piping the flowers individually on a flower nail was time consuming. However, I believe that the end results were worth the amount of time spent piping each purple bloom onto a square of parchment paper on top of a flower nail. What do you think? 
I also piped the daisy/aster blooms indiviually. 

Purple flowers - 104 tip and a 3 tip for the yellow centers
White flowers - 102 tip and a 5 tip for the centers
Green ruffles on the cupcakes - 104 tip
Yellow drop flowers - 224 tip

The Cupcakes
Lemon and strawberry are the two flavors I chose to use in these cupcakes. I purchased a box of each flavor at the local grocery store. After mixing the cake batters, I put about 2 Tbsp. of yellow lemon cake batter in each cupcake liner. Next, I topped the lemon cake batter with pink, strawberry cake batter. A swirled "S" with a butter knife created marbled cupcakes that are pink and yellow. 

I made 2 dozen cupcakes and used the left over batter to make 1-9 inch layer cake. After cooling the layer cake, I wrapped it in plastic wrap and it is in the refrigerator freezer compartment waiting for me to torte it, or slice it crosswise, and to fill/frost with buttercream frosting.


Sunday, January 8, 2017

Rosette Birthday Cake

Cake mix strawberry cake with cream cheese frosting. 10" bottom layer and 4.5" top layer
Cake Pan Hack
Use a removeable, 1.5 quart crockpot to bake a 4.5 inch cake layer. Grease and flour the inside of the small crockpot insert, pour in about an inch and a half of batter, and bake for about 20 - 30 minutes, or until a toothpick inserted into the center comes out with a few crumbs clinging to it.
Wilton 1 tip created large rosettes. Small open star tip for small red flowers. Small leaf tip for the leaves. #5 writing tip for writing. 


Bottom and top layers are split and filled with cream cheese frosting.

Princess coach was made using the mold shown below and melted vanilla bark. The gold is from Wilton color mist, an edible spray. 
Melted vanilla bark held a round toothpick onto the back of the molded candy carriage. 

Wednesday, December 21, 2016

Snowman Cookie Exchange Winner

My adorable snowman cookies won 1st in the Best Decorated category in the annual Christmas cookie exchange at work. 

Sugar Cookie recipe   Click Here  Use a 3 inch gingerbread man cookie cutter
Royal Icing recipe      Click Here  Use clear vanilla extract to get snow white icing. 

Icing Colors
  • Apply the white royal icing with a butter knife and allow to dry for about 20 minutes.
  • Tint a small amount of icing black with Americolor Gel Super Black.
  • Tint a small amount of icing orange with 1 drop Americolor Gel Super Red, and 2 drops Americolor Gel Yellow.
  • Put tinted icing into a small decorator bag. Carefully snip the very end of the bag off. Pipe onto the cookies. 

Saturday, December 17, 2016

Polar Bear Christmas Cake

Blue-eyed polar bear Christmas cake made with American butter cream frosting and a cooking-from-scratch pumpkin spice cake.
Bear Cakes
Bear cakes are a favorite of mine - camo bears, biker bears, and NOW a blue-eyed, polar bear Christmas cake. 
Love how the wreath turned out!

This is a "spur of the moment" cake. 
After arriving home from work at 5:30 PM,  I made the decision to start baking.

I grabbed my bear cake pan, prepped it, and whipped up a pumpkin spice cake to pour into it while the oven was preheating
While the cake was baking, I started thinking about Christmas frosting colors and decorator tips. 
Fur color was easy. I wanted an Arctic white polar bear and a green wreath.

Eye color took a little thought. However, I settled on blue because I knew it would be the perfect pop of color. Then I could add the leftover blue frosting to the bowl of green frosting for the wreath. No waste that way!

I pulled out my decorator tip container and looked through the plastic baggies containing decorator tips. As I looked through them, I thought:
No, not floral flowers or basket weave. Hmmm...maybe the #5 frosting tip for berries, eyes, nose, and paws.For the sides I wanted a LARGE tip that would cover a maximum amount of cake. I picked a Russian tip that looks like an extra large #233 grass tip, the actual #233, and a very small star tip.  
#5 frosting tip for berries and paws. #233 grass tip for the wreath.
Russian Tip was a Fail.

I spent an exasperating 20 minutes trying to pipe fur onto my bear with the Russian tip. 
  • The frosting kept sticking to the tip when I released pressure on the bag.
  • I tried starting on the cake and slightly above the cake. Same results. 
  • Then I tried changing the angle at which I held the bag. Same results. 
After scraping the frosting back off the cake several times,
I switched to a large, 2D tip. Hence, the feathery looking fur. I filled in around the paws, face, and any bare spots left by the 2D tip with a medium open star tip. 


Saturday, November 19, 2016

Baby Floral Celebration Cupcakes


A coworker is having her second baby. 
After her family reveal party on a Friday night,  I made two dozen celebration cupcakes to take to work on Monday morning. As you can see, Baby Number 2 is a girl!

Start with two dozen of your favorite cupcakes and a batch of your favorite butter cream frosting. 
Divide the frosting into small bowls and tint the desired colors. I used Wilton and Americolor gel food coloring in the following combinations:
  1. pink with a touch of burgundy - blossoms
  2. lemon yellow with a touch of copper - flower centers and blossoms
  3. lemon yellow with a touch of red - orange blossoms
  4. leaf green with a tiny touch of brown - greenery

Note: I used two colors in my pastry bag for the blooms and kept reloading the same bag with frosting.
Decorating Tips Used
1. Wilton 2D tip for the butter cream flowers
2. #5 piping tip for the yellow flower centers
3. #68 leaf tip for the greenery
4. #3 piping tip for writing the "Baby" topper

Steps for Frosting the Cupcakes with Butter Cream Frosting
  1. Using the #68 leaf tip and green frosting, pipe a band of greenery around the outside edge of each cupcake. Note: It is not necessary to frost the cupcakes with a base coat of frosting. I piped the blooms directly onto the bare cupcake tops that were edged with the band of greenery. 
  2. Using the 2D tip and two colors of frosting, cover the top of each cupcake with flowers. To create height, slightly overlap some of the blooms, and in the center of the cupcakes, pipe a bloom or two over the first layer of blooms. 
  3. Fill in gaps between the flowers with the leaf tip and green frosting. 
  4. Using the #5 piping tip, place a small dot of yellow frosting into the center of each flower. 
  5. Carefully place the "Baby" cupcake topper onto each cupcake

How to Make the Baby Cupcake Topper

Ingredients
  • 3 - 4 blocks, or squares vanilla almond bark
  • 1 tsp. solid, vegetable shortening
  • tiny drop of red, gel food coloring
Directions
  • Melt almond bark in a microwave following the package directions.
  • Add a tsp of solid, vegetable shortening and stir into the melted almond bark until it is melted.
  • Add a tiny bit of red gel food coloring to tint the almond bark pink. 
  • Place a sheet of parchment paper onto two baking sheets.
  • Spoon the warm, tinted almond bark into a piping bag that has been fitted with a #3 piping tip.
  • Pipe the word Baby about 26-28 times onto the parchment paper covered baking sheets.Try to hold the tip slightly above the parchment paper as you pipe the word. 
  • Place the baking sheets into the freezer for about 10-15 minutes, or until you are ready to put them on top of the cupcakes. 
  • When completely cooled and solid, gently lift each word from the parchment paper and place carefully onto the frosted cupcakes. 

Tuesday, September 20, 2016

Drivin' Down the Road Cupcakes and Smash Cake

Great way to use a number 1 cookie cutter: Gently press the cookie cutter into the frosting and carefully remove it. This will leave the outline of the number 1 and then you can pipe frosting inside the outline. 
Tip - Pipe the number onto the cake first. Then decorate the top of the cake from the center to the edges.
The Road: Pipe four strips of dark gray frosting, side by side, across the cupcake with a #47 basket weave tip with the smooth side up.
The Grass: Use a #67 leaf tip to form the grass on the cupcakes and the smash cake. Hold the pastry bag so that the long slots of the leaf tip are vertical. Pipe and lift to form the grass.
The Road Border and Stripes: Pipe white frosting along the edges of the gray frosting and down the center of the road with a #5 piping tip. 

I used a small, stainless steel pan to make this 5.5 to 6 inch smash cake. 
Decorating the Cake Top
  • Gently press the brim of a large glass into the frosted center of the cake top. This will give you a perfect circle for your track center and road. 
  • Fill in the center with a #67 leaf tip and follow the directions above. 
  • Then pipe the road around the circular edge of the grass with a #47 basket weave tip with the smooth side up. 
  • Having your cake on a lazy susan with greatly help with this part of the decorating. Turn the lazy susan as you pipe around the grass edge.
  •  As with the cupcakes, pipe four side by side strips of dark gray frosting to form the road. 

Candy Bar Car Cupcake and Cake Toppers
  • $3 bag of mini-candy bars - about 27 bars
  • 1 large bag of candy coated chocolate candy - I used about half of the candy. 
  • 1 box of teddy bear graham crackers
  • small amount of semi-sweet chocolate chips. 
  • 1 small pastry bag
Chocolate Candy Glue
I placed about  2 Tbsp. of semi-sweet chocolate chips into a pastry bag and microwaved them at 20 second intervals until they were soft and melted. Then I snipped the very end off the pastry bag. This was my "glue" to hold the candy wheels, steering wheel, and bear halves onto the candy bars. 

I have included the video that I watched before making my teddy bear candy cars.
In the video, it shows cutting the steering wheel candy piece in half and piping on headlights. As you can see, I didn't do this and am perfectly happy with the end results!
For video directions        Click Here

Basic Butter Cream Frosting
This is my favorite butter cream frosting and it will frost 2 dozen cupcakes or 1 - 8 inch cake. For 3 dozen cupcakes and the smash cake I made 2 double batches of frosting and had plenty of frosting for the 6 inch smash cake. The smash cake was cut in half and filled with frosting.
Ingredients
  • 4 Tbsp of salted butter, at room temperature
  • 1/2 cup of vegetable shortening Do not use pre-creamed shortening.
  • 1/2 tsp. of vanilla or other extract
  • 1/4 cup of water
  • 1 lb. of confectioners sugar
Directions
  • Place butter and shortening in a mixing bowl.
  • Beat on low speed for 2-3 minutes
  • Add half of the powdered sugar and extract
  • Beat on low speed until the sugar is almost blended with the butter-shortening mixture
  • Add the remaining powdered sugar and the water.
  • Beat at low speed for 2-3 minutes, scraping sides of bowl once or twice. 
You will need to divide and tint your frosting the colors you want.

Monday, July 4, 2016

The Actual Red, White, and Blue Cake

I am going to quit telling folks my decorating plans for cakes.
I am only going to share the actual cake, cupcakes, or cookies and here is why.


On June 16th, I posted my plans for a three-layer, half sheet cake for a July 1st community program being hosted by our church, First Baptist of Belle.

In the post, Planning a Red, White, and Blue Cake for July, I shared my carefully thought out plan. However, that isn't exactly the cake I took to the program.
White Lemonade, or White Lemon cake is made using a white cake mix. 
  1. Place 2-3 Tbsp of lemon juice into your measuring cup and add enough water to make the amount of liquid called for in the box directions. 
  2. Also, use whole eggs in place of the egg whites.
  3. To use fresh lemon juice and lemon zest   Click Here  for directions
The cake layers and fillings stayed the same with only a minor difference - no lemon zest.

Not a big deal.

However, once I started decorating the giant layer cake, my decorating scheme just disappeared and a totally different cake emerged.

Bill told me the reason this happened. He thinks it is the artist in me. Isn't he a sweetie?

So here are the cake pictures:
Piping a greeting is getting easier for me - I'm not shaking like a leaf and panicking - but it still is not anything to brag about. I used a Wilton #5 tip. 
I decided to try the petal frosting technique on the cake sides. Instead of using a small spatula, I used a teaspoon. It took me about an hour to frost all four sides of the cake and this is the first time I have done this. 
Narrow end of the cake - I used a #125 Wilton petal tip with the wide end toward the cake to make the red ruffled border. 
Corner detail -  I used a #32 Wilton open star tip to pipe a red star in each corner. I started the ruffle at each star. The random red and blue drop flowers were formed with a ##224 Wilton tip.
I was very pleased with my cake. The sides were beautifully straight. The corners were sharp and the petal technique went around the corners in an unbroken line. 

What does it take to make a cake this size?
6 boxes of cake mix - two for each layer
15 eggs
3 cups of canola oil
8 lbs. of powdered sugar
1.5 lbs of butter
about 4-5 cups of shortening
1 cup of strawberry puree
2 pints of blueberries
1 tsp of raspberry extract
about one cup of lemon juice
Americolor super red and royal blue gel food coloring. I love the fact that Americolor puts their gel coloring in a squeeze bottle. 

Strawberry Lemonade Frosting                   

Ingredients
  • 1/2 cup strawberry puree - I made mine using thawed, drained frozen strawberries and blending in a mini food chopper.
  • 2-3 Tablespoons lemon juice
  • 1 cup shortening
  • 1 stick butter, softened
  • 2 lb bag of powdered sugar
Directions
  • Beat shortening and butter together in a large mixing bowl just until blended well, about 2-3 minutes.
  • Add 2 Tbsp. of lemon juice and half of the powdered sugar. 
  • Beat on low until the ingredients are almost smooth.
  • Scrape the sides of the bowl with a large spoon or spatula once or twice. 
  • Add the remaining sugar, the strawberry puree, and another Tablespoon of lemon juice.
  • Beat on low until the ingredients form a smooth, thick, frosting. No more than 3-4 minutes usually. 
Note: If you think the frosting is too thick, add an additional Tbsp. of lemon juice, or water. It depends on how your frosting tastes.If you think it has enough lemon, add water to thin it down. 

Monday, June 27, 2016

Naked Wedding Cake Cookies and Heart Cookies

Yes, we wore clothes.The wedding cookies are naked, not the wedding party. 
My daughter, Cassie wanted a destination wedding in the Colorado mountains about an hour and a half from where my sis lives in Greeley, Colorado. 
Greeley, Colorado just happens to be about 800 plus miles from central Missouri. 

Cassie wanted rustic simplicity with immediate family members.

No fancy dress. 
No reception hall. 
No catered meal. 
No wedding cake. 

Rustic, simple, and outdoors was what she wanted. 
However, she did tell me I could make my sugar cookies for the simple, outdoor meal she wanted us to share.

Naked wedding cakes gave me the idea for making three tier, naked wedding cake cookies.

Graduated, square cookie cutters used to make the tiers for the wedding cake cookies.
Double heart cookie cutter for making the Mr. and Mrs. cookies.
Each square is cut in half cross-wise. This yields two wedding cake cookies.
Hot pan of baked cookies cooling for five minutes before the cookies are removed and placed onto the cooling rack.
Royal icing piped with a #5 decorating tip outlines the cookie tiers.
Royal icing piped with a #5 decorating tip outlines each heart. 
Royal icing flowers and leaves are piped on each tier for a naked wedding cake look. Blooms and leaves are made with a Wilton #16 star tip and a #67 leaf tip. 
 Each double heart cookie has a dozen blooms created with the Wilton #16 star tip and a #67 leaf tip. Script writing is done with a #5 decorating tip.

Sugar Cookie Recipe              Click Here            Note: I use 1/2 cup of salted butter
Royal Icing Recipe                  Click Here            Note: I use lemon juice instead of cream                                                                                         of tartar.