Showing posts with label cake. Show all posts

Friday, April 10, 2020

Food Blogger to Day Care Provider to Cottage Food Business AND Volunteer!

It's been quite a while since I last published a post! Life has been busy my friends!
Since I retired in 2018, I started watching my two youngest grandsons for my daughter Ashley. About 50 hours a week is dedicated to being at her house watching the boys. This arrangement is working very well for both of us. 

Before I retired
Food blogging metamorphosed into a cottage food business called SalleeB's Kitchen. Remember, happiness is homemade and I'm the happiest baking and decorating sweet treats for special occasions of all kinds.

My daughter doesn't mind me baking and decorating in her kitchen. 
Therefore, I have two totes of cake decorating equipment that stays packed up in the hatch of my Nissan Versa most of the time. I have gotten quite fast at packing additional equipment into the car on baking days! 

Last year I baked 17 dozen cupcakes, 13 dozen cookies, and 45 cakes. 

Some of you might not think this sounds like a lot, BUT that is all of the treats I care to bake and decorate! My goal has never been to run a full-time business. It has always been to supplement my income AND keep it somewhere between a hobby and a part-time pursuit. 

Remember, I am spending about 50 hours a week watching the two grands. 
The oldest started Kindergarten in August 2018 and I am using my 20 years of educational paraprofessional experience helping him complete homework, practice math facts, and read 20 to 40 minutes a day. During school breaks, I also make packets of daily review and practice work. Don't worry though, I have a lot of online learning scheduled in there too. 

As if this wasn't enough, I also help with a church program called Bible Buddies. The Bible Buddies program is once a week for students in K-4th grade and it runs from September to April. There are usually about 28-33 children enrolled in the program. My role is shadowing my older grandson and assisting his group through the three class rotations; music, bible lesson, and crafts/games. 

Are any of you other Grammys keeping up with a schedule like this? 
Be proud of yourself! For me, retirement hasn't been the end of working. It is the end of working for an employer. Now I have a monthly income, supplemental income and every federal holiday and weekend off to go and play! Yes, I am blessed. Well, friends, that catches you up on what I have been doing. I am going to post some baking pictures for you to drool over. I wish you could taste them too!


Sunday, February 25, 2018

Sallee Shares - You CAN Have Edible Black Frosting

This cake was refrigerated overnight.
Note that the black frosting
didn't bleed into the peach or yellow.
This is Americolor Super Black
gel food coloring.
I can achieve a dark black color, but it didn't taste edible. Bitter and yucky is what it taste like. 
How do you achieve a dark black that is edible? Is that top secret information? I found myself thinking so. However, it isn't top secret information. 
I did have to search and read the results of several searches before finding the right search terms to gain the information I was looking for. 
I am going to share the almost-top secret way of gaining an edible, dark black buttercream frosting. 
  1. Start with 2 cups of chocolate frosting. Don't have chocolate frosting on hand? Add 1/2 cup of cocoa powder to white frosting and blend well. Voila, chocolate frosting!
  2. Add about 2 American tablespoons or 30mL of Americolor Super Black gel food coloring. I am always happy with the color and taste of Americolor Super Black.
  3. Add the first tablespoon and blend well. Add the rest of the coloring 1 teaspoon at a time and blend well each time. Remember, you can always add more food coloring, but you can't take out too much! 
  4. When the color is almost as dark as I want it, I wait 30 minutes for the color to deepen. 
Now you know the secret to a super black frosting. Happy decorating! 

Saturday, November 25, 2017

No Bake Pumpkin Cheesecake with Pumpkin Spice Whipped Cream Topping

Yield: One 8" cheesecake
Ingredients
  • 1 no bake cheesecake mix
  • 1/2 cup 100% pumpkin puree
  • 1 Tbsp. granulated sugar
  • pumpkin pie spice
  • 1/4 cup powdered sugar
  • 8 oz. of heavy cream
Directions
  • Follow the package directions on the cheesecake mix, but add 1/2 cup pumpkin puree, 1 Tbsp. granulated sugar, and 1/2 tsp. pumpkin pie spice to the milk called for in the directions. 
  • After mixing the graham cracker crust, set 1 Tbsp. of crust aside in a small bowl. 
  • While the cheesecake is setting up in the refrigerator, pour 1 cup of cold heavy cream into a mixing bowl. 
  • Beat on high until the cream begins to thicken slightly. 
  • Gradually add 1/4 cup of powdered sugar and 1/4 tsp. pumpkin pie spice. 
  • Continue to beat on high until the cream thickens and forms creamy, stiff peaks. 
  • Spoon onto the cheesecake filling and spread evenly. 
  • Sprinkle 1 Tbsp. of reserved graham cracker crust over the top. 
  • Refrigerate until time to serve. 

Enjoy a slice of homemade happiness on a plate!

Saturday, March 18, 2017

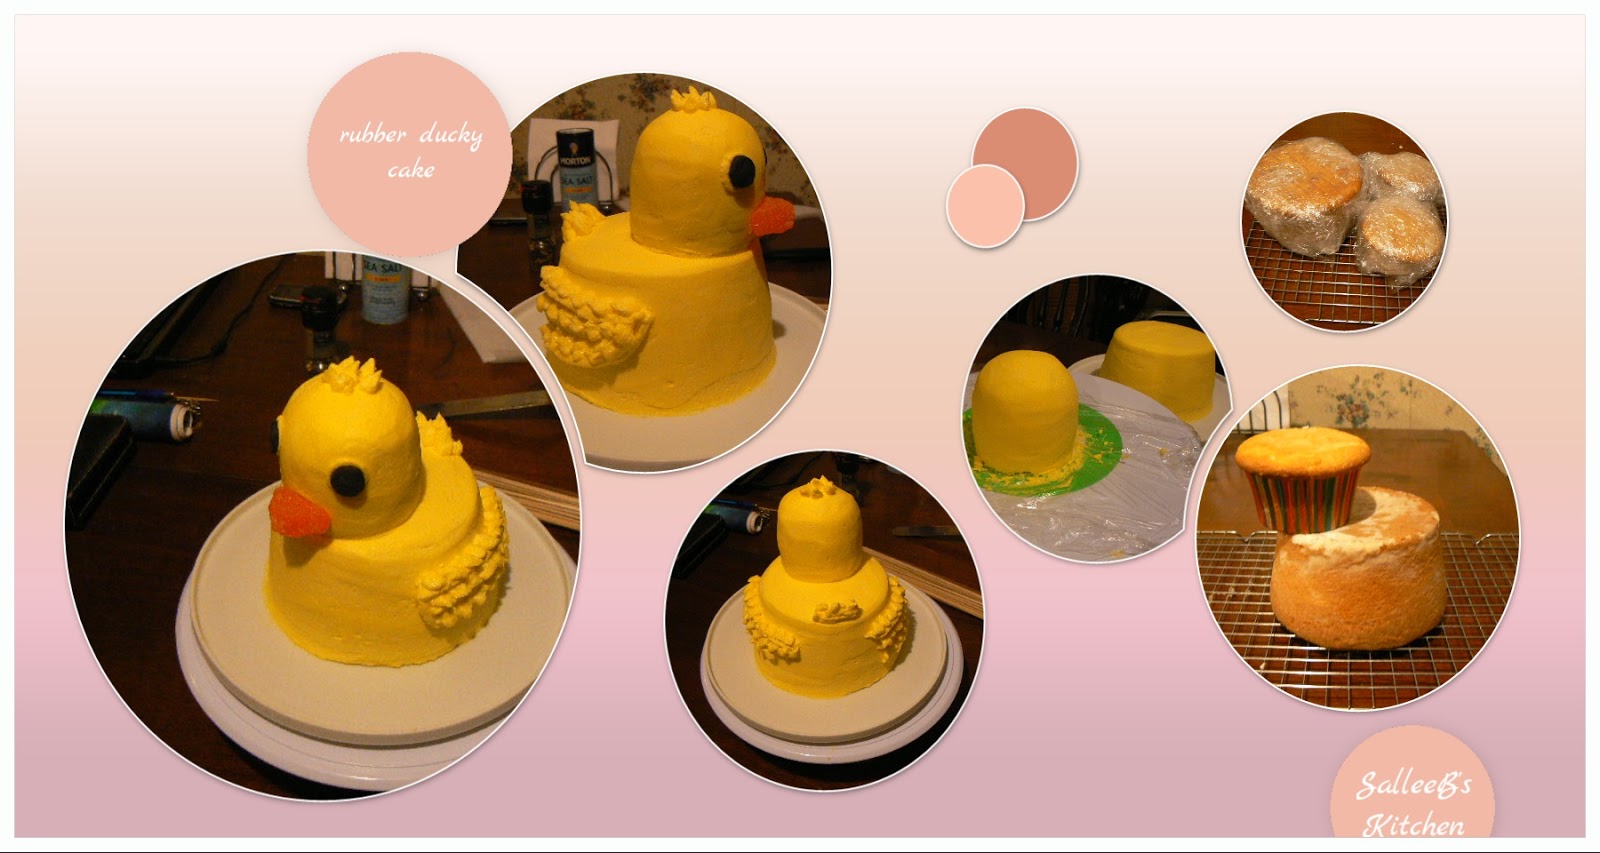
Rubber Ducky Smash Cake

Right to Left: Beginning to End
It has been 364 days since my youngest grandson was born! His mom asked me if I would make his smash cake.
Of course I said YES!
Step 1
  • Preheat the oven to 300 degrees Fahrenheit.
  • Make a white cake mix according to the package directions.
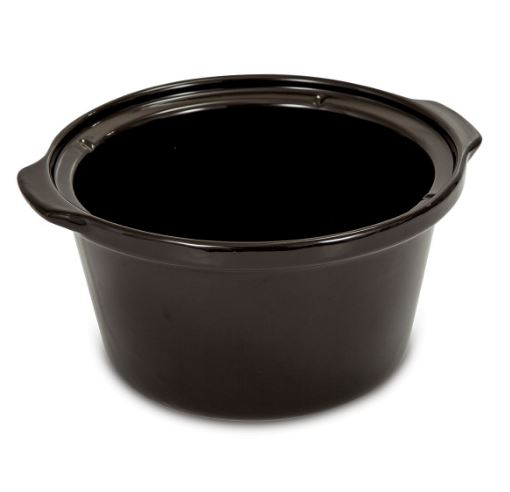
  • Grease and flour a 1.5 quart crock pot insert - see the picture below.

  • Put liners for 2 jumbo cupcakes into  jumbo cupcake pan.
  • Filling the jumbo cupcake liners 2/3 full of batter and pouring the rest into the greased and floured cake pan.
  • Cook for 20 - 24 minutes. Check the jumbo cupcakes by inserting a toothpick into the cupcakes about halfway between the edge and center of the cupcakes. If the toothpick comes out clean, your cupcakes are done.
  • Remove the cupcakes from the oven and let cool for about 10 minutes in the pan. Remove from the pan and let cool on a cooling rack. 
  • Cook the cake for another 16 minutes and check the cake for doneness with a bamboo skewer about halfway between the edge and center of the cake. If the skewer comes out clean, your cake is done.
  • Remove cake from oven and cool for 10 minutes before removing it from the pan. 
Step 2

  • After cooling the cake and cupcakes, wrap them in plastic wrap and put them in the freezer until good and firm.
  • Remove wrapped cupcakes and mini-cake. 
  • Cut the rounded tops off of the two jumbo cupcakes to form a flat surface.
  • On one of the cupcakes only, cut off 1/3rd from the bottom end. This will be the bottom of your duck head.
  • Pipe a dam of frosting around the top, outside edge of the trimmed cupcake, then fill with a thin coat of frosting inside the dam. Place the whole jumbo cupcake, topside down, onto the top of the frosting. Apply a thin base coat to the cupcakes and put back into the freezer until the frosting is firm. 
  • Apply a base coat of frosting to the duck head and the mini-cake. Finish frosting the head and the body of the cake. and chill until the duck head can be handled  and attacked to the mini-cake as pictured below. 


Sunday, January 8, 2017

Rosette Birthday Cake

Cake mix strawberry cake with cream cheese frosting. 10" bottom layer and 4.5" top layer
Cake Pan Hack
Use a removeable, 1.5 quart crockpot to bake a 4.5 inch cake layer. Grease and flour the inside of the small crockpot insert, pour in about an inch and a half of batter, and bake for about 20 - 30 minutes, or until a toothpick inserted into the center comes out with a few crumbs clinging to it.
Wilton 1 tip created large rosettes. Small open star tip for small red flowers. Small leaf tip for the leaves. #5 writing tip for writing. 


Bottom and top layers are split and filled with cream cheese frosting.

Princess coach was made using the mold shown below and melted vanilla bark. The gold is from Wilton color mist, an edible spray. 
Melted vanilla bark held a round toothpick onto the back of the molded candy carriage. 

Saturday, December 17, 2016

Polar Bear Christmas Cake

Blue-eyed polar bear Christmas cake made with American butter cream frosting and a cooking-from-scratch pumpkin spice cake.
Bear Cakes
Bear cakes are a favorite of mine - camo bears, biker bears, and NOW a blue-eyed, polar bear Christmas cake. 
Love how the wreath turned out!

This is a "spur of the moment" cake. 
After arriving home from work at 5:30 PM,  I made the decision to start baking.

I grabbed my bear cake pan, prepped it, and whipped up a pumpkin spice cake to pour into it while the oven was preheating
While the cake was baking, I started thinking about Christmas frosting colors and decorator tips. 
Fur color was easy. I wanted an Arctic white polar bear and a green wreath.

Eye color took a little thought. However, I settled on blue because I knew it would be the perfect pop of color. Then I could add the leftover blue frosting to the bowl of green frosting for the wreath. No waste that way!

I pulled out my decorator tip container and looked through the plastic baggies containing decorator tips. As I looked through them, I thought:
No, not floral flowers or basket weave. Hmmm...maybe the #5 frosting tip for berries, eyes, nose, and paws.For the sides I wanted a LARGE tip that would cover a maximum amount of cake. I picked a Russian tip that looks like an extra large #233 grass tip, the actual #233, and a very small star tip.  
#5 frosting tip for berries and paws. #233 grass tip for the wreath.
Russian Tip was a Fail.

I spent an exasperating 20 minutes trying to pipe fur onto my bear with the Russian tip. 
  • The frosting kept sticking to the tip when I released pressure on the bag.
  • I tried starting on the cake and slightly above the cake. Same results. 
  • Then I tried changing the angle at which I held the bag. Same results. 
After scraping the frosting back off the cake several times,
I switched to a large, 2D tip. Hence, the feathery looking fur. I filled in around the paws, face, and any bare spots left by the 2D tip with a medium open star tip. 


Monday, December 12, 2016

Redeemed Riders 2016 All-Buttercream Christmas Party Cake

At the Christmas party, 
our friends and CMA family gathered around the cake table to look at the holiday cake. As a hobby baker, I appreciate the many compliments that the decorated cake received. Yes, in my opinion, the compliments paid for the hours I spent on making, baking, and decorating the party cake.  
The Christmas Party Cake
A two layer cake that is half white cake, half devils food chocolate with a strawberry buttercream filling. Five rows of petals and a ruffled border decorate the cake sides. 
My first time piping greenery onto a cake. 
With a #104 petal tip, I made pine cone roses and rose leaves. Other decorator tips that I used were a #233 grass tip for the pine needles and a #5 piping tip for the trios of small red berries. 
Frosting Colors
For the rose leaves and pine needles, I used Wilton leaf green, Wilton copper, Wilton brown,and a drop of Americolor black gel food coloring to achieve the various colors. A mix of Wilton burgundy and Americolor super red, gel food coloring was used for the ruffle border, side petals, berries, and lettering. 


Tutorial Videos for the Visual Learner
I am a visual learner, which means video tutorials are the perfect way for me to learn new piping techniques. There are several tutorials that I have watched multiple times before practicing the demonstrated techniques that I used on this cake and I want to share that information with you.
  1. Liz Larson's Elk and Pinecone Cake - https://youtu.be/PZAUsVRpxQw
  2. Olga Zaytseva's BC Red Roses Wreath Cake - https://youtu.be/_mxUIt-t2MA
  3. Olga Zaytseva's BC English Roses Wreath Cake - https://youtu.be/kvae1rb1ZS0
  4. Brigitte Fultz's Petal Technique - https://youtu.be/WASVWn4nN6w
Dare to challenge yourself to become a better cake decorator! Honestly, you can be a self-taught cake decorator by watching these videos and practicing the techniques you see. 

Sunday, October 30, 2016

Chocolate Chip Cake and Starlight Cake with Fall Candy Decorations

The Fall Festival  at church is tomorrow and I promised to bake 6 cakes for the cake walk. Besides cakes for church, I need to bake mini-cupcakes for the Halloween party at work, too.

In most of my cake/cupcake posts, I choose to use boxes of cake mix. Today is different. Instead of cake mix cakes, I chose to use two recipes from my 1985 Betty Crocker cookbook, chocolate chip cake and starlight cake.

Starlight cake is a yellow cake that is made with vanilla extract. The chocolate chip cake uses brown sugar and granulated sugar. The batter does smell like chocolate chip cookie dough!

Maybe because of my cake mix ways, I did not use the shortening called for in the recipes. Instead, I substituted 1/2 cup of canola oil for the shortening, and reduced the amount of milk from 1 1/4 cup to 3/4 of a cup. Personally, I was happy with the batter and my cakes were nice and moist.

Starlight mini-cupcakes with vanilla buttercream frosting. Each cupcake is topped with black and orange sprinkles and two pieces of candy corn. 

Starlight cake with peanut butter buttercream frosting.  The cake is decorated with a candy pumpkin, candy corn, orange/black sprinkles mix, and mini-flower decors. 

Chocolate chip cake with peanut butter buttercream frosting. See the frosting recipe below.

Peanut Butter Buttercream Frosting - This recipe will frost about five single-layer 8" cakes. 

Ingredients

  • 1 cup creamy peanut butter
  • 1/2 cup butter, at room temperature
  • 2 lbs. of powdered sugar
  • about 3/4 cup of milk
  • 3 tsp. vanilla extract

Directions

  • Put butter and peanut butter into a large mixing bowl. Beat at medium speed until the butter and peanut butter is light and creamy. 
  • Add one third of the powdered sugar and vanilla extract. Beat on low speed until the powdered sugar is blended with the butter mixture.
  • Add half of the remaining sugar, and 1/2 cup of milk. Beat on low speed until the powdered sugar is about mixed into the frosting. 
  • Add last of sugar and remaining 1/4 cup of milk. Beat on low speed until sugar is incorporated. If frosting is too stiff, add another Tbsp. of milk and blend at low speed. Then, beat on high speed until frosting is smooth and creamy. 
Chocolate Chip Cake
Yield: 1 - 13x9 cake, or 2 - 8" cakes

Ingredients
  • 2 cups all purpose flour
  • 1 cup brown sugar, packed firmly
  • 1/2 cup granulated, white sugar
  • 3 tsp. baking powder
  • 1 tsp. salt
  • 1/2 tsp. baking soda
  • 1/2 cup canola oil
  • 3/4 cup milk
  • 3 large eggs
  • 1/2 cup semisweet chocolate chips
  • 1 1/2 tsp. vanilla extract
Directions
  • Heat oven to 325 degrees. 
  • Grease and flour your pans. I used disposable pans and skipped this step.
  • Put the flour, sugars, baking powder, baking soda and salt into a large mixer bowl. Stir until well blended.
  • Add all of the wet ingredients to the bowl of dry ingredients. 
  • Mix on low speed, scraping bowl constantly for 30 seconds. Then beat on high speed for 3 minutes.
  • Add chocolate chips and stir into batter.
  • Pour batter into cake pan(s).
  • Bake for about 30-35 minutes, or until a wooden tooth pick inserted into the center comes out clean. 
  • Gently remove  the cake from the oven and place on a cooling rack until cool. 
  • Frost with desired frosting. 

Starlight Cake
Yield: 1-13x9 cake, or 2-8" cakes

Ingredients
  • 2 1/4 cup all purpose flour
  • 1 1/2 cup granulated, white sugar
  • 3 1/2 tsp. baking powder
  • 1 tsp. salt
  • 1/2 cup canola oil
  • 3/4 cup milk
  • 1 tsp. vanilla
  • 3 large eggs
Directions
  • Heat oven to 325 degrees.
  • Grease and flour cake pans. If using disposable pans, you can skip this step.
  • Place flour, sugar, baking powder, and salt into a large mixing bowl. Stir until well blended.
  • Add oil, milk, vanilla, and eggs to the bowl of dry ingredients. 
  • Beat at low speed for 30 seconds. 
  • Beat on high speed for 3 minutes, scraping bowl occasionally. 
  • Pour batter into cake pan(s).
  • Bake for about 30-35 minutes, or until a wooden tooth pick inserted into the center comes out clean. 
  • Gently remove the cake from the oven and place on a cooling rack until cool. 
  • Frost with desired frosting. 
Note: For mini-cupcakes put about 1 Tbsp. of batter into each liner and bake for about 12 minutes. I made 24 mini-cupcakes and 1-8" layer cake from one batch of cake batter. 

Thursday, October 6, 2016

Spiced Pumpkin - Applesauce Layer Cake with Salted Caramel Frosting

I love the flavors in this rustic layer cake. The salted caramel and fall spices make your taste buds jump for joy! Bill thinks this is the best frosting he has ever eaten. He wants it on his birthday cake.
The Pumpkin and Applesauce Cakes
Ingredients
2 1/2 cups all-purpose flour, sifted
2 cups sugar
1 1/2 tsp. baking soda
1 1/2 tsp. salt
1/4 tsp. baking powder
1/4 tsp. cinnamon, heaping full
1/4 tsp. ground cloves
1/4 tsp. all spice
3/4 tsp. pumpkin pie spice
3/4 cup unsweetened applesauce
3/4 cup 100% pumpkin puree
1/2 cup water
1/2 cup canola oil
2 large eggs

Directions
Preheat your oven to 325 degrees Fahrenheit. Grease and flour two, 8 or 9 inch round cake pans.
  • Put the flour, sugar, baking soda, salt and baking powder into a bowl and mix well. Divide the blended ingredients between two medium bowls.
Applesauce and pumpkin puree waiting to be beaten into the dry ingredients.
  • Add 3/4 cup of applesauce to the dry mixture in one of the medium bowls and add 3/4 cup of pumpkin puree to the other bowl. 
  • To the applesauce cake bowl add the cinnamon, ground cloves, and ground allspice
  • To the pumpkin cake bowl add the pumpkin pie spice
Evenly divided dry ingredients with a spices. The left bowl contains cinnamon, cloves, and allspice. The right bowl contains pumpkin pie spices.
  • To each bowl add 1 egg, 1/4 cup of water, and 1/4 cup of canola 
  • Beat each bowl of ingredients on low speed for thirty seconds, and on high speed for about two minutes. Occasionally scrape the bowl sides as you beat the batter.
  • Pour each bowl of batter into a cake pan.
  • Bake for about 28 to 30 minutes, or until a tooth pick inserted into the center comes out clean.
  • Cool the cakes for about 10 minutes in the pans.
  • Remove the cakes from the pans and place on a cooling rack for about 15 minutes. 
Ready to chill in the freezer for about 20-30 minutes.
  • Put the cooling rack with the cakes into your freezer for about 20 or 30 minutes to completely chill.
  • While the cakes are cooling, make the Caramel Buttercream frosting.                           See the recipe below.
  • Once the cakes are completely chilled, you can level and stack the cake.
Leveling, Stacking, and Frosting the Cake
I used 9 inch cake pans which gave me a thinner round of cake. I did not cut the layers in half. If you use 8 inch cake pans, you can slice each cake in half and have four cake layers.
A fine tooth, serrated knife and a cake level help achieve an even layer. 
  • Level the top of the bottom round.
  • Place on a cake plate so that the bottom of the cake layer is facing up
A vintage turkey platter stands in for a cake plate. 
  • Spread with caramel butter cream frosting to within 1/4 inch from the edge.
  • Place the top layer, bottom side facing down,  on top of the frosting.
  • With an angled spatula, spread frosting into the gap between the layers and smooth completely.
  • Spread caramel frosting over the cake top to within a quarter inch of the edge.
  • Swirl the frosting from side to side with the angled spatula
  • Drizzle cool caramel topping across the top of cake in the same direction as the frosting ridges. Allow the caramel topping to drip slightly down the cake sides. 
                        
Caramel Buttercream Frosting 
Yields enough to fill and frost an 8 or 9 inch four layer cake. 
Left over frosting keeps for 2 weeks if covered tightly and refrigerated. 

Ingredients
2 lb. bag of powdered sugar
1 cup of salted butter, at room temperature
1/2 cup of solid vegetable shortening, at room temperature
1/2 tsp. caramel extract
1/2 cup cool water
Caramel topping for drizzling the cake top

Directions
  • Place butter and shortening into a large mixing bowl
  • Cream the butter and shortening together until blended and light colored
  • Add one third of the powdered sugar and blend on low speed until just blended. Scrape the bowl sides constantly
  • Add the caramel extract, half of the remaining sugar, and 1/4 cup of water
  • Beat on low speed until just blended
  • Add the remaining ingredients and beat on low until blended
  • Beat on high for another minute or two until the frosting is blended and creamy.
  • Cover the bowl with plastic wrap and set aside. Keep the frosting at room temperature if layering the cakes immediately.

Tuesday, September 20, 2016

Drivin' Down the Road Cupcakes and Smash Cake

Great way to use a number 1 cookie cutter: Gently press the cookie cutter into the frosting and carefully remove it. This will leave the outline of the number 1 and then you can pipe frosting inside the outline. 
Tip - Pipe the number onto the cake first. Then decorate the top of the cake from the center to the edges.
The Road: Pipe four strips of dark gray frosting, side by side, across the cupcake with a #47 basket weave tip with the smooth side up.
The Grass: Use a #67 leaf tip to form the grass on the cupcakes and the smash cake. Hold the pastry bag so that the long slots of the leaf tip are vertical. Pipe and lift to form the grass.
The Road Border and Stripes: Pipe white frosting along the edges of the gray frosting and down the center of the road with a #5 piping tip. 

I used a small, stainless steel pan to make this 5.5 to 6 inch smash cake. 
Decorating the Cake Top
  • Gently press the brim of a large glass into the frosted center of the cake top. This will give you a perfect circle for your track center and road. 
  • Fill in the center with a #67 leaf tip and follow the directions above. 
  • Then pipe the road around the circular edge of the grass with a #47 basket weave tip with the smooth side up. 
  • Having your cake on a lazy susan with greatly help with this part of the decorating. Turn the lazy susan as you pipe around the grass edge.
  •  As with the cupcakes, pipe four side by side strips of dark gray frosting to form the road. 

Candy Bar Car Cupcake and Cake Toppers
  • $3 bag of mini-candy bars - about 27 bars
  • 1 large bag of candy coated chocolate candy - I used about half of the candy. 
  • 1 box of teddy bear graham crackers
  • small amount of semi-sweet chocolate chips. 
  • 1 small pastry bag
Chocolate Candy Glue
I placed about  2 Tbsp. of semi-sweet chocolate chips into a pastry bag and microwaved them at 20 second intervals until they were soft and melted. Then I snipped the very end off the pastry bag. This was my "glue" to hold the candy wheels, steering wheel, and bear halves onto the candy bars. 

I have included the video that I watched before making my teddy bear candy cars.
In the video, it shows cutting the steering wheel candy piece in half and piping on headlights. As you can see, I didn't do this and am perfectly happy with the end results!
For video directions        Click Here

Basic Butter Cream Frosting
This is my favorite butter cream frosting and it will frost 2 dozen cupcakes or 1 - 8 inch cake. For 3 dozen cupcakes and the smash cake I made 2 double batches of frosting and had plenty of frosting for the 6 inch smash cake. The smash cake was cut in half and filled with frosting.
Ingredients
  • 4 Tbsp of salted butter, at room temperature
  • 1/2 cup of vegetable shortening Do not use pre-creamed shortening.
  • 1/2 tsp. of vanilla or other extract
  • 1/4 cup of water
  • 1 lb. of confectioners sugar
Directions
  • Place butter and shortening in a mixing bowl.
  • Beat on low speed for 2-3 minutes
  • Add half of the powdered sugar and extract
  • Beat on low speed until the sugar is almost blended with the butter-shortening mixture
  • Add the remaining powdered sugar and the water.
  • Beat at low speed for 2-3 minutes, scraping sides of bowl once or twice. 
You will need to divide and tint your frosting the colors you want.