Showing posts with label mixed media. Show all posts

Wednesday, June 26, 2013

Crafting My Way to a Mixed Media Collage - Final Product

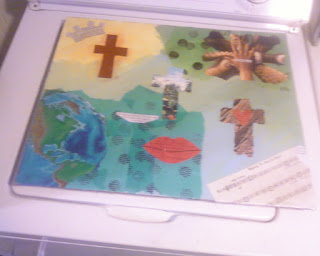
I'm so excited! My mixed media collage is done. After looking at the collage for two weeks, I decided that gold glass seed beads would be the final accent on the canvas. Monday morning, I took out the Mod Podge and beads to complete the collage. Drying time was forty-eight hours.
 
Today, I rummaged around upstairs in the storage room and found a picture frame for my DIY masterpiece. Careful insertion of the canvas into the frame showed that the picture frame glass could remain in the frame. What a pleasant surprise, because I thought the glass gem angel heads would make that impossible. Bill likes the collage. Actually, he was surprised at how well it turned out. My collage is now hanging on the living room wall.
 
 Be brave fellow crafters, take a chance, and craft your way to a mixed media collage!
 
Upper left corner detail showing gold glass bead
Unframed DIY Masterpiece


         All of the crosses have eight to ten gold glass beads accenting the cross ends.
                     
         Star detail with gold glass beads                                                         Midsection to lower right details


Friday, June 7, 2013

Crafting My Way to a Mixed Media Collage - Update 2


Angels, star, blended tissue paper edges.


Details of upper left corner
 

Additions

Last night I used permanent markers to outlined the center cross, lips, and hearts. I used a fine point marker to create a dot pattern just inside the lip lines and heart edges.

The next step was to mix a small amount of Mod Podge with my acrylic paints. I used  regency blue, leaf green, and dark green acrylic paint to cover the raw edge of the tissue paper.
Burnt sienna acrylic paint now surrounds two of the crosses, and the upper right picture. Using the handle of a paint brush dipped in Antique Gold, I applied dots to the upper, red cross and the crown points. Burnt sienna also highlights the diamond pattern on the antique bible cover - cross.

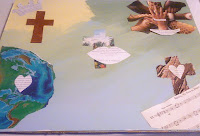
After the paint was dry, I began applying the angels and star with Mod Podge. The angel heads are clear garden gems with white paper glued to the flat back of each one. Rather than use adhesive, Mod Podge was the bonding agent.

What's Next?

The crown - apply dark red, glass beads on top of the gold dots. Outline the crown with a gold paint pen.

Angels - maybe a ribbon detail at the waist of each.

Uppermost cross - Use a gold paint pen to bring out the text "New Testament"

The last step to complete this project will be to apply several coats of a clear medium to seal and even the whole collage. I'm not sure if it will be Mod Podge or clear paint.


Saturday, June 1, 2013

Crafting My Way to a Mixed Media Collage - Update 1

Bill is curious about this project and has asked me what I'm making the collage for. The project is simply for my own satisfaction and enjoyment.  Also, I want to experiment with this type of art project. So far, a large amount of time has been spent on placing the paper pieces and deciding on the most balanced arrangement. I've consulted my original sketch once or twice, but now I'm planning the additional elements that will help to complete my collage.
 
My acrylic paint choices for the collage.

Primary and Secondary Colors

Before I put paint on the canvas, I decided that my primary colors are regency blue, leaf green, pineapple, and white. My secondary colors are Burnt Sienna, Cardinal Red or Real Red, Sandstone, and Antique Gold.


Brushing and Blending the Paint

The naked canvas was a little bit intimidating. Paint by number sets, junior high art class, and walls are the extent of my experience with paint and a brush (roller). Therefore, I just did what I saw a YouTube artist do. I squeezed paint out of the tube onto the canvas and applied my brush to spread it out. Regency Blue was applied to the bottom half, leaf green was brushed onto the top right, and pineapple(yellow) was applied to the top left. More paint was applied until I thought it was okay.
 
Mod Podge was brushed over the dry acrylic paint and further blended the three colors. I was surprised that the Mod Podge also lightened the paint to some extent. Then I left the canvas to dry for twenty-four hours.


Preparing Paper Items
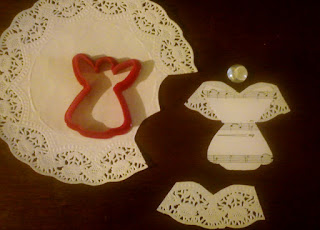
  1. Two coffee filters were dipped into yellow food color and water. The two filters went onto a baking rack until they were dry.
  2. Using Cardinal Red acrylic paint and a little water, I painted the lip shape and one paper heart. Then I placed them on the baking rack with the coffee filters to dry.
  3. My small angel cookie cutter made a great template to trace around for angel shapes. I traced five angels onto the sheet music, cut them out with scissors, trimmed the bottom of the wings with edging scissors, and made another set of wings for the angels with a paper doily.
  4. Next I cut out three crosses using a cross cookie cutter. The paper came from a National Geographic and an antique New Testament cover.
  5. The last item I wanted was a crown and I used a template to trace around. Yes, it was a cookie cutter. Smile.
  6. Using two conversation dot stamps and a black ink pad, I stamped about a quarter of a sheet of green and blue tissue paper. I used a different stamp on each color.

Applying Paper Items using Mod Podge

Aah, how I love the smell of Mod Podge in the morning. (I am laughing as I type this!) Now the last time I did a decoupage project, I was a Junior Girl scout. Okay, quit laughing cause I'm just being honest with you. Actually, I used the white gluey stuff last fall to glue paper circles onto glass gems for a refrigerator magnet project. This morning though I began putting my selection of art objects onto the prepped canvas.
 
  • First I tore one yellow coffee filter into wedges. Then I tore the center circle out of the second coffee filter. Then I just used a brush and my fingers to position each piece until I was satisfied.
  • Torn pieces of the stamped blue and green tissue paper were applied over the corresponding colors on the canvas. I did tell you my experience was with paint by number sets, right?
  • I continued with the Earth shape, sheet music corner, crosses, lip shape, heart, crown, etc.


Using Microsoft Paint for Planning

 
My next step will be to paint highlights, low lights, and blend the edges of the blue tissue paper again with Regency Blue, white, and maybe a touch of True Blue. You can see how well the green tissue paper blended with the painted area. My goal is to add more depth.
 
The picture below shows how I used Microsoft Paint to assist me with placement of text, angels, and adding further paint. This picture is for planning purposes only. The completed collage will be similar, but not identical.


Thursday, May 30, 2013

Crafting My Way to a Mixed Media Collage - The Beginning

Supplies for a mixed media collage
Okay, I like turning candy bars and cookies into floral bouquets for gift giving. Recycling and reusing paper by turning it into wreaths is another endeavor that satisfies my urge to create. Now I should have known that this was leading me in the direction of mixed media art. My brain takes different ideas and blends them into a new project all on its own; mixed media is a natural for me. My friend, Sharon, is an art teacher and she has shown me some of her own mixed media art canvases. All of this has been germinating in my mind for months, but I started researching mixed media collages about a week ago.
First,  I did an online search for mixed media collages. The search showed that YouTube has tons of videos on techniques and DIY tutorials about mixed media collages. After watching two or three, I realized I have all the basics for a mixed media collage.  Paint, paintbrushes, stencils, ink, stamps, ModPodge, recyclable books, magazines, and pictures are all in my crafting room.

After that, Pinterest and Etsy had pictures of completed projects that helped me to decide what direction to go in for a collage. The germinating seed finally took root and an idea began to grow. My collage is going to be faith based. As the seedling idea grew, I reached for my trusty notebook and sketched out the preliminary ideas for a collage.
Preliminary doodles to get ideas for a collage down on paper.

Today was spent exploring my resources. I purchased vinyl letters and a pack of multicolored tissue paper at the dollar store, but the bulk of the things I needed were already on hand.

Right now I am aging the sheet music and scripture page with cold, black coffee. The pages are currently drying on a cooling rack and I am looking forward to beginning my summer art project. Check for updates as this project progresses.