Wednesday, June 26, 2013

Crafting My Way to a Mixed Media Collage - Final Product

I'm so excited! My mixed media collage is done. After looking at the collage for two weeks, I decided that gold glass seed beads would be the final accent on the canvas. Monday morning, I took out the Mod Podge and beads to complete the collage. Drying time was forty-eight hours.
 
Today, I rummaged around upstairs in the storage room and found a picture frame for my DIY masterpiece. Careful insertion of the canvas into the frame showed that the picture frame glass could remain in the frame. What a pleasant surprise, because I thought the glass gem angel heads would make that impossible. Bill likes the collage. Actually, he was surprised at how well it turned out. My collage is now hanging on the living room wall.
 
 Be brave fellow crafters, take a chance, and craft your way to a mixed media collage!
 
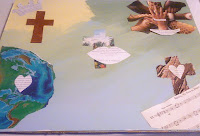
Upper left corner detail showing gold glass bead
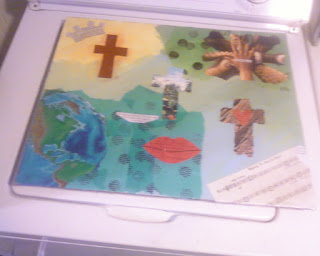
Unframed DIY Masterpiece


         All of the crosses have eight to ten gold glass beads accenting the cross ends.
                     
         Star detail with gold glass beads                                                         Midsection to lower right details


Tuesday, June 25, 2013

Our Favorite Motorcycle Pit Stops: Rolla, MO to Chandler, OK

A year ago, Bill and I started traveling this route on our motorcycles once or twice a year. I want to share our favorite stops along Interstate 44 from Rolla, MO to Chandler, OK. 

Our General Criteria

Our criteria is not listed in any certain order or priority.
  • Cleanliness
  • Within 1 mile of the highway 
  • Fuel and food are both available
  • Good food for $10 or under
  • Premium fuel (93-91 octane) is available
  • Fuel and food  are within one city block of each other
  • Ease of access when arriving or departing the business
  • Ease of access when departing or entering Interstate 44, Will Rodgers Turnpike, and Turner Turnpike
  • Friendly staff

 From East to West

  • Rolla, MO     

Fuel: Moto Mart    
 
Moto Mart has a large parking lot with adequate parking close to the building and at the pumps. I've stopped here many times. Immediately behind Moto Mart, you will find Los Cazadores.

I think this is the best Mexican food in the area. You can get a platter full of piping hot food for $6-$12. Urbanspoon.com users have established a 91% rating for Los Cazadores. 
  • Lebanon, MO

Fuel: Lebanon Eagle Stop, 2545 Granite Lane
FoodDickey's Barbecue Pit, Granite Lane

Eagle Stop is busy, but it also has 93 octane, premium fuel. The lot is good sized; it is easy to enter and exit.

Dickey's Barbecue Pit is next door and has it's own large parking lot. This is a franchised chain with a standardized menu. For dessert,patrons can help themselves to soft serve ice cream. I love the Route 66 antique, collectible, car theme at Dickey's.
  • Sarcoxie, MO

Fuel and Food: Kum n Go with an attached Subway

We have stopped here on three separate occasions while traveling west. The restrooms are for a single occupant. However we still like to stop here.
  • Joplin, MO

 Fuel and Food: Petro Stopping Center
Iron Skillet Restaurant, Blimpie, Taco Bell, Pizza Hut, Caribou Coffee

This is a great place to stop because it offers several dining options with lots of seating.
  • Vinita, OK

Fuel: NO
Food: Clanton's Cafe

Fuel someplace else. We found 10% ethanol at the two stations we tried. Plus, there is limited availability for 91 octane, crowded gas pumps, AND it was difficult to enter and exit the two stations we have been to.

Clanton's Cafe is a Route 66 landmark that has been featured on Food Network. Great place to eat. The bathrooms are the original, one occupant facilities. Cute signs adorn the walls in the women's bathroom and make for entertaining reading.
  • Big Cabin, OK 

Fuel and Food: Big Cabin Travel Plaza with The Cherokee Restaurant

Bill and I enjoy stopping at this truck stop. The staff in the restaurant are friendly, the service is excellent, and an ATM is available. Be careful leaving the parking lot because this is a popular stop with truck drivers too.
  • Claremore, OK

Fuel: Quiktrip Convenience Store #66
Food: fruit, baked goods, typical convenience store

This is a brief fuel stop for us. A Motel 8 is located about two blocks west of the convenience store.
  • Tulsa, OK

Fuel: Quiktrip
Food: Hardrock Hotel and Casino

Quiktrip is a national chain with standardized regulations for each store. Hardrock Hotel is a great place to stop, but the cost for lunch and dinner is in the $10 to $20 range.

You can detour around Tulsa if necessary by getting off at this exit, going back east about two miles and entering the Creek Turnpike. Our experience with the first, unmanned toll booth on the Creek Turnpike wasn't stellar. No change machine was available so make sure you have quarters, nickels, and dimes. The turnpike was very nice though.
  • Stroud, OK

Fuel: On Cue Express
Food: Rock Cafe

We usually need a full tank of gas when we arrive at the Stroud exit and this station is very close to the turnpike exit. At this point in our trip, I like to take old Route 66 from Stroud to Chandler. Honestly, I've had enough high speed travel on the turnpike this far into our 400 mile trip.

The Rock Cafe is a nationally known, Route 66 diner. This diner has been featured in newspapers, magazines, and television.
  • Chandler, OK    

Fuel: Limited Choice
Food: Route 66/OK 66 has a variety of restaurants

We do not normally eat or fuel in Chandler because it is within twelve miles of our destination. However, the food link will take you to a list of local restaurants along Route 66 that I have passed on our trips.

Note:

I'm sure some of you may have noticed that Springfield, MO is not on this list. Traffic is heavy in this area due to tourism, hospitals, colleges, and events. Gas prices tend to be higher in the Springfield area. Bill and I prefer to stop before or after Springfield when we are traveling west.


Saturday, June 22, 2013

Greetings From Oklahoma -Updated 6.25.2013

Motorcycle Ministry Trip

Bill and I are on a motorcycle ministry trip this week. We stopped in Vinita, OK at Clanton's Cafe for a second chance to sample the best homestyle cooking I've had in a long time. This time I sampled the chicken fried steak. Bill was absolutely correct in describing it as "the best I ever ate".

 Our Camp Site

We are camping in this hot,humid weather. However, the campground is wooded. Our tent is in between two trees along a hilltop that receives a breeze most of the time. Below is a picture of our "portable palace"


Two motorcycles and one trailer
equals
The Bonham's Portable Palace

The Route Home

Bill and I packed up our camp Sunday, June 23rd, and rode east for home on Route 66 from Chandler, OK to Bristow, OK. After that we just rode the Will Rodgers Turnpike/Interstate 44 to the Missouri border. I-44 to Rolla, MO was an easy ride with the traffic streaming east at a good rate. Normally, we only stop for gas and lunch, but this trip home wasn't normal. Bill was feeling achy Saturday night, and Sunday morning he continued to feel ill. Thanks to fever reducer/pain relief tablets, he was able to ride his motorcycle. However, we were stopping  about every sixty miles so he could sit in air conditioning and rest. Thankfully, we arrived home safe and dry.


Monday, June 17, 2013

Balloon Flower Bouquet

A lovingly crafted bouquet for my dad, Richard.
An Original Sallee Bonham Creation

 During my photo browsing, I've seen several balloon wreaths and that fueled my idea for the balloon flowers in my candy bouquet. As far as I know, the balloon flower idea is an original Sallee Bonham creation because I haven't seen it posted on Etsy or Pinterest. 

 My mom received a candy bar bouquet from Bill and I on Mother's Day and I didn't want my dad feeling left out, so I created a Father's Day bouquet just for him. Dad appreciates a good cup of coffee and a piece of  hard candy, so the coffee candy was an easy choice. Likewise, the candy bars shown are his very favorite.


 Bouquet Items

20 party size balloons
bamboo skewers
16-18 fun size candy bars
1 small bag of hard candy
narrow ribbon of your choice
clear or invisible tape
4" or 5" container of your choice

Balloon Flowers

1. Skewer Stem 
  •  Cut to your desired length, tie four or five balloons around the middle of each "stem." I didn't measure these stems, I just "eyeballed it", but I did start with 10" skewers.
 2. Balloon Flower
  •  Cut the balloon stem off, snip a tiny hole in the top center of the balloon, repeat until you have the desired number of "flowers"
  • Slide a skewer "stem" through the snipped hole in the top of a balloon until it meets the tied balloons.
  • Tape a fun size candy bar above the balloon flower
  • Gently pull the balloon up and around the candy bar. Slide tied balloons on stem up or down until the balloon flower and the tied balloons meet and hide the bamboo.
  • Make a ribbon bow under your candy bar bloom. Trim ribbon to a length that pleases you.

Assembly

  •  Fill container with a random arrangement of candy bars and hard candy.
  • Place your ballon flowers as desired. I arranged the candy around the "stems" of each flower to hold them in place.
Happy Crafting!

Friday, June 14, 2013

Shoedazzled

Shoedazzle Curiosity

 
I decided to take the style quiz at Shoedazzle.com. I am curious to see what the new chief stylist, Rachel Zoe, will recommend for me. After clicking on the Shoedazzle link and arriving at their homepage, I answered several questions about my age, shoe size, heel height preference, and dress size - my age is 50+, shoe size is 9.5, heel height preference is flat to 2", and dress size is 18+. A free registration form followed. So now, I'm waiting for my stylists to prep my show room. My welcome message says the show room will be prepped for me within the next 24 hours. I'm curious to see what style choices are made for a 50ish, plus size woman from the middle of Missouri. How about you?

My Showroom

My morning email contained a message from Shoedazzle.com announcing that my show room was ready. I clicked on the link, signed in, and started viewing my stylist-selected choices. Three of the shoe selections appealed to my style sense:


The other selections ranged from suitable to ridiculous. Two of the pumps had heels well over the 2" maximum that I had specified.  
Handbags were appealing to me though. Happiness is a new handbag and the displayed choices were all styles that I would happily carry with me.
I would rate my showroom choices as:
Shoes          3 out of 5
Handbags   5 out of 5
My overall experience was positive. 

Friday, June 7, 2013

Crafting My Way to a Mixed Media Collage - Update 2


Angels, star, blended tissue paper edges.


Details of upper left corner
 

Additions

Last night I used permanent markers to outlined the center cross, lips, and hearts. I used a fine point marker to create a dot pattern just inside the lip lines and heart edges.

The next step was to mix a small amount of Mod Podge with my acrylic paints. I used  regency blue, leaf green, and dark green acrylic paint to cover the raw edge of the tissue paper.
Burnt sienna acrylic paint now surrounds two of the crosses, and the upper right picture. Using the handle of a paint brush dipped in Antique Gold, I applied dots to the upper, red cross and the crown points. Burnt sienna also highlights the diamond pattern on the antique bible cover - cross.

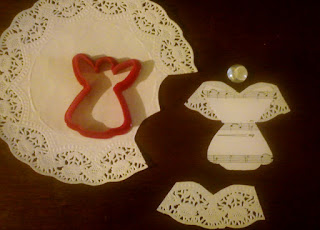
After the paint was dry, I began applying the angels and star with Mod Podge. The angel heads are clear garden gems with white paper glued to the flat back of each one. Rather than use adhesive, Mod Podge was the bonding agent.

What's Next?

The crown - apply dark red, glass beads on top of the gold dots. Outline the crown with a gold paint pen.

Angels - maybe a ribbon detail at the waist of each.

Uppermost cross - Use a gold paint pen to bring out the text "New Testament"

The last step to complete this project will be to apply several coats of a clear medium to seal and even the whole collage. I'm not sure if it will be Mod Podge or clear paint.


Monday, June 3, 2013

Moody Menopause

I Surrender

I have surrendered to menopause, again. Early this morning, I took a menopause supplement. My husband was the first to know this information and he did try hard to hide his look of relief, but I still saw it. Bless his heart.

Today marks the end of my effort to be in charge of my emotions without any help. Before menopause, I have been described as moody or prickly. My family knows to leave me alone until I have drank about a half a pot of strong, black coffee. After that, I love you and want to hear what you have to say. So menopause seems to have magnified this personality trait, plus added tearfulness, suspiciousness, and rapid mood swings. Rapid as in, happy to upset, by the time you blink once. Moreover, my thinking process seems to have developed an inability to stay focused on one topic for more than thirty seconds. My analogy is my brain feels like a super ball in a rapidly shaken, closed shoebox. Sound familiar?

Dabbling with a Supplement

Two months ago, I dabbled at taking black cohosh for menopause, but I quit when I had my first monthly cycle in nine months. Oh no, I did not want that to start again! In my opinion, that was the best part of being pregnant. However, I did notice a change in my behavior and thinking. By day two, I actually felt my thinking process slowing and resuming a more normal, logical way of processing thought. In addition, the mood swings leveled out to gentle, rolling hills. Alas, the break through bleeding caused me to stop taking the supplement. Are you getting the idea that I am an all or nothing kind of gal? Good, because you would be correct. As the black cohosh left my body, the mood swings and bouncing thought process resumed.

Surrendering Again

Do you want to know what caused me to surrender again? Okay, here it is - I love my family. When my loved ones start asking me if I am Bad Sallee or Good Sallee, it is time to surrender and change. One pill a day is not something to be stubborn about. So I bought two boxes of Estroven at Dollar General Store and after two pills, I am feeling better. I know that could be the sugar pill syndrome, but I do not really think so. My husband bravely agreed to observe me for signs of changed behavior this week. He will report his findings to me next Sunday.

Update 6/6/2013
Five days down and I am feeling less stressed. Plus,  my brain has slowed down and my ability to stay focused has increased.

Please feel free to comment on menopause, your problems with menopause, or any helpful information pertaining to menopause. Below are four links for more information on menopause


Saturday, June 1, 2013

Crafting My Way to a Mixed Media Collage - Update 1

Bill is curious about this project and has asked me what I'm making the collage for. The project is simply for my own satisfaction and enjoyment.  Also, I want to experiment with this type of art project. So far, a large amount of time has been spent on placing the paper pieces and deciding on the most balanced arrangement. I've consulted my original sketch once or twice, but now I'm planning the additional elements that will help to complete my collage.
 
My acrylic paint choices for the collage.

Primary and Secondary Colors

Before I put paint on the canvas, I decided that my primary colors are regency blue, leaf green, pineapple, and white. My secondary colors are Burnt Sienna, Cardinal Red or Real Red, Sandstone, and Antique Gold.


Brushing and Blending the Paint

The naked canvas was a little bit intimidating. Paint by number sets, junior high art class, and walls are the extent of my experience with paint and a brush (roller). Therefore, I just did what I saw a YouTube artist do. I squeezed paint out of the tube onto the canvas and applied my brush to spread it out. Regency Blue was applied to the bottom half, leaf green was brushed onto the top right, and pineapple(yellow) was applied to the top left. More paint was applied until I thought it was okay.
 
Mod Podge was brushed over the dry acrylic paint and further blended the three colors. I was surprised that the Mod Podge also lightened the paint to some extent. Then I left the canvas to dry for twenty-four hours.


Preparing Paper Items

  1. Two coffee filters were dipped into yellow food color and water. The two filters went onto a baking rack until they were dry.
  2. Using Cardinal Red acrylic paint and a little water, I painted the lip shape and one paper heart. Then I placed them on the baking rack with the coffee filters to dry.
  3. My small angel cookie cutter made a great template to trace around for angel shapes. I traced five angels onto the sheet music, cut them out with scissors, trimmed the bottom of the wings with edging scissors, and made another set of wings for the angels with a paper doily.
  4. Next I cut out three crosses using a cross cookie cutter. The paper came from a National Geographic and an antique New Testament cover.
  5. The last item I wanted was a crown and I used a template to trace around. Yes, it was a cookie cutter. Smile.
  6. Using two conversation dot stamps and a black ink pad, I stamped about a quarter of a sheet of green and blue tissue paper. I used a different stamp on each color.

Applying Paper Items using Mod Podge

Aah, how I love the smell of Mod Podge in the morning. (I am laughing as I type this!) Now the last time I did a decoupage project, I was a Junior Girl scout. Okay, quit laughing cause I'm just being honest with you. Actually, I used the white gluey stuff last fall to glue paper circles onto glass gems for a refrigerator magnet project. This morning though I began putting my selection of art objects onto the prepped canvas.
 
  • First I tore one yellow coffee filter into wedges. Then I tore the center circle out of the second coffee filter. Then I just used a brush and my fingers to position each piece until I was satisfied.
  • Torn pieces of the stamped blue and green tissue paper were applied over the corresponding colors on the canvas. I did tell you my experience was with paint by number sets, right?
  • I continued with the Earth shape, sheet music corner, crosses, lip shape, heart, crown, etc.


Using Microsoft Paint for Planning

 
My next step will be to paint highlights, low lights, and blend the edges of the blue tissue paper again with Regency Blue, white, and maybe a touch of True Blue. You can see how well the green tissue paper blended with the painted area. My goal is to add more depth.
 
The picture below shows how I used Microsoft Paint to assist me with placement of text, angels, and adding further paint. This picture is for planning purposes only. The completed collage will be similar, but not identical.