Friday, April 10, 2020

Food Blogger to Day Care Provider to Cottage Food Business AND Volunteer!

It's been quite a while since I last published a post! Life has been busy my friends!
Since I retired in 2018, I started watching my two youngest grandsons for my daughter Ashley. About 50 hours a week is dedicated to being at her house watching the boys. This arrangement is working very well for both of us. 

Before I retired
Food blogging metamorphosed into a cottage food business called SalleeB's Kitchen. Remember, happiness is homemade and I'm the happiest baking and decorating sweet treats for special occasions of all kinds.

My daughter doesn't mind me baking and decorating in her kitchen. 
Therefore, I have two totes of cake decorating equipment that stays packed up in the hatch of my Nissan Versa most of the time. I have gotten quite fast at packing additional equipment into the car on baking days! 

Last year I baked 17 dozen cupcakes, 13 dozen cookies, and 45 cakes. 

Some of you might not think this sounds like a lot, BUT that is all of the treats I care to bake and decorate! My goal has never been to run a full-time business. It has always been to supplement my income AND keep it somewhere between a hobby and a part-time pursuit. 

Remember, I am spending about 50 hours a week watching the two grands. 
The oldest started Kindergarten in August 2018 and I am using my 20 years of educational paraprofessional experience helping him complete homework, practice math facts, and read 20 to 40 minutes a day. During school breaks, I also make packets of daily review and practice work. Don't worry though, I have a lot of online learning scheduled in there too. 

As if this wasn't enough, I also help with a church program called Bible Buddies. The Bible Buddies program is once a week for students in K-4th grade and it runs from September to April. There are usually about 28-33 children enrolled in the program. My role is shadowing my older grandson and assisting his group through the three class rotations; music, bible lesson, and crafts/games. 

Are any of you other Grammys keeping up with a schedule like this? 
Be proud of yourself! For me, retirement hasn't been the end of working. It is the end of working for an employer. Now I have a monthly income, supplemental income and every federal holiday and weekend off to go and play! Yes, I am blessed. Well, friends, that catches you up on what I have been doing. I am going to post some baking pictures for you to drool over. I wish you could taste them too!


Sunday, February 25, 2018

Sallee Shares - You CAN Have Edible Black Frosting

This cake was refrigerated overnight.
Note that the black frosting
didn't bleed into the peach or yellow.
This is Americolor Super Black
gel food coloring.
I can achieve a dark black color, but it didn't taste edible. Bitter and yucky is what it taste like. 
How do you achieve a dark black that is edible? Is that top secret information? I found myself thinking so. However, it isn't top secret information. 
I did have to search and read the results of several searches before finding the right search terms to gain the information I was looking for. 
I am going to share the almost-top secret way of gaining an edible, dark black buttercream frosting. 
  1. Start with 2 cups of chocolate frosting. Don't have chocolate frosting on hand? Add 1/2 cup of cocoa powder to white frosting and blend well. Voila, chocolate frosting!
  2. Add about 2 American tablespoons or 30mL of Americolor Super Black gel food coloring. I am always happy with the color and taste of Americolor Super Black.
  3. Add the first tablespoon and blend well. Add the rest of the coloring 1 teaspoon at a time and blend well each time. Remember, you can always add more food coloring, but you can't take out too much! 
  4. When the color is almost as dark as I want it, I wait 30 minutes for the color to deepen. 
Now you know the secret to a super black frosting. Happy decorating! 

Tuesday, January 30, 2018

My New Food Journey - 56 pounds and Another Inch Smaller

Yippee! Another 4 pounds smaller and an inch from most of my measurements!
My energy levels are higher, my knees aren't threatening to buckle anymore, and my lower legs don't feel heavy by the end of the day now. Stairs are no longer an obstacle to be negotiated one step at a time.

Carb counting is my happy spot!
Food is my friend and I can eat a lot of food in one day. Protein, dairy, grains, vegetables, and fruit fill my plate and my stomach. I love smoked sausage, pork sausage, bacon and beef. I can have a link of smoked sausage or a bratwurst, but not in a bun. I can have a couple of chocolate chunk chewy granola bars a day if I want and this curbs all of my chocolate cravings.
Breakfast was a breakfast biscuit minus the biscuit. Lunch was my chocolate fix. Dinner was a skinny version of chicken with mashed potatoes and gravy. My husband had oven fried chicken, but the skinny mashed potatoes and gravy. I use chicken bouillon and 2% milk to make my white sauce and mashed potatoes. I still put 1-2 Tbsp. of butter in them. 


Pizza is another food I LOVE!
Carb counting lets me eat pizza just not in the amounts I was consuming before. Pizza is now 2 slices a meal from a medium pizza and I usually eat it for supper, 2 slices for breakfast the following morning, and 2 slices for lunch the following day. Pizza splurge over 3 meals!
Cheese is another food I LOVE!
I can have 1/3 cup of grated Colby Jack cheese or Mozzarella on salads, scrambled eggs, skillet scrambles, etc. Cottage cheese, sour cream, and yogurt are all things I can still eat.
Are you seeing the heavy cream and butter that I am still eating? Yes, I eat heavy cream and butter on or with my food. I cook with the butter and the cream, but I seldom go over 2 Tablespoons a day. Dinner was a skillet scramble that I love. Lots of veggies scrambled with a large egg and egg white. Then topped with picante sauce. 
When I started my food journey, I used the app LoseIt! and set my goal to lose 95 pounds at a rate of a pound and a half a week.
The app tracks calories, carbs, protein, etc. For myself, I watched the carbohydrates, but found that the calories I consumed seldom went over the calorie goal anyway. Fat and sodium intakes were two things I also tried to balance out. My weight was put on gradually and wanted to take it off gradually.
The initial plan was eating 135-180 carbs a day and almost 1900 calories a day.
As I logged my weight loss, the app gradually reduced the calorie count, but I continued to eat 135 - 180 carbs a day. Honestly, there are days I can't eat another bite because I am full and my carb count is at 80 to 125 carbs. See the food diary snip for January 29th. I ate 87 carbs and couldn't eat another bite!


Saturday, January 27, 2018

My New Food Journey Continues - Fifty Pounds Smaller

It has been awhile since I have posted here at SalleeB's Kitchen, but life happens doesn't it? My new food journey began in June 2017 when my blood work came back in the upper end of the prediabetic range. I immediately resolved to lose the extra pounds that I had slowly put on over the last seven years. However, this news just increased my resolve to follow through on a decision I had made in April 2017 after seeing the picture below. 
To date, I have lost 51.8 lbs. 
My original clothing size was a plus size 22/24. Now, I am wearing a plus size 16/18. How amazing is that? There have been several other benefits to losing this weight. The first one is that my November blood sugar, or A1C test, was at the lower end of the prediabetic scale. Another benefit is that my knees and lower legs no longer ache and cause me pain. No more one stepping up and down stairs while holding onto the banister. My energy level is much better too.
Exercising Much? 
One of the first questions I get asked is how often am I exercising. This is funny because I haven't exercised once. Yes, I have lost over fifty pounds and haven't intentionally exercised once. Instead, I have made a change in what and how I eat. This eating change is responsible for my weight loss.
My choice for dropping the extra pounds is a combination of counting carbohydrates and using the plate plan method
When I first started counting carbs, I decided to use an app to help me log my carbs. This has been a great way for me to track my calories, carbs, fat, sugar, sodium, and protein intake too. My daily carb goal is 135-180 carbs a day. As long as I don't eat a lot of pasta, cake, or food containing starches that turn into sugar, I can eat a lot of food and I do not feel hungry or food deprived.  A side benefit of counting carbs and using an app is that I find myself planning my meals most of the time. 
The plate plan is easy! 
I just imagine a line divides my plate in half horizontally. That top half of my plate is for non starch food like lettuce, salad olives, cucumbers, etc. The bottom half of my plate is for starches on the left and protein on the right. None of my food should be taller than a package of playing cards. How easy is that? 
Measuring My Food
In addition to carb counting and the plate plan, I started measuring and weighing the food that goes onto my plate at home. No more guesstimates for me. Now my kitchen scale is in use almost daily in contrast to before when it sat in the cabinet for weeks at a time. I also use 1/2 cup and 1 cup containers to use when I pack my lunch for work. 
A Label Reading Surprise
I have always been a label reader, but after I started counting carbohydrates, my first shopping trip to the grocery store took label reading to another level. That initial trip took much longer than usual because I had to read the ingredient list  and carbohydrate count on every prepackaged product I picked up and was surprised at how sugar hides as an ingredient in an amazing number of foods! 
One of the Changes in What I Buy
One of the biggest changes in my new food journey is that I stopped buying prepackaged pasta and pasta sauce. I can't eat prepackaged pasta mixes because of the carbs and pasta sauce has sugar hiding in it. Sugar equals lots of empty carbs. These two items are no longer found in my pantry. 

I could go on and on about the changes, but I don't want to overload you with information that I have acquired over a seven month period of time. My new food journey is continuing and I will tell you more about it in other posts. 

Saturday, November 25, 2017

No Bake Pumpkin Cheesecake with Pumpkin Spice Whipped Cream Topping

Yield: One 8" cheesecake
Ingredients
  • 1 no bake cheesecake mix
  • 1/2 cup 100% pumpkin puree
  • 1 Tbsp. granulated sugar
  • pumpkin pie spice
  • 1/4 cup powdered sugar
  • 8 oz. of heavy cream
Directions
  • Follow the package directions on the cheesecake mix, but add 1/2 cup pumpkin puree, 1 Tbsp. granulated sugar, and 1/2 tsp. pumpkin pie spice to the milk called for in the directions. 
  • After mixing the graham cracker crust, set 1 Tbsp. of crust aside in a small bowl. 
  • While the cheesecake is setting up in the refrigerator, pour 1 cup of cold heavy cream into a mixing bowl. 
  • Beat on high until the cream begins to thicken slightly. 
  • Gradually add 1/4 cup of powdered sugar and 1/4 tsp. pumpkin pie spice. 
  • Continue to beat on high until the cream thickens and forms creamy, stiff peaks. 
  • Spoon onto the cheesecake filling and spread evenly. 
  • Sprinkle 1 Tbsp. of reserved graham cracker crust over the top. 
  • Refrigerate until time to serve. 

Enjoy a slice of homemade happiness on a plate!

Monday, August 14, 2017

Two going on twenty.: "Some Pig!" cupcakes for Charlotte's Web

Two going on twenty.: "Some Pig!" cupcakes for Charlotte's Web: The one thing I love baking for as much as preschool snack day are school bake sales! ESPECIALLY when there is a theme involved.  My bonus ...

Monday, July 31, 2017

SalleeB's Kitchen - Amish Ham Casserole


I love any dish that contains potatoes, ham, eggs, and cheese.
When I found this make and bake casserole recipe, I was thrilled to try a new recipe using four ingredients that I LOVE. Of course, I had to give it my own twist - cream cheese. 

Who doesn't like cream cheese? 
The addition of cream cheese makes this an indulgent and hearty version of a crust less breakfast pie that is not low calorie, but is low in carbs. It is perfectly suitable for breakfast or supper. 

I want to repeat what I already said though - This is not a low calorie dish.
However, I am tracking carbs AND staying below 2000 calories a day. I save calories to enable a calorie splurge that satisfies my craving for ham and potatoes surrounded by luscious, cheesy eggs without having them fried in oil, or butter. Baked is better, don't you agree?

An 8"x1" round cake pan yields four wedges of  hammy, cheesy goodness with 10.5 carbs and 387 calories a wedge.

Remember, I said it was low carb and the entire pan only has 42 grams of carbs

Two Tips to Use With This Recipe 
  1. Have a left over baked potato? Remove the skin, dice the potato, and store it in the refrigerator for a day or two.  Add the diced potato to a soup or casserole.
  2. Mix the casserole ingredients up to 24 hours ahead of time. After spooning the ingredients into the pan,  wrap it with plastic wrap and store it in the refrigerator. When you want to bake the casserole, remove the plastic wrap, and pop the cold casserole into the cold oven and let it preheat with the oven. Set your timer for 25 minutes once the oven temperature reaches 350 degrees Fahrenheit.

SalleeB's Kitchen - Amish Ham Casserole  Recipe                              Yield: 2-4 servings

Ingredients
  • 8 ounces of cooked ham, diced
  • 1/4 cup onion, diced
  • 2 large eggs and 1 egg white, beaten
  • 1 baked or microwaved potato, peeled and diced about 1 cup
  • 1/3 cup shredded Colby Jack cheese
  • 1/3 cup shredded Mozzarella cheese
  • 1/2 cup small curd cottage cheese
  • 1/4 cup cream cheese, cut into small pieces
  • 1/4 tsp. paprika
  • 1/8 tsp. garlic powder
  • 1/8 tsp. chili powder
  • black pepper to taste
Directions
  • Preheat oven to 350 degrees Fahrenheit.
  • Grease an 8"x1" round pan and set aside.
  • Put diced ham, onion, potato, shredded cheeses, and cottage cheese into a medium bowl.
  • Stir gently until the mixture is blended well.
  • Combine the beaten eggs and egg white with the cream cheese pieces and stir until the cream cheese pieces are well coated with the beaten eggs
  • Pour the eggs and cream cheese over the ham mixture
  • Add seasonings and stir gently until blended well
  • Spoon the mixture into greased 8' round pan and put the pan into the preheated oven
  • Bake at 350 degrees for 25 minutes, or until the mixture is firm and bubbly.
  • Change the oven setting from bake to broil.
  • Broil the top of the casserole for 2-3 minutes, or until the top looks like the picture. 
  • Take the casserole out of the oven and let it cool in the pan for 10 minutes before slicing into 4 wedges. 
Enjoy a slice of homemade happiness on a plate!


Friday, July 14, 2017

Oat Flour Sweet Potato Pancakes - A Gluten-Free Recipe

Golden brown and delicious oat flour sweet potato pancakes.
These pancakes are approximately 3.25 inches in diameter.

This morning Bill and I tried out this recipe that I adapted from superhealthykids.com. My changes are the gluten-free oat flour, ground flax seed, and honey. 


The pancake texture is denser than a traditional pancake and reminds me of bread pudding. The cinnamon, sweet potato flavor is only enhanced by the slightly nutty flavor of the ground flax seed. 

Yield and Nutrients
6 pancakes, 3.25 inch diameter
112 calories and 19 carbohydrate grams for each pancake
Ingredients
  1. 1/2 cup, cooked sweet potato, mashed with a fork
  2. 1 cup 1% milk
  3. 1/4 to 1/2 teaspoon ground cinnamon
  4. 1/2 tsp.  vanilla extract
  5. 1 large egg
  6. 3/4 cup rolled oats, blended into oat flour
  7. 1 Tbsp. raw flax seed, ground in a blender
  8. 2 tsp.  baking powder
  9. 1/4 tsp. salt
  10. 1 Tbsp. honey
Directions Step 1
  • Put 3/4 cup rolled oats into a blender. Use the grind setting and pulse into flour.
  • Put oat flour in a medium mixing bowl.
  • Put 1 Tbsp of flax seed into a blender and pulse with grind setting
  • Add the ground flax seed to the oat flour and set the bowl aside.
Directions Step 2
  • Put the first five ingredients into a blender.
  • Blend on stir setting for about 20-30 seconds
  • Add the liquid ingredients into the oat flour mixture and stir until well blended
  • Let the batter sit for 2-3 minutes to thicken up.
  • Add more milk if needed to thin down the pancake batter.
  • Then pour 1/4 cup batter onto a hot griddle for each pancake. Use a lower temperature than a wheat bas
  • Flip pancake when it begins to bubble and is browned.
 Note: Sweet potato browns quickly so make sure your griddle isn't too hot. 

Homemade breakfast pancakes  = homemade happiness on a plate!

Tuesday, July 11, 2017

Learning My Carb Counting Range and More

Life-long learner is a term that describes me well. 
A new project, or interest means I will immerse myself into learning and studying how to accomplish the task, or interest. This isn't just a passing phase, this is a part of my personality

Learning a new way of eating means I will devote myself to the initial learning and then keep myself updated. 

Online Research
First, I researched online to find out what types of food I needed to be eating and what type of plan would work well for me. Websites by individuals can be helpful, but my initial search for information was from research-based websites, like the National Institute of Diabetes and Digestive and Kidney Disorders (NIDDK) and the National Institutes of Health (NIH). 

The article that helped me shape my eating plan is linked to the NIDDK link above. 

Now on to carb counting.
I found a 15 pg. PDF booklet at www.lillydiabetes.com that I am finding to be very helpful and it has links to additional resources included. 

According to the booklet, most women need 45 to 60 grams of carbohydrates at each meal. This means the carb counting range for me is a total of 135-180 grams of carbs. 
I can easily count my carbs because I am using the LoseIt! online website and app to help me track what I eat. 
I hope you find this information helpful. I am finding that I can eat more food than I want and I am still losing weight and within my carb range. 


Friday, July 7, 2017

First Time Putting Spinach in a Smoothie

I made my first ever smoothie with spinach in it!
The taste was mango/strawberry with a hint of another flavor and surprisingly good. The luscious, thick smoothie was GREEN.

Go ahead and laugh, I don't mind.
If you have been hesitating about putting spinach in a smoothie, quit hesitating and go for it! The results will surprise you, I promise.

Recipe   Yield: One 10-12 ounce smoothie
  • 1/2 cup 1% milk
  • 1 handful of spinach I didn't grab a fistful, just reached into the bag and picked up spinach leaves between my fingers and thumb.
  • half of a diced mango
  • 3 fresh strawberries, stemmed and sliced. 

Directions
Put all the ingredients into a blender, or processor and blend until smooth and thick.
Pour into a 10-12 ounce glass and enjoy your smoothie!

Never tried using a mango and don't know how to cut it up? 
Watch the video below and you will be ready to slice and dice a mango.


#spinachsmoothie #eathealthy 

Thursday, July 6, 2017

A New Food Journey Begins

Prediabetes
I have known that I have a high risk of developing sugar diabetes because during my last pregnancy, I developed gestational sugar diabetes. After the birth of my daughter, it went away. However, I recently found out that I have an elevated glucose level and my doctor wants me to eat healthier and exercise more. 
A New Food Journey - The Dinner Plate Eating Plan
After a little research, I decided to adopt the dinner plate eating plan. This plan fits in with my lifestyle and will help me eat consistently no matter where I am. The picture below shows how to mentally divide your plate into sections and what type of food to put in each section.
Today's Breakfast and Lunch Menu

  • Breakfast: Overnight oats without any dairy, half of a mango,diced;  two large strawberries, sliced thinly; and  1 Tbsp sliced almonds. I put the half cup of oats on the bottom with an equal amount of water and layered the fruit and nuts. I added an additional 1/2 cup of water. Honestly, it needed a sweetener. Next time, I am adding a tsp. of honey. 
  • Lunch Salad: 2 cups of chopped spinach and romain lettuce,  a small amount of thinly diced red onion, 2 large strawberries, sliced thinly; 1 Tbsp. of raw pumpkin seeds, and 1 Tbsp of lite raspberry vinaigrette. I was still hungry 15 minutes after I finished the salad, so I made a folded cheese quesadilla with one whole wheat tortilla containing 1 ounce of melted Colby jack cheese and ate it slowly - 10 chews per bite. 
Tonight I took a picture of my dinner plate. 


  • The top half is filled with homegrown green beans and diced tomatoes, the non-starch vegetables
  • Bottom left quarter has baked sweet potato fries, a starchy vegetable
  • Bottom right quarter has my protein, Melt-in -Your-Mouth BBQ pork ribs that are baked in foil, unwrapped and brushed with BBQ sauce, then broiled on each side for about 2 minutes.

Drinks
I already drink black coffee by choice during the morning. For afternoon and evening,  I am now adding lemon juice to my water because the lemon juice will help lower my blood glucose level.
Exercise
A formal workout isn't part of my day at this time. To add more walking to my day, I am parking my car at the end of each store parking lot that I visit. Push mowing for 20 minutes instead of using the riding lawn mower the whole time has added more exercise into my day. Another way I am planning on incorporating exercise into my daily routine is to do leg lifts while watching TV in my recliner and to do some walking in place while watching TV. 
Two Weeks and 6 Pounds Later
I started my new meal and exercise plan two weeks ago. Yesterday, I decided that my clothes had definitely become a little looser around my midsection and hips. With some hesitancy, I took out  the bathroom scales to see if I had shed some pounds. I am happy to share that the fit of my clothes was from being six pounds lighter! 

I am still serving some homemade happiness on a plate; it is just a lighter version of homemade happiness on a plate!

 #prediabetes #dinnerplateplan 

Monday, July 3, 2017

Have a Happy and Safe 4th of July 2017

Father God I ask that you protect Americans everywhere as they travel and go about their holiday business. Let us remember that this is a Christian nation, under your Lordship Father. Amen. 

Thursday, June 29, 2017

Pineapple Mug Cake

Enjoy pineapple mug cake in or out of the mug! 
The texture of this mug cake isn't nearly as dense as most of the made-from-scratch mug cake recipes that I have tried. I feel like this is a great way to make small servings of cake.
Yield: about 2 - 12 ounce servings, or about 4 - 6 ounce servings
  1. Two 12 oz. mugs
  2. Crack a large egg into a small bowl and beat with a fork until the yolk and egg white are blended fairly well. 
                                               One large egg makes about 3 Tbsp. of beaten egg.

Measure the following ingredients into each mug:

  • 6 Tbsp pineapple cake mix
  • 3 Tbsp water
  • 3 Tbsp melted butter, or melted shortening. Canola oil may be used too. 
  • about 1 1/2 Tbsp. beaten egg
  • 1/4 tsp. vanilla extract
    Ready to stir.
Directions


  • Stir ingredients in each mug together for about a minute, or until smooth and well blended.
    Smooth and well blended. Ready to microwave.
  • Place mugs into microwave  and cook for 3 minutes. Cooking time is for a 900 - 1000 watt microwave. 
  • The cake will rise to the top of the mug.
    Immediately after microwaving 3 minutes.
  • Remove the mugs from the microwave and allow to cool 2-3 minutes.
    After cooling 2-3 minutes, the mug cake can be turned out of the mug. 
  • At this point, you can turn the cake out onto a plate, or you can leave the cake in the mug.
    The mug cake slips out of the stoneware mug easily. The mug wasn't oiled or greased.
    Top with a topping of your choice and enjoy!

Monday, June 26, 2017

Cake Mix Mug Cake - A Five Minute Mug Cake

I decided to Google the phrase, cake mix mug cake.
Yep, a few of you have tried this idea out too, BUT I don't think anyone else has had such excellent results as I have.

Why? Because I actually use ideas from more than one mug cake recipe. Yep, I did what I do best...take inspiration from more than one recipe and combine them into a new recipe.
Storing Cake Mix for Mug Cake Use
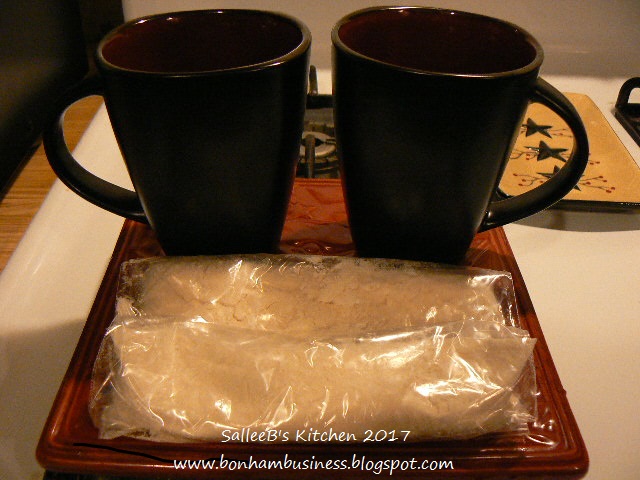
  • Measure out 6 Tbsp. of cake mix into an individual, zip top sandwich bag. Repeat.
  • Roll the bags tightly and zip the tops closed. 
  • Place the rolled bags of cake mix back into the cake mix box to store for use at a later time. 
A 15.25 ounce package of cake mix will make about 7 mug cakes.
A 16.50 ounce package of cake mix will make about 8 mug cakes.

I hope you will try my cake mix hack - Cake Mix Mug Cake.

Recipe for a Five Minute Mug Cake

Yield: about 1 - 12 ounce serving, or about 2 - 6 ounce servings


Directions:
  • Crack a large egg into a small bowl and beat with a fork until the yolk and egg white are blended fairly well. 
    One large egg will yield about 3 Tbsp. of beaten egg, just enough for 2 mug cakes!
  • Set aside.
Measure the following ingredients into a 12 ounce mug:

  • 6 Tbsp cake mix, any flavor
  • 3 Tbsp water
  • 3 Tbsp melted butter, oil, or melted shortening 
  • about 1 1/2 Tbsp. of the beaten egg 
  • 1/4 tsp. vanilla extract
  • Stir ingredients in the mug together for about a minute, or until smooth and well blended.
  • Place mug into microwave  and cook for 3 minutes. Cooking time is for a 900 - 1000 watt microwave. 
  • The cake will rise to the top of the mug.
  • Remove the mug from the microwave and allow to cool 2-3 minutes.
  • At this point, you can turn the cake out onto a plate and slice it into two portions, or you can leave it in the mug for a 12 ounce serving. 
  • Top with the topping of your choice and enjoy!

Wednesday, June 21, 2017

Sallee's Six: July Pie Crust Designs


Use this technique with star cookie cutters for a 4th of July pie.
Pretty pies feed your eyes.
Just looking at pictures of gorgeous pie crust designs makes me want to get my rolling pin and bake a pie or two.

Listed below are five sources for pie recipes and pretty pie crust designs that I like.
Not a pie lover? Look at number 6.

  1. MarthaStewart.com has 12 piecrust designs to share with you.                           Click Here
  2. Sally over at Sally's Baking Addiction not only has an American Flag piecrust, but the pie has a blue fruit filling and a red fruit filling.                                                           Click Here
  3. How about a Blueberry Peach Pie with a gorgeous crust?                                   Click Here
  4. Food Network has some great new designs for apple and pumpkin pies.          Click Here
  5. Ashton over at Something Swanky has a great recipe for a 4th of July Berry Pie that uses two purchased pie crusts. The top crust has cut out stars and the pastry star cutouts are layered on the crust.                                                                                                        Click Here
  6. Not a pie lover, but you love crust? Bridget of Bake at 350 will show you 4 new ways to use pie crust.                                                                                                                   Click Here
Here is my never fail pie crust recipe     Click Here for the recipe

SalleeB's Pizza Casserole

Looks like pizza, but it has a pasta crust!
Bill is not a fan of casseroles. 
However, this casserole won him over because the bottom layer is a tender, angel hair pasta "crust" topped with pizza toppings. A perfect bite contains an even amount of the pizza toppings and the angel hair pasta.
Wow, what a way to make your mouth happy!
Customize this recipe to make your favorite pizza in a casserole! 


Simply substitute a pound of your favorite meat, or a combination of meats. The possibilities are endless.

Ingredients   
This recipe can be downsized from a 13" x 9" pan to a 9" round or square pan.  Simply use half of each listed ingredient.
  • 8 oz. angel hair pasta, broken into thirds and cooked
  • 1 pound ground chuck or sirloin
  • 3-4 oz. pepperoni slices
  • 1/3 cup diced onion
  • 1 -  24 oz. can spaghetti/pasta sauce
  • 6.5 oz. can mushrooms, drained or  6 oz. of fresh, sliced mushrooms
  • 1/2 tsp. dried Italian seasoning
  • 1/4 tsp. garlic powder
  • 1/4 tsp. ground black pepper
  • 8 oz. of shredded mozzarella cheese
  • 2 oz. Parmesan cheese, about 1/2 cup
Directions
  • Grease your casserole pan. Set aside.
  • Break 8 oz. of angel hair pasta into thirds. Place in salted, boiling water. Turn heat down to simmer and cook pasta for five minutes. 
  • Pour half of the pasta sauce into the greased casserole pan.
  • Drain the pasta and place it in the casserole pan.
  • Spread the pasta into a layer.
  • Layer the remaining sauce over the pasta.
  • Place the ground chuck and onion in a skillet. If using fresh sliced mushrooms, add them now.
  • Begin to brown over medium heat, stirring occasionally.
  • When the beef is about half way done, sprinkle the Italian seasoning, garlic powder, and black pepper over the meat and onions. Using a spatula, work the seasoning into the meat and onions.
  • When the beef is almost done, add the drained mushroom slices to the skillet. 
  • Stir briefly with the spatula until the mixture is well blended. 
  • Drain excess grease from the skillet.
  • Layer the meat mixture over the sauce in the casserole dish.
    Pepperoni can be mixed into the meat mixture, or placed on top of the cheese layer.
    I prefer having in on top of  the cheese layer as shown in the first picture.
  • Put cheeses on top of meat mixture
  • Top the cheese with pepperoni slices as shown in the first picture. 
  • Cover with foil.
  • Large Batch: Bake at 350 degrees F for 35 minutes; Small Batch: Bake at 350 degrees F for 20 minutes
  • Remove foil and bake another 10 minutes. 
  • Remove from oven and let sit for 10 minutes.
Your pizza casserole is ready to serve!

Pantry-Style Tomato Beef Vegetable Soup

I have been suffering with a sore throat for a couple of days. Vegetable soup was the only thing I felt like making and eating. Additionally, I knew the tomato beef soup would be quick and easy to assemble because my pantry contained all of the ingredients that I needed.

Makes about 4-1 cup servings.

Ingredients
  • 2 cups of water
  • 2 beef bouillon cube
  • 1 can diced tomatoes
  • 1 can of whole kernel corn, drained
  • 1 can of green beans, drained
  • 1 piece of bacon, finely diced 
  • 1 tsp basil, dried
  • 1/2 tsp. parsley,dried 
  • 1/2 tsp. sriracha sauce 
  • 1 pkg of crushed ramen noodles, do not use the seasoning packet
Directions
  1.  Put the water and bouillon cubes in a medium sauce pan
  2. Add the whole can of diced tomatoes, juice and all
  3. Drain the corn and green beans, put into the pan
  4. Put everything except the crushed noodles into the pan and simmer until the bacon is cooked. 
  5. Put the crushed ramen noodles in and let them sit for 3 minutes. 
This is a thick, veggie soup. If you like a thinner soup, add an additional cup of water and 1 more bouillon cube.