Friday, June 9, 2017

Link to Thirty Frosting Recipes

I have been following Cookies and Cups, for several years now and wanted to share this link with you. I can always use another great recipe for frosting.

30 Frosting Recipes

Wednesday, May 31, 2017

My First Ever 4 Tier Wedding Cake.

Tier sizes: 12 inch, 10 inch, 8 inch, and 6 inch
Yield: about 100 servings of cake
I volunteered to make a wedding cake for a friend's wedding as my wedding present to her. 
My experience with making wedding cakes is limited to 2 - two tier cakes and 2 - three tier cakes. However this is my first, four tier cake. 
Despite losing electricity for almost eight hours, baking the cake layers went somewhat smoothly until I started baking the 12 inch rounds. After throwing away 3 layers of cake due to fallen middles and falling apart,  I managed to end up with 2 usable layers of vanilla cake.
Why did I have so much trouble with the 12 inch layers? 
After thinking about it, I believe the cake mixes that I bought on sale were old and just didn't bake as well as they normally do. Even the smaller layers had one or two issues, but nothing like the large, 12 inch layers! 

Once the power was restored and the cake layers were cooling, I set about making the buttercream frosting with 10 pounds of powdered sugar, 2.5 lbs of butter, and 2.5 cups of solid, vegetable shortening, 3 Tbsp. and 1 tsp. of vanilla extract, about a quarter cup of lemon juice, and about 1.5 cups of water. 
Like Making Four Cakes of Different Sizes
When I began to work with the two inch layers, I quickly discovered that making the wedding cake was the same as making four, separate layer cakes. Each tier had two cake layers that had to have the tops leveled before they were cut in half, filled with frosting, stacked, and crumb coated with icing. THEN, each tier had a final coat of frosting applied and smoothed. 
Each sunflower was individually piped onto a square of parchment that was attached to a flower nail.
Sunflower petals and buds: Wilton #366 leaf tip
Sunflower centers: Wilton #21 open star tip
Sunflower leaves: Wilton #125 petal tip. 
Cake borders: Wilton #21 open star tip

Sunflower Tutorial


Smoothing Crusting Buttercream
The following tutorial will show you the basics of frosting a cake and then smoothing the crusted buttercream frosting with a Viva paper towel.

  • For best results, wait 10 to 20 minutes after frosting your cake before you begin smoothing the frosting. 
  • If your work area is warm, put the frosted cake into a refrigerator for about 10 minutes before you begin smoothing the buttercream. 

Believe me, it took several attempts before I figured this out for myself!


Sunday, April 2, 2017

Spring Blooms Cake Pictures

An original, SalleeB's Kitchen design for a spring half sheet cake - blooming red bud branches, daffodils, narcissus, hyacinths, and yellow, drop flower clusters.

The daffodil and narcissus blooms are piped using Wilton petal tips #104 and #102. Use a square of parchment paper on a flower nail to shape each blossom. Put the blossoms into the freezer until you are ready to place them. 
The narcissus petals are made using the Wilton #104 tip and the ruffle was the Wilton  #102 tip. 
The green centers were formed with a #3 piping tip.

The red bud branches are made with a Wilton #10 piping tip and the blossoms are a Wilton 2D tip. 
Narcissus and daffodil leaves are formed with a Wilton #352 leaf tip
Hyacinths are made with a drop flower tip. Layer the clusters to get a rounded, 3D look. In the pictures the hyacinths shown have 3 layers of blooms. 

The cake top is textured with the end of a spatula. 
Move the spatula from side to side in about 2 inch, vertical strips, long side to long side of the cake.
Don't measure anything exactly so you can have a more random look. 
The borders are made with a #16 star tip. . 
And that is how to create a SalleeB's Kitchen Spring Blooms cake. 

Saturday, March 18, 2017

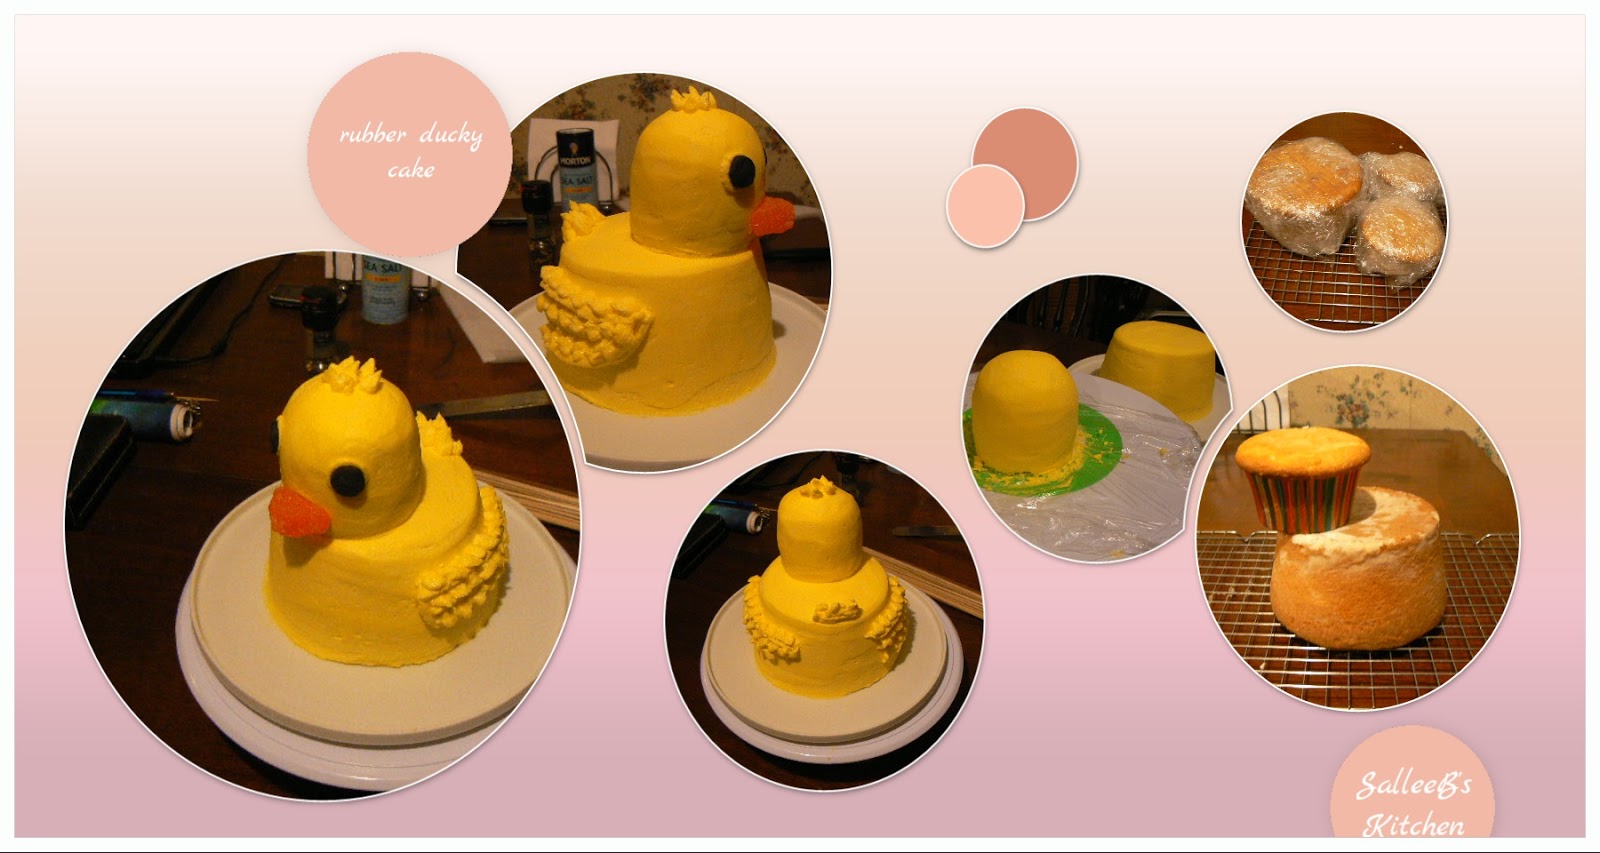
Rubber Ducky Smash Cake

Right to Left: Beginning to End
It has been 364 days since my youngest grandson was born! His mom asked me if I would make his smash cake.
Of course I said YES!
Step 1
  • Preheat the oven to 300 degrees Fahrenheit.
  • Make a white cake mix according to the package directions.
  • Grease and flour a 1.5 quart crock pot insert - see the picture below.

  • Put liners for 2 jumbo cupcakes into  jumbo cupcake pan.
  • Filling the jumbo cupcake liners 2/3 full of batter and pouring the rest into the greased and floured cake pan.
  • Cook for 20 - 24 minutes. Check the jumbo cupcakes by inserting a toothpick into the cupcakes about halfway between the edge and center of the cupcakes. If the toothpick comes out clean, your cupcakes are done.
  • Remove the cupcakes from the oven and let cool for about 10 minutes in the pan. Remove from the pan and let cool on a cooling rack. 
  • Cook the cake for another 16 minutes and check the cake for doneness with a bamboo skewer about halfway between the edge and center of the cake. If the skewer comes out clean, your cake is done.
  • Remove cake from oven and cool for 10 minutes before removing it from the pan. 
Step 2

  • After cooling the cake and cupcakes, wrap them in plastic wrap and put them in the freezer until good and firm.
  • Remove wrapped cupcakes and mini-cake. 
  • Cut the rounded tops off of the two jumbo cupcakes to form a flat surface.
  • On one of the cupcakes only, cut off 1/3rd from the bottom end. This will be the bottom of your duck head.
  • Pipe a dam of frosting around the top, outside edge of the trimmed cupcake, then fill with a thin coat of frosting inside the dam. Place the whole jumbo cupcake, topside down, onto the top of the frosting. Apply a thin base coat to the cupcakes and put back into the freezer until the frosting is firm. 
  • Apply a base coat of frosting to the duck head and the mini-cake. Finish frosting the head and the body of the cake. and chill until the duck head can be handled  and attacked to the mini-cake as pictured below. 


Wednesday, March 8, 2017

Cake Pictures for Family

My grandson's 1st birthday smash cake, a rubber ducky cake in all buttercream.

My parents 59th anniversary cake. Sugar-free yellow cake with a super thin base coat of buttercream and tons of buttercream flowers.
Watch for the blog posts about these two cakes.
Homemade happiness on a plate!