Friday, September 12, 2014

Sallee Shares: Masterchef Casting for Season 6

Calling all home cooks! 

Masterchef USA is having open casting calls for Season 6 until October 25, 2014. 

Casting Call Schedule

  • San Diego - Saturday, September 13th
  • San Francisco - Saturday, September 13th 
  • San Antonio - Saturday, September 20th
  • Cleveland - Saturday, September 20th
  • Atlanta - Saturday, September 27th
  • New Orleans - Saturday, September 27th 
  • Miami - Saturday, October 4th
  • New York City - Saturday, October 4th
  • Chicago- Saturday, October 11th 
  • Memphis - Saturday, October 11th 
  • Los Angeles - Saturday, October 18th 
For cooks unable to make a casting call, make a video and send it in with an application. 

Click on the Masterchef USA link for more information and applications.


Not Quite a Fail: No Bake Chocolate Cheesecake Bites


Chocolate and cheesecake. A simultaneous craving for chocolate and cheesecake was the seed that sprouted into my idea for no bake, chocolate cheesecake bites.

The desire for chocolate and cheesecake had me in the kitchen scanning the pantry shelves and the refrigerator shelves.

 Hmmmm...a no bake cheesecake mix, chocolate almond bark, milk,.......AND chocolate syrup.

Those ingredients made perfect sense for making a chocolate cheesecake.  Brain cells continued to process the bytes of thought into a more developed idea. Finally, a plan emerged from all of the processed ingredient data and options.

THE Plan

  1. Use the no bake cheesecake filling, but not the graham cracker crumbs.
  2. Flavor the milk for the cheesecake with chocolate syrup.
  3. Use the mini-muffin pan with liners for cheesecake bites.
  4. For the crust, use melted chocolate almond bark.
One, nagging thought did keep popping up for attention - What if the chocolate syrup, an added liquid, caused the filling to remain soft? 

You know what I did, right? Told myself it would be just fine.  Anyway, let me continue this not quite a fail tale. 

The Plan Worked Well
  • The cheesecake filling blended very well with the chocolate milk.
  • The melted chocolate bark was somewhat thick, but it smoothed easily with a teaspoon.
  • The cheesecake filling was quickly poured into each liner.
  • A last minute addition: shaved, chocolate almond bark on top of the cheesecake bites.
  • The completed, pan of twenty-four bites went into the refrigerator on the top shelf. 
  • The timer was set for one hour.

Beep-beep-beep. One hour was up.

Anticipation was high as I removed the pan from the refrigerator. Carefully, I removed one bite from the pan and gently began to remove the liner. 

Remember that one nagging thought about the filling? 

The outside edges of the cheesecake filling remained attached to the liner. Oh well, the cheesecake bite still looked good and the chocolate almond bark was firm.

Greedily, I popped the whole bite-sized treat into my mouth.

Luscious, chocolate cheesecake sent my taste buds into a flash mob dance. My teeth parted to bite into the chocolate bottom, and encountered a disc of chocolate almond bark. 

Remember the last time you bit into a solid chocolate Easter bunny? Biting into the chocolate bottom of the cheesecake bite was exactly like that moment. 

However, I remained optimistic. I am a "glass half full" woman. After all, the cheesecake box directions said to, "wait at least one hour before serving." The filling could still get firmer. Plus, the bottom was solid, but it was chocolate.

24 Hours Later

The cheese cake filling was still slightly soft. The outside edges of the cheesecake filling continued to stay on the liner. 

In Conclusion

The slightly soft, chocolate cheesecake filling had my taste buds dancing with happiness. A perfect blend of chocolate and cheesecake flavor. Chocolate almond bark is chocolate almond bark, it always makes me happy to eat it. My brain cells have already been busy formulating a new plan for making No Bake Chocolate Cheesecake Bites. Keep checking in because I have another box of  No Bake Cheesecake!


Monday, September 8, 2014

Sallee's Six: The Apple Edition


Cinnamon Applesauce Chocolate Chip Cake.

Apples make me think of apple pie and bobbing for apples. Today, we do not bob for apples at fall festivals or harvest gatherings. Too unhygienic. Apple bobbing may be a curiosity now, but everyone has a favorite apple pie recipe or apple laden dessert. Listed below are six links to kitchen tested, amazing apple recipes for every meal and event.


Sallee's Six: The Apple Edition              

  1. Food Network has an amazing list of fifty, yes fifty, food items that you can make with apples. The list includes main dishes, desserts, and side dishes. 50 Things to Make With Apples
  2. Allrecipes.com has over a thousand apple recipes that have been reviewed and rated by home cooks. Apple Recipes
  3. Mr. Food Test Kitchen has 34 quick and easy recipes for breakfast, lunch, and dinner. Mr. Food
  4. My favorite place for recipes is BettyCrocker.com! Betty's list of Newest Apple Recipes includes Apple Crisp Crepes, Streusel Topped Apple Cheesecake Bars, and six more delicious apple offerings.
  5. A healthy alternative for apple recipes, Cooking Light has 31 Apple Recipes for every meal and every occasion. 
  6. Last, but not least is a Top 10 Apple Desserts recipe list from Taste of Home. How about making some Caramel Apple Bread Pudding? 

Apple Wisdom from Mom

My mother was taught many lessons with country proverbs. Mom then felt obligate to teach those same lessons to my siblings and I. Listed below are six of her favorite apple sayings. (idiom or proverbs)

  1. An apple a day keeps the doctor away.
  2. You are the apple of my eye.
  3. The apple does not fall far from the tree.
  4. Don't be a crab apple.
  5. One bad apple spoils the bunch.
  6. As American as apple pie.

Saturday, September 6, 2014

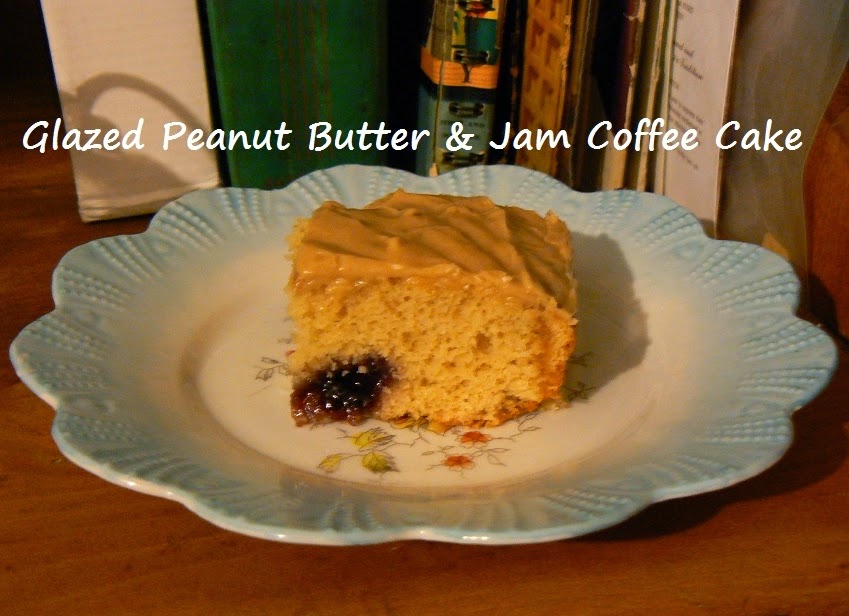
Glazed Peanut Butter & Jam Coffee Cake

If you enjoy eating peanut butter and jelly sandwiches, this is the coffee cake for you!

A peanut butter coffee cake with a scattering of streusel, dollops of grape jam, and topped by a creamy peanut butter glaze.

Is your mouth watering yet? Best of all, this is a pantry style recipe; no expensive or exotic ingredients are required to make this mouth watering, breakfast cake. Yes, I said breakfast cake.

Ready to make some homemade happiness on a plate? Let's get started. 


Before making your coffee cake batter:

1. Preheat your oven to 350 degrees Fahrenheit.
2. Make your streusel topping.

Streusel Topping 

1/3 cup packed light brown sugar
1/4 cup all purpose flour
1/2 teaspoon ground cinnamon
3 Tbsp. butter, or margarine

Directions

  • Place all of your ingredients in a bowl.
  • Mix all ingredients until crumbly. 
  • Make sure the butter or margarine is cold or your topping will not form small crumbs.
  • Set aside and prepare your coffee cake batter.


Coffee Cake Ingredients

2 cups all purpose flour
1 cup granulate white sugar
3 tsp. baking powder
1 tsp. salt
1/3 cup creamy peanut butter
1 cup milk
1 medium to large egg
1/4 cup grape jam


Directions

  • Place all of your dry ingredients into a bowl.
  • Stir dry ingredients until blended.
  • Add peanut butter, milk, and egg.
  • Beat on low speed for 30 seconds.
  • Beat on medium speed for 2 minutes, scrapping sides of bowl occasionally.
  • Spread half of the batter in a greased 13 x 9 x 2 inch pan, or a 9 x 9 inch square pan.
Half of the batter is spread into the greased pan.


  • Sprinkle half of the streusel topping on top of the batter.
Half of the streusel is sprinkled on the batter.

  • Pour remaining batter into the pan.
  • Spread gently over streusel topping with a spatula, if necessary.
Second layer of batter and streusel.

  • Sprinkle remaining streusel topping over batter.
  • Place grape jam by teaspoonfuls on top of the cake.
Dollops of grape jam placed onto the coffee cake.

  • Bake for about 30 minutes, or until a wooden toothpick inserted into the center comes out clean. 30 minutes for an oblong cake pan, 40 minutes for a square cake pan.
Baked and ready for a layer of creamy peanut butter glaze.

  • Cool before applying creamy peanut butter glaze

Creamy Peanut Butter Glaze

Ingredients

2 cups powdered sugar
1 1/2 tsp. vanilla extract
1/3 cup creamy peanut butter
4 Tbsp. hot water


Directions
  • Place powdered sugar in a bowl.
  • Add vanilla extract, creamy peanut butter, and 2 Tbsp. of hot water.
  • Beat with a whisk just until mixed well.
  • Add 2 more Tbsp. of hot water.
  • Whisk or beat until well mixed and creamy.
  • Pour peanut butter glaze onto the top of the cooled coffee cake
  • Gently spread with a spatula until the entire top of the cake is covered.

Creamy peanut butter glaze.

NOTE: The streusel in an oblong cake is not in a distinct layer. If you want distinct layers of streusel, use a square, 9 x 9 inch cake pan. OR  double the streusel recipe. 

Tuesday, September 2, 2014

Gone Batty for Faux Buttermilk Brownies

I LOVE brownies! Cake brownies, fudge brownies, cakey fudge brownies. Get the picture?

Curious about the "faux" in the title? The secret ingredient is not buttermilk......give me a drum roll please..... it is plain yogurt!

Buttermilk is used so infrequently at my house that it just doesn't make sense to buy a carton to make one recipe. So, I substitute plain yogurt mixed with milk to achieve the consistency of buttermilk. The yogurt works fabulously.

Today's post is a recipe for a made-from-scratch, cake brownie that is topped with a ganache-type frosting made from sweetened condensed milk and semi sweet chocolate chips. The sweetness is more subtle than with powdered sugar frosting.

The chocolate flavor is more subtle than in most brownies. These brownies are a great after school snack, or they go well with morning coffee. Actually, I already had one with my coffee as I was writing this. 

Another plus, bake time is fifteen minutes because you cook the brownies on a large cookie sheet.

Brownie Ingredients


  • 1 stick margarine
  • 1 cup water
  • 1/4 cup cocoa
  • 1/2 cup canola oil
  • 2 cups flour
  • 2 cups sugar
  • 1/2 tsp. salt
  • 2 rounded Tbsp. plain yogurt
  • 2 eggs
  • 1 tsp. baking soda
  • 1 tsp. vanilla extract


Brownie Directions


  • Combine margarine, water, cocoa, and oil in a saucepan. 
  • Bring to a boil over medium heat, stirring occasionally.
  • Remove from heat and cool briefly
  • Place dry ingredients into a bowl.
  • Stir dry ingredients until will mixed.
  • Pour cocoa mixture over the dry ingredients
  • Stir three or four times.
  • Place 2 rounded, Tbsp. of plain yogurt into a liquid measuring cup. Add just enough water or milk to make 1/2 cup of liquid.
I was a little over 1/2 cup, but I only used 1/2 cup of the thinned yogurt.

  • Add thinned yogurt, eggs, and vanilla to the brownie mixture.
  • Stir just until well blended.
  • Pour into a foil lined, 10 inch x 15 inch cookie sheet with sides.

  • Bake at 400 degrees Fahrenheit for fifteen minutes.
  • Cool and frost.


Frosting Ingredients

1 - 14 oz. can of sweetened, condensed milk (not evaporated milk)
1 oz., or 3 Tbsp.,semi sweet chocolate chips
1 Tbsp. water
1/2 tsp. vanilla extract

Frosting Directions


  • Over medium heat, in a heavy saucepan, melt chocolate with sweetened condensed milk.
  • Cook and stir until it thickens. The original recipe said ten minutes, but mine thickened within five to six minutes.


  • Remove from heat. 
  • Stir in Tbsp. of water; cool. 
  • Stir in vanilla. 
  • Pour and spread onto pan of brownies. 

  • Let frosted brownies sit until frosting is completely cool.
I use a 2" - 3" square, scalloped edge, cookie cutter to cut my brownies.


Slice and serve some homemade happiness on a plate!