Thursday, July 28, 2016

Spiced Monkey Bread for Two

Sugar and spice and everything that's nice maybe what little girls are made of,
BUT I am a big girl and I want my sugar and spice in my monkey bread! Specifically, cinnamon, ginger, nutmeg, and cloves mixed with brown sugar and baked with butter into a spiced, caramelly syrup that surrounds the crisp sugar coating with each bite of buttermilk monkey bread. I've got to stop describing it or I am going to be making more monkey bread!
I thought everyone knew about monkey bread.
I was wrong. Bill didn't know what monkey bread was.
Can you believe that? He grew up in California and Kansas. Don't you have monkey bread there? Somehow he missed out on this treat until I made spiced monkey bread for us. NOW that he knows what it is............he wants more, much more!

I used two  - 6 ounce souffle cups, but any 6-8 ounce ramekin, or baking dish will work.
Ingredients
  • 1- 7.5 oz tube of generic buttermilk biscuits
  • 2 Tbsp. butter - for buttering your baking dishes
  • 2 tablespoons granulated sugar
  • 2 tablespoons brown sugar
  • 1/2 teaspoon cinnamon
  • 1/8 tsp. ground nutmeg
  • 1/8 tsp. ground ginger
  • 1/8 tsp. ground cloves
Topping Ingredients
  • 2 tablespoon butter, melted
  • 2 tablespoon brown sugar
  • ½ teaspoon cinnamon
  • 1/8 tsp. ground nutmeg
  • 1/8 tsp. ground ginger
  • 1/8 tsp. ground cloves

Directions

  1. Preheat your oven to 350 degrees Fahrenheit
  2. Butter your two baking dishes generously and set aside
    Generously buttered souffle dishes.
Preparing the Biscuits
  1. Cut each biscuit into quarters and roll each quarter into a ball. 
    I cut the biscuit into quarters with a pizza cutter. 
  2. Set the dough balls aside.
  3. Put the sugars and spices into a one quart zip top bag.
  4. Zip the top and mix the sugar and spices in the bag.
  5. Dip a ball of dough into the melted butter and drop it into the bag of spiced sugar.
  6. Repeat until you have four butter coated dough balls in the bag of spiced sugar
  7. Close and shake the bag until the balls of dough are completely coated.
  8. Divide the dough balls between the two buttered baking dishes.
  9. Repeat steps 4-7 until all of the dough balls are coated and divided between the two baking dishes. 
    Ready to bake!
Preparing the Topping
  1. In a small bowl, blend the melted butter, brown sugar, and spices for the topping.
  2. Using a tablespoon, spoon the topping equally over the top of the dough in each baking dish.
Time to Bake
  • Set the baking dishes on a small cookie sheet or shallow baking pan and put it into the preheated oven.
  • Bake in the oven for about 25 minutes, or until the dough is beginning to brown.
  • Remove from oven and let sit for 2 or 3 minutes. 
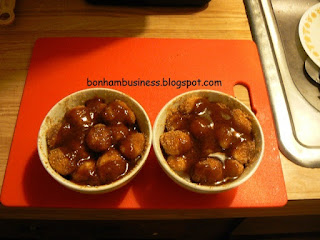
  • Carefully turn each baking dish upside down onto a plate and let it sit for a minute.
  • Gently remove the monkey bread from the baking dish. 
    This is what happens when you don't let the baking dish sit on the plate for a minute.
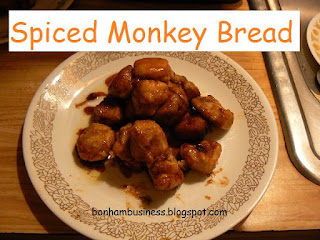
    A perfect individual serving.
    You are ready to eat some homemade happiness on a plate!

Tuesday, July 26, 2016

Applesauce Mug Cake with Salted Caramel Sauce

It has been scorching hot in Missouri this week - triple digit scorching hot!

Summer heat removes my desire to bake, but not my desire for dessert.

My solution? A single serving, microwave mug cake!

Last night I whipped up two, applesauce mug cakes with salted caramel sauce for Bill and I. 
We loved them. The cake was moist, the crumb topping was gooey rather than crunchy, and the whipped topping with salted caramel sauce complemented the apple and cinnamon flavor perfectly. 
We are lovin' our mugs of microwaved homemade happiness!

Ingredients For One Mug Cake                      Total Time - About 10 minutes

  • 3 tablespoons flour
  • 1 heaping tablespoon brown sugar
  • ½ teaspoon ground cinnamon
  • ⅛ teaspoon baking powder
  • 1 tablespoon applesauce
  • ½ tablespoon vegetable oil
  • ½ tablespoon milk
  • ⅛ teaspoon vanilla extract
     Crumb Topping Ingredients
  • 1 tbsp butter
  • 2 tbsp flour
  • 1 tbsp brown sugar

Instructions 
Note: The cooking time is for a 900 watt microwave.

  • Put the dry ingredients into a 6-12 ounce, microwaveable mug or dish. '
I have used a 12 oz. mug and a 6 oz. souffle dish with this recipe; both cakes turned out perfectly.
  • Blend the dry ingredients until all of the ingredients are completely combined. I used a teaspoon.
  • Add applesauce, veg oil, milk, and vanilla extract.
  • Stir until just combined and wet - be careful to not over mix.
  • Place the crumb topping ingredients into a small bowl.
  • Using a fork, blend the topping ingredients until pea size crumbs form.
  • Put the crumb topping on top of the cake batter.
  • Microwave on high for about 60 seconds - Remember, in microwave cooking the ingredients will continue to cook. 
    Dish on left after 60 seconds in the microwave.
    Dish on the right after cooling one minute
  • Remove the mug cake from the microwave and cool for about five minutes Warning - the bottom of the mug is VERY hot. Be careful.
  • Place a dollop of whipped topping, whipped cream, or vanilla ice cream on top of the mug cake. 
  • Then, drizzle the topping with store bought caramel sauce and sprinkle with a pinch of sea salt. I used fine sea salt and loved it!

Enjoy your mug of homemade happiness! 


Wednesday, July 20, 2016

Disappointed in Recommended Kentucky Diner

Bill and I were in Kentucky last week for the Sturgis Kentucky Bike Rally. 
We are on a budget, but we do try to eat out at least once on a trip. I usually try to find a local restaurant that local recommend to me. 

The Roadside Diner is located less than a quarter mile from the Union County Fairgrounds, which is the home of the Sturgis Kentucky Bike Rally. 
Several people at the local motorcycle rally recommended this diner's burgers to me and I was excited to try it. 

Specifically, I was told the diner had a great Mushroom and Swiss burger with very large orders of fries. Mushroom and Swiss burgers are my favorite burger to eat. 

My first impression of the diner as we seated ourselves was - rundown. However, I overlooked that because it was during the bike rally. Thousands of bikers were in town for the rally and I'm sure that the diner had been flooded with customers. 

The waitresses were friendly, attentive, and made you feel at home. 
However, my burger was considerably less than spectacular. It was cold and overcooked with unmelted, shredded white cheese that might have been Swiss cheese, or mozzarella.The button mushroom slices were straight out of a can with no sauce. I was definitely disappointed, but the burger patty was 100% beef. 

The half order of tots was large and taste okay. 

The hubby's tuna salad sandwich was very tangy. He didn't like it. However, I tasted it and it was tasty if you like a generous amount of lemon juice in your tuna salad. 

The bright spot in our dining experience was dessert. 
I ordered the blackberry cobbler with vanilla ice cream for dessert. I loved it! The house made cobbler was tangy, not too sweet and the cobbler crust was tender, flaky, and flavorful. Personally, I would go back just for dessert and coffee.


Sunday, July 10, 2016

Sallee's Cupcake Bouquets

Standard size cupcakes are decorated as flowers in these cupcake bouquets.
The hydrangeas were formed with a 2D decorator tip and the roses were formed with a 1M decorator tip.
Cupcake bouquet pictures have been catching my attention for a couple of years now. 
I have saved pictures of cupcake bouquets and read blog posts about cupcake bouquets. 

After watching several tutorial videos that show how to assemble a cupcake bouquet, I found that there are different ways to make a cupcake bouquet. 

Of course, I picked the easiest one!  

After volunteering to make four dozen cupcakes for a benefit dessert auction, I felt it was time to tackle this project.
The cupcakes are made from boxed cake mixes. Easy peasy, right?

I made devil's food chocolate cupcakes following the package directions.

Then, I used a little bit of cake mix magic with a white cake mix and made white lemon cupcakes. 

Want to know how to make white lemon cupcakes? The directions are underneath the next picture. 
To make a white lemon cake: Add 1/2 tsp. chopped lemon zest, and the juice of two large lemons, about 1/4 cup to a white cake mix. Also, use whole eggs. The light, fresh taste is perfect for summer!
Fresh strawberry butter cream is delish! About 6 large strawberries equals a half cup of strawberry puree. 
How To Make a Cupcake Bouquet Form
1. Staple seven, 5 ounce cups together (as seen in the above picture)
2. Cut a 14" to 16" square of tissue paper using zig zag scissors, paper edgers, or pinking shears.
3. Set the stapled cups in the center of the tissue paper square
4. Fasten the tissue paper in between the cups using packing tape, or hot glue. My cups are waxed paper and I used a hot glue gun. 
5. Repeat to make the number of bouquet forms you need. 

6. Place each form into a container of your choice. I used round, 8"aluminum pans.

However you are free to place the bouquet into any container the form will fit into. Baskets, small pails, or a flower bowl are some of the options you can use. 
Cooled cupcakes ready to be filled with fresh strawberry butter cream. I use an apple corer to remove the center from cupcakes. 
To fill a cupcake
1. Put frosting in a pastry bag, snip the pastry bag tip, and squeeze the frosting into the center of each prepared cupcake. 
2. Start filling at the bottom and lift the bag as the frosting level rises. 
3. Place the filled cupcakes into a cupcake bouquet form.
You are ready to decorate!
Devil's food chocolate cupcakes with fresh strawberry butter cream hydrangea blossoms in place. 
Each hydrangea blossom received a dot of lemon yellow frosting with a #3 piping tip. 

The leaves were placed randomly using a #67 leaf tip. 
To make the roses, use a 1M tip. Start in the center of the cupcake and spiral outward. 
Fresh Strawberry Butter Cream Frosting 
 I filled 4 dozen standard cupcakes and frosted 2 dozen as hydrangeas with 1 batch of  this frosting. It makes a lot! 

Ingredients
  • 2 pound bag of powdered sugar
  • 1 stick of salted butter, at room temperature
  • 1 cup of regular vegetable shortening  Do not use pre-creamed shortening, it is too soft.
  • 1/2 cup of strawberry puree - about 6 large strawberries
  • 2-3 Tablespoons of cold water
Directions
  • Puree 6 large strawberries using a mini-food chopper, blender, or food processor
  • Pour the pureed strawberries into a measuring cup. You should have 1/2 cup of puree. If you have a little more or a little less, don't worry. It doesn't have to be exact. 
  • Place butter and vegetable shortening into a large mixing bowl
  • Beat the butter and shortening until they are blended and creamy, about 2-3 minutes
  • Add half of the powdered sugar, and 1 Tbsp of cold water
  • Beat at low speed until most of the sugar is blended with the butter/shortening mixture.
  • Add remaining sugar and the strawberry puree to the frosting.
  • Beat at low speed for 2-3 minutes, scraping sides of bowl once or twice. 
  • If you feel the frosting is too thick, you can add a Tablespoons of cold water and beat on low for a minute or two.  
Remember the frosting/filling will soften up a little from being at room temperature. You want it to hold its shape when you are piping flowers. 

For the roses I made a small batch of my butter cream frosting using the recipe below.

This is my favorite butter cream frosting!

Ingredients
  • 4 Tbsp of salted butter, at room temperature
  • 1/2 cup of vegetable shortening Do not use pre-creamed shortening.
  • 1/4 tsp. of vanilla extract
  • 1/4 tsp. raspberry extract
  • 1/4 cup of water
  • 1 lb. of confectioners sugar

Directions

  • Place butter and shortening in a mixing bowl.
  • Beat on low speed for 2-3 minutes
  • Add half of the powdered sugar and both extracts.
  • Beat on low speed until the sugar almost blended with the butter-shortening mixture
  • Add the remaining powdered sugar and the water.
  • Beat at low speed for 2-3 minutes, scraping sides of bowl once or twice. 
You will need to divide and tint your frosting the colors you want.


Monday, July 4, 2016

The Actual Red, White, and Blue Cake

I am going to quit telling folks my decorating plans for cakes.
I am only going to share the actual cake, cupcakes, or cookies and here is why.


On June 16th, I posted my plans for a three-layer, half sheet cake for a July 1st community program being hosted by our church, First Baptist of Belle.

In the post, Planning a Red, White, and Blue Cake for July, I shared my carefully thought out plan. However, that isn't exactly the cake I took to the program.
White Lemonade, or White Lemon cake is made using a white cake mix. 
  1. Place 2-3 Tbsp of lemon juice into your measuring cup and add enough water to make the amount of liquid called for in the box directions. 
  2. Also, use whole eggs in place of the egg whites.
  3. To use fresh lemon juice and lemon zest   Click Here  for directions
The cake layers and fillings stayed the same with only a minor difference - no lemon zest.

Not a big deal.

However, once I started decorating the giant layer cake, my decorating scheme just disappeared and a totally different cake emerged.

Bill told me the reason this happened. He thinks it is the artist in me. Isn't he a sweetie?

So here are the cake pictures:
Piping a greeting is getting easier for me - I'm not shaking like a leaf and panicking - but it still is not anything to brag about. I used a Wilton #5 tip. 
I decided to try the petal frosting technique on the cake sides. Instead of using a small spatula, I used a teaspoon. It took me about an hour to frost all four sides of the cake and this is the first time I have done this. 
Narrow end of the cake - I used a #125 Wilton petal tip with the wide end toward the cake to make the red ruffled border. 
Corner detail -  I used a #32 Wilton open star tip to pipe a red star in each corner. I started the ruffle at each star. The random red and blue drop flowers were formed with a ##224 Wilton tip.
I was very pleased with my cake. The sides were beautifully straight. The corners were sharp and the petal technique went around the corners in an unbroken line. 

What does it take to make a cake this size?
6 boxes of cake mix - two for each layer
15 eggs
3 cups of canola oil
8 lbs. of powdered sugar
1.5 lbs of butter
about 4-5 cups of shortening
1 cup of strawberry puree
2 pints of blueberries
1 tsp of raspberry extract
about one cup of lemon juice
Americolor super red and royal blue gel food coloring. I love the fact that Americolor puts their gel coloring in a squeeze bottle. 

Strawberry Lemonade Frosting                   

Ingredients
  • 1/2 cup strawberry puree - I made mine using thawed, drained frozen strawberries and blending in a mini food chopper.
  • 2-3 Tablespoons lemon juice
  • 1 cup shortening
  • 1 stick butter, softened
  • 2 lb bag of powdered sugar
Directions
  • Beat shortening and butter together in a large mixing bowl just until blended well, about 2-3 minutes.
  • Add 2 Tbsp. of lemon juice and half of the powdered sugar. 
  • Beat on low until the ingredients are almost smooth.
  • Scrape the sides of the bowl with a large spoon or spatula once or twice. 
  • Add the remaining sugar, the strawberry puree, and another Tablespoon of lemon juice.
  • Beat on low until the ingredients form a smooth, thick, frosting. No more than 3-4 minutes usually. 
Note: If you think the frosting is too thick, add an additional Tbsp. of lemon juice, or water. It depends on how your frosting tastes.If you think it has enough lemon, add water to thin it down.